Introduction: Media Cabinet With Shutters


I made this media cabinet for a client a while back and really enjoyed the process. I think the timeless, traditional design can fit in to most homes. This was a fairly complex project in some areas, but it was well worth it and if you're on this site, I think you could do it, too.
Similar designs can be found at places like Pottery Barn http://www.potterybarn.com/products/holstead-shutt...
Step 1: Draw It Up

I start every project by drawing it out. Some use programs like SketchUp to lay out their projects, which those programs are great, and maybe I'll get into that someday, but I really enjoy drawing my pieces out by hand.
The numbers to the left of the image are the materials list. This way I have an accurate estimate on what materials and hours will go into this project.
I will also be using red oak and plywood.
Step 2: The Carcass
I designed this project to evenly distribute the weight of a large TV. You can certainly spot a cheap cabinet by the sag in the middle after years of use. When constructing most of my projects, I use dado's and rabbets, but with the design and structure of this piece, pocket hole joinery will work just fine. Maybe I'll do an Instructable on the pro's and con's of pocket hole joinery and best uses one day but for now, let's get started.

To help keep my cabinet square, I tried to build the majority of it on my workbench because I know it is far flatter than my garage floor. The first shelf is fairly wide, so I measured my marks and placed my quick clamps right at the lines and rested my first shelf on those so I could drive the screws. Measure twice, glue and screw.

Once I screwed my first shelf in, I measured my internal cabinet upright dividers and screwed those in. I used my small framing square to help keep everything straight. I also measured the full distance of the width and divided by three to find my exact divider placements.

Now that the main cabinet was built, I went ahead and put on the feet (process not pictured...oops). I cut out 4x4 pieces of plywood, glued and nailed them to the 4 corners, then screwed in the feet.

Step 3: Face Frame
Once the carcass was assembled, I had all that I needed to make my face frame. Pocket hole's here as well.

Always use your pocket holes on the end grain side of your pieces. Because end grain doesn't glue up well. The pocket screws pull the end grain into the long grain. I'm sure Googling it can explain/prove this a little more in case you think I'm a wise-guy.

Putting the face on helped bring this thing to life. I applied glue, clamped the face frame on, then used my nail gun to tack it in place, then pocket screws from the carcass to help hold the face frame tight. I used pocket screws in places that would be covered up by the top and hidden underneath. I didn't want you to open a door and see my secrets.
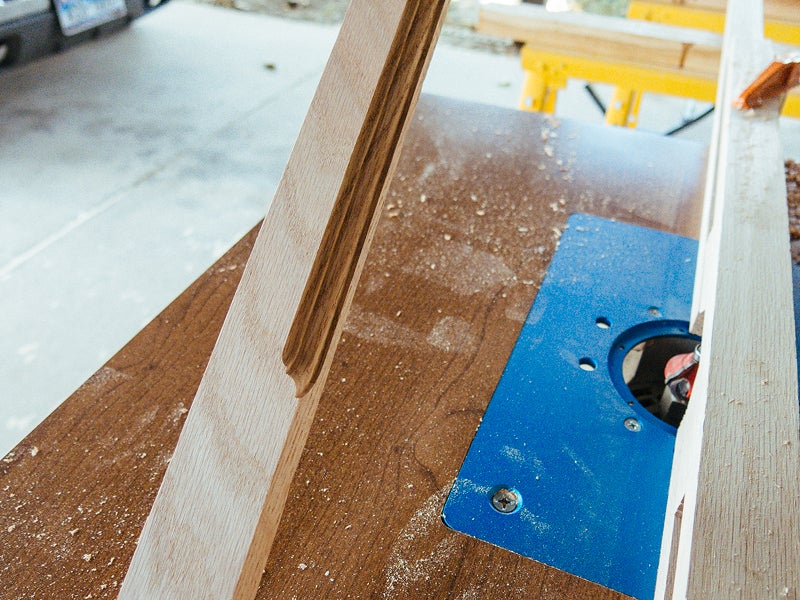
Step 4: Trim
I knew what kind of trim I wanted, but couldn't find it anywhere, so I used my homemade router table to shape my own. Here I also used red oak.
Here's the bit I used. http://www.homedepot.com/p/Diablo-1-1-2-in-Classic...
I applied the trim on the top and bottom. It really finishes the cabinet. I wasn't totally happy with how the feet were so tucked in, so I worked out a way for the feet to come out to the corners a bit further for proportion's sake.

Step 5: The Doors - Structure
For the doors, I'll do open slot mortises. This will leave a clean opening in the middle of the doors for the shutters to be made in the next step.
I placed the boards flat on the table saw and cross cut the depth of my tenon using my sled.

To cut the rest of the material off the tenons, I made a tenon jig to accomplish consistent cuts. You can find out how to build one of these on Google and YouTube.
https://www.google.com/search?q=tenon+jig&oq=tenon... https://www.youtube.com/watch?v=d4BarCgYLgA

After they were all cut, each piece still needed to be cleaned up with the chisel because of the small bumps left by the blade. This was the easy part.


I used my jig for the mortises as well. They had a snug fit, but not too tight. This leaves room for the glue.


I dry fit the pieces together and set them in the doorways to make sure there's enough room for the hinges and shifting. All good.


Once perfect, I rounded over the edges of the doors.

Step 6: The Doors - Shutters
Now the most tedious part of the whole project.
With the doors, I plan to make working shutters. There really isn't a cheap way of ordering pre-made custom shutters. The cheapest way is to do it yourself. I wanted the shutters to be removable in case a shutter breaks down the road. (kids...) If one does break, I'd hate to have to bust the door a part, so I made a chassis. First I needed to route out rabbet's in the back of the doors for the side bars to set in the hole. The side bars will hold the shutters.

Now to make the side rails. I didn't photography the process of cutting 1/2" by 1/2" strips out of the red oak because it was a scary process on the table saw. I still have all my fingers.
Once the pieces were cut, I cut them to length on the radial saw.

Once the strips were cut, I rounded them off on the bandsaw to match the routed rabbet in the doors. Rounding as opposed to squaring up my rabbets in the doors with a chisel was merely preference.

Now to drill the holes. This took some time to space and measure out. They make jigs, but I don't see myself making these often, so I can't justify buying something that will collect sawdust most of the year. Once measured out, I was able to knock out all of it with the drill press.

I got the small hardware pieces from Rockler. These little pieces were a must for me.
http://www.rockler.com/project-supplies/shutters

I also ordered long shutter basswood strips from Rockler. I thought about making the shutters out of red oak, but changed my mind due to the inexpensive price Rockler offered.
Here's the 'exploded' view before assembly.

After the first door was together, I set it in the cabinet. It's finally coming to life.


To keep all the shutters aligned, I installed a vertical bar that they all hook to. This controls the open and closed motion of the shutters. I thought that would help add dimension to the doors, so I made it visible on the front of the doors rather than the back, hidden inside the cabinet. Each shutter needs to have a small hole drilled in the middle of one edge and corresponding holes drilled in the bar. Rockler makes small clips that connect the two.

A video may help explain some of this a lot better than I. I Think Rockler has one you can find on the YouTubes.
UPDATE: This cabinet has been in use for over a year now by the clients and the only complaint on this whole cabinet would be the little clips that connect the vertical bar to the shutters themselves. Nothing has broken, but the clips are easily pulled out (kids...) when yanked on. A better option may be something that actually screws in rather than a spring fit that the Rockler clips use.
Step 7: Finishing
Now that all the shutters are cut and installed, it's time to hang the doors. I put shims all around the doors to hold it down while I marked my pilot holes. I lucked out. Every door closed perfectly.

Now to disassemble everything to putty and sand for the stain.

Once the doors and cabinet were ready, I brushed the cabinet down with wood conditioner. This soaks into the wood for even staining. This usually keeps the wood from accepting and holding stain in some parts creating splotchiness.

The only parts I didn't condition were the shutters. I liked how the stain soaked into the wood without it. The next image shows a comparison between the conditioned basswood and non-conditioned. The bottom is non-conditioned.

Staining was a beast. I only used one coat of stain on everything and 2 coats of polyurethane sanding with 220 between.


Once everything was stained and polyurethaned, It felt really good to put everything back together.

Step 8: The Doors - Hardware
Drilling the holes for the door pulls are fairly easy. The biggest thing is just preventing too much blowout. The best way to prevent blowout is to clamp a scrap piece behind as a backer so the drill just keeps on going through without a worry in the world.


Step 9: Done

I hope you enjoyed the process.


