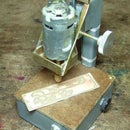
Introduction: Mini Diamond Grinding Disk for Drill Bits
Without a fine grit grinding wheel, it's almost impossible to get a decent point on a small drill bit. There are many tool-maker wheels available, but I look at the prices and gag.
This 2 inch diamond disk (EBay - disk + mandrel for $2.34, free shipping) has worked very well for grinding drill bits from 1/16 to 1/4in. The disk is only .020" thick, but is surprisingly stiff. It could also be used for other small, low pressure grinding jobs.
The grinder motor came from a cordless drill (Goodwill, 2 bucks), and turns 16,000rpm @ 18vdc.
Safety First: Always wear eye protection when using power tools.
Step 1: Mount the Motor
Start with a 2in piece of 1-1/4" schedule 40 PVC pipe. Cut a 1/4in wide slit down the length with a hacksaw. The motor is a very tight slip fit in the pipe.
Drill air flow vents in the pipe to match the vent holes on the motor.
The base is made from pieces of 1x3in wood from the scrap bin. The two pieces are joined with drywall screws.
Drill and countersink the pipe for #4 wood screws to attach the pipe to the base.
The base is 6in long. It can be screwed or clamped to the workbench.
Step 2: Attach the Mandrel
I shortened the mandrel shaft to reduce excess overhang.
A piece of 1/8"id brass tubing attaches the motor shaft to the mandrel. The tubing is a press fit on the motor shaft, but the mandrel's fit was a little too loose.
Prepare the tubing with a smooth, square end with no burrs. This will help align the mandrel.
Use a soldering iron or small torch to tin the inside of the tubing and the mandrel shaft. Remove any plating on the mandrel for good solder flow.
Apply solder paste to the tube and shaft, and assemble as shown. Heat the pieces until the solder flows, then allow to cool slowly.
Step 3: Final Assembly
I always use a PWM speed controller when I run DC motors. Most motors have a 'happy' speed they like to run, and I try to indulge them.
For an LM324 PWM speed controller check out this website: http://www.pcsilencioso.com/cpemma/pwm.html
Use a mallet to gently tap the tubing onto the motor shaft. Start the motor at low speed and check the run-out of the mandrel. If it's excessive, go back a step and reflow the solder joint.
If the run-out is acceptable, fine tune the mandrel alignment with gentle nudges from a small mallet.
With the motor running, carefully file the mandrel end to get a square surface. Remove any burrs.
Attach the disk and check for wobble. Is everything within specs? Then let's go fix those worn out drill bits!
Seeya
wotboa
PS Here's a good site to see the basics of drill bits: http://www.autospeed.com/cms/article.html?&title=Sharpening-Drill-Bits&A=112910


