Introduction: Non Contact Voltage Detector
In this Instructable I’ll show you how you can build a non contact voltage detector for checking of live power wires.
Tools and materials used (Affiliate links):
Transistors http://s.click.aliexpress.com/e/bWomecjI
LEDs http://s.click.aliexpress.com/e/39wG0Q8
Prototype PCBs: http://s.click.aliexpress.com/e/b5dSOzvQ
Soldering Iron: http://s.click.aliexpress.com/e/3u9NQ5K
Solder Wire: http://s.click.aliexpress.com/e/bo6JdYZw
Step 1: Transistor Operation
A transistor is a device that can be used in two basic operations, as an electronic switch or as an amplifier. Depending on the current we apply to it’s base, it can control a much larger current through the collector and emitter path with a typical multiplication of around 200 times. This is called the transistor gain.
By connecting the output of one transistor to the base of another, we can multiply this gain to now get an amplification of 40 000 times. By building a circuit with three such stages we can create a device that is capable of detecting even the tiniest charges and movement of electricity.
Step 2: Assemble the Components
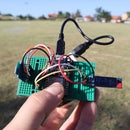
To begin, take a piece of perfboard with at list five to six rows of holes. I’m using this 2 by 8 cm board that I’ve purchased online.
Place the first transistor on the first row of holes and the second one, one row apart. Additionally, move the second transistor one hole up so its emitter aligns with the base of the first transistor. Same as with the second transistor, the third one is placed one row apart with its emitter being aligned with the base of the second transistor.
All three of the resistors connect to the collectors of the transistors and the values are all marked on the schematic.
Check out the full schematic on EasyEDA:
https://easyeda.com/bkolicoski/Non-Contact-Voltage...
The LED is connected with it’s negative side to the resistor on the first transistor and its positive side is then commoned with the resistors.
Step 3: Add the Antenna
The sensor for the circuit will be this copper rod that I’ve soldered on the top of the PCB and it is then connected with a piece of wire to the base of the third transistor.
The entire circuit is powered with a 9v battery and as soon as you bring it close to the wires connected to the mains voltage, the LED starts flickering.
While this is a nice indicator for isolated cables, it should never be used to test bare wires. For testing open contacts, only use proper isolated measuring equipment.
Step 4: Experiment With 4th Stage
As a final experiment I wanted to see how the detector will react with one more stage so I soldered one more transistor with a 5MOhm resistor so we now got 4 stages in total of amplification. The detector is a bit more sensitive now where it can detect the wire a bit further apart than before. Additionally it is also more sensitive to false triggering to a static electricity as well.
Step 5: Enjoy
I hope that this Instructable was educational and interesting so I suggest to follow me and don’t forget to subscribe to my YouTube channel.

Participated in the
Build a Tool Contest


