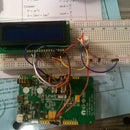
Introduction: OLED Displays and LinkIt ONE Board
Today, we'll be looking at how to display images and text using the 128 x 32 and 128 x 64 SPI OLED displays from Adafruit. ( http://www.adafruit.com/product/661 )
With this tutorial, you'll be able to integrate sharp, bright displays to any other projects you may be working on, either to display status updates, or vital data.
Step 1: Materials Needed
1. LinkIt ONE Board
2. OLED Display ( http://www.adafruit.com/product/661 )
3. Breadboard Wires
4. Preinstalled LinkIt ONE SDK
5. Adafruit Libraries (Search "Adafruit GitHub" and download the libraries specified in the examples)
Step 2: Wiring
Connect these pins to you LinkIt ONE Board:
GND goes to ground
Vin goes to 5V
DATA to digital 9
CLK to digital 10
D/C to digital 11
RST to digital 13
CS to digital 1
Step 3: Programming
After you've downloaded the Adafruit SSD1306 library, open up the example that corresponds to your specific OLED display. In our case, we used the 128 x 32 SPI display.
Looking at the top of the program, install any other libraries that may be needed. These include the SPI, Wire, and GFX libraries. They can all be taken from the Adafruit GitHub page.
Running the example will cause images and vectors to flash across the screen.
Step 4: Conclusion
Congrats! You've managed to utilize your OLED display and show some simple graphics and vectors as an example. Try out some of your own code based off of the example, and be sure to share your findings with us! If you have any questions, feel free to ask!


