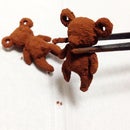
Introduction: Original Button
This is Original Button using a laser cutting machine.
Title : Let's make an original button
Detail : make button with the illustration of the freehand drawing
Target : the person who is not good at a PC, Computer beginners,Little child,and so on...
Required time : 2 hours
An aim:
The person coming for the first time in f.Labo interest in manufacturing in f.Labo
Width of the originality opens in "the illustration of the freehand drawing becoming the button" and "painting with one's favorite color"
Point that an undertaker thinks of :
Distribute The staff who makes data for processing and The staff who does laser material processing
Time for processing is 2-3 minutes, so participant can enjoy the processing time without being too long
Original Button
f-labo.tumblr.com/tagged/button
f.Labo
f-labo.tumblr.com
Step 1: Things to Prepare
Environment :
Desk to be able to draw an illustration on
The outdoor space that can use spray
Laser material processing machine
material : transparence-colored acrylic board(I recommend 2mm)
The tool which a participant uses :
design paper
Acrylic plate
Pencil
Eraser
Oily color magic
The tool which the staff uses :
Scanner
laser cutting machine
Illustrator
Photoshop
Clear spray (possible in painting use)
Trial product to introduce to a participant
Print design paper and process the plate beforehand.
Step 2: Design
Because scan it later, acquire a color black well.
Step 3: Coloring
Paint an acrylic board with the oiliness magic of the color that wants to make a button.
Step 4: Making of Data for Processing
1. Scan design paper
2. Make black and white in PS
3. Choose the outline of the frame partially and copy it
4. Reject pasting in Illustrator
5. Reduce in 40% and merge the direction
6. Autotracing and am expanded
7. Match a position with data for processing
8. Do it centering on the center point of each button, and reverse it to the vertical direction
Step 5: Processing
The plane where I painted in a color is the face.
Step 6: Coating
Coat it with spray not to discolor.


