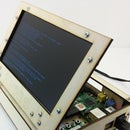
Introduction: PIvena Assembly Instruction With 1280x800 Display


This instructable goes along with PIvena-Assembly-Instructions and PIvena-Assembly-Instructions-B+ to show you how to build a PIvena Raspberry PI case with a 7" 1280x800 LCD. There is so much similarity that I didn't want to write it all over again, so you'll be flipping between the other instructables to get it all done. Let's Get Started!
Step 1: First Steps

To start, either fabricate your parts (all the files are available on thingiverse) or purchase them here. I've designed this version of the kit to work with the HSD070PWW1 LCD. I picked one up on ebay, or you can get one from adafruit
Start you build here: PIvena-Assembly-Instructions-B+. Follow it half way through Step 6, then come back for Step 2 in this instructable.
Step 2: LCD Main Board and HDMI Cable


I've found the height of the little blue adapter board makes running the HDMI cable a little tricky. You will want to make sure that you plug the long white ribbon cable into the blue adapter board before we screw it all down.
1. Run the white cable from the button board underneath the HDMI cable.
2. Carefully set the LCD board on the 1" standoffs, while forcing the HDMI cable to wrap very tightly around the front right standoff. You should be able to get it to stay to the right of the blue adapter board.
3. Take your time! I found this part to be tricky. Be gentle so as to not damage anything.
Now you can head back over to the PIvena B+ instructions and pick up at step 7 where we left off. Take that through Step 10, then come back here for Step 3!
Step 3: Display Bezel and Hinges


- Grab the Top Front piece, Display Bezel, (2) 3D printed hinges, (9) 5/16" screws
- The hinges are asymmetrical. The longer, angled part of the hinge gets screwed to the bezel
- Use (4) 5/16" screws to attach the hinges to the bezel.
- Use (4) 5/16" screws to attach the hinges to the Top Front piece.
- The last 3D printed piece is the kickstand mount. Use (1) 5/16" screw in the TOP hole of the two that it line up with. The lower hole is oversized so that the screw won't grab in it.
- Use the pictures for reference.
Step 4: Mount LCD


- Grab (6) 1/2" screws, (2) angle wood brackets, (1) long wood bracket, LCD
- If the LCD still has it's protective film on it, now is a convenient time to remove it
- Set the assembled bezel face down and set the LCD on it.
- Attach the long bracket with (2) 1/2" screws. The screws will self thread into the wood of the bracket.
- Only lightly tighten the bracket, we will need to nudge the LCD a bit later
- Next grab an angled wood bracket and use (2) 1/2" screws to install it. The top back of the LCD is covered with a metal tape that we don't want to put much of any pressure on. The bracket is designed to only slightly overlap the taped area.
- Install the last bracket.
Step 5: LCD Installation


Almost Done!
- Feed the ribbon cable underneath the long LCD bracket so we can connect it to the LCD
- To insert the ribbon cable, flip up the small black door on the connector. It will stick straight up when it is "open"
- Gently push it into the connector. You should feel it slide in and then stop.
- Flip the black door down to lock the cable in.
- Lay the screen on the top of the PIvena and put the last 2 5/16" screws in the Top Front wood piece to secure it.
- The ribbon cable is quite long and you want it to kinked or creased by closing the screen, so feed it underneath the LCD driver board. Check that you can close the screen without it getting in the way.
*****Important Tip!*******
I found that my LCD wasn't working well, and it turned out to be from LCD driver board not getting enough power. The solution was to chop off the barrel connector and direct solder the power wires to the LCD driver board. You can see in the last picture above how the wires are soldered.
******End Important Tip!******
That's it for the special instructions, head over to the PIvena-Assembly-Instructions instructable and pick up at step 14. All you have to do is screw in the kickstand and install the front panel, then you are done!


