

Introduction: Pellet Level Monitor for Home Assistant With HC-SR04 and ESP8266


Hey everyone! In this Instructable, I dive into a DIY project that's not only fun but also solves a real problem I've been dealing with at home. The issue at hand is keeping track of the wood pellets for my pellet stove, which is key to heating my home It's always been a bit of a guesswork game, checking and refilling pellets to make sure I don't run out at an inconvenient time.
To tackle this, I'm creating a gadget that will keep an eye on the pellet levels for me. I'll be using an HC-SR04 ultrasonic distance sensor and hooking it up to an ESP8266 microcontroller. The plan is to make a device that will consistently measure the amount of pellets left and integrate with Home Assistant to keep me updated.
The Instructable is sponsored by Altium Designer so be sure to check them out and get 25% off from any new license!
Supplies


Below are affiliate links for everything that you might need to make this project. By purchasing through them, you support me and my work, without any additional cost to you!
- Wemos D1 Mini Development Board - https://s.click.aliexpress.com/e/_EwblUAZ
- HC-SR04 Ultrasonic Distance Sensor - https://s.click.aliexpress.com/e/_onYxR6K
- Mini Breadboards - https://s.click.aliexpress.com/e/_mLh0VXk
- Breadboard Jumprs - https://s.click.aliexpress.com/e/_olhgRAK
- Rework Soldering Station - https://s.click.aliexpress.com/e/_oEHR6NU
- Wire Snips - https://s.click.aliexpress.com/e/_EHCIXWV
- 5V Power Adapater - https://s.click.aliexpress.com/e/_EyuhkQt
- Project Box - https://s.click.aliexpress.com/e/_oneBy6W
- Mini Magnets - https://s.click.aliexpress.com/e/_EJ1fWBT
- Bench Power Supply - https://s.click.aliexpress.com/e/_mtCeT1Y
- Multimeter - https://s.click.aliexpress.com/e/_onYXIzc
- Hot Glue Gun - https://s.click.aliexpress.com/e/_msjOpMI
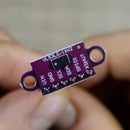
Step 1: Working Principle of the HC-SR04 Ultrasonic Sensor


The HC-SR04 ultrasonic sensor is going to be the eyes for our project. It's a little gadget with some neat tricks up its sleeve. The sensor has two main parts: one that sends out sound waves (the transmitter) and another that listens for those waves to bounce back (the receiver). When we trigger the sensor, it emits a series of ultrasonic pulses that are so high-pitched, our ears can't hear them. These pulses travel through the air, hit an object, and reflect to the sensor.
As the receiver picks up the reflected sound, the sensor can calculate the time it took for the sound to leave and return. This is what we call the 'time of flight' and it's crucial because it helps us figure out how far the object is from the sensor. Remember, all of this happens in the blink of an eye.
So, for our pellet stove, this means we'll be measuring how far the pellets are from the top of the stove, or in technical terms, the distance from the sensor to the pellet surface. With a little bit of math, we can translate this distance into an actual level – low, medium, or full – so we know when it's time to refill the stove. Pretty cool, right? Now, let's get our hands dirty and see how this theory works in practice with our hardware setup.
Step 2: Setting Up the Hardware


Setting up the hardware for our pellet-level monitor is straightforward and doesn't need too many parts. The star of the show is the HC-SR04 ultrasonic distance sensor. With this sensor, we have four pins to hook up: GND (ground), VCC (power), Echo, and Trigger. Ground will connect to the ground on our ESP8266 board, while VCC will go to the 5V output—though the sensor can handle 3.3V, using 5V gives us a bit more reliability.
Now, let's talk about the Echo and Trigger pins. The Trigger pin is the one that tells the sensor to send out an ultrasonic pulse. The Echo pin, on the other hand, listens for the pulse's echo once it's bounced back from the pallet surface. We'll connect the Trigger and Echo pins to two digital pins on the ESP8266; let's pick D6 and D7 for now.
The end goal is to mount the sensor on the inside of the pellet stove's lid. Since this lid is almost always shut, the sensor will get a clear view of the pellet level, and our microcontroller will do the rest of the work.
Step 3: Arduino Code


Before I fully committed to the project with Home Assistant integration, I wanted to test out the sensor first and see how it behaves with a bit of Arduino code. With it, you can still learn how to interact with the sensor, even if you do not have a smart home setup like mine.
This script measures the distance and then displays it on the serial monitor, so we can make sure everything's OK.
Let's break down the essentials.
First off, we'll define our pin connections - remember we chose D6 for Trigger and D7 for Echo:
const int trigPin = D6;
const int echoPin = D7;
Next, we set some constants for the speed of sound – this helps us calculate distance. We'll use 343 meters per second as our speed:
#define SOUND_VELOCITY 0.034
#define CM_TO_INCH 0.393701
In the `setup()` function, we'll initialize our serial communication and set our pin modes. Trigger out, Echo in:
  Serial.begin(115200);
  pinMode(trigPin, OUTPUT);
  pinMode(echoPin, INPUT);
Time for the `loop()`—the heart of our code. Here's what happens: we need to send a short pulse to trigger the sensor and then listen for the echo. The pulse length (time the sound waves take to come back) is what we're after:
void loop() {
  digitalWrite(trigPin, LOW);
  delayMicroseconds(2);
  digitalWrite(trigPin, HIGH);
  delayMicroseconds(10);
  digitalWrite(trigPin, LOW);

  duration = pulseIn(echoPin, HIGH);

  // Calculate the distance
  distanceCm = duration * SOUND_VELOCITY/2;

  // Convert to inches
  distanceInch = distanceCm * CM_TO_INCH;

  // Prints the distance on the Serial Monitor
  Serial.print("Distance (cm): ");
  Serial.println(distanceCm);
  Serial.print("Distance (inch): ");
  Serial.println(distanceInch);

  delay(1000);
}
So what are we actually doing? We're sending a high pulse for 10 microseconds which tells the sensor to emit those ultrasonic waves. We then wait for the echo and `pulseIn` gives us the travel time. Knowing the speed of sound, we can calculate how far the waves traveled – which translates to our pellet level.
After all the math, we print our results on the serial monitor. This is where we can see our distance in both centimeters and inches.
Since we know that the sensor works and can accurately measure distance, let's see now how we can integrate it with Home Assistant.
Step 4: Integrating With Home Assistant


We'll now switch gears from Arduino to ESPHome, which plays nicely with Home Assistant.
I did the flashing through the web installer from ESPHome and once the device was installed with the firmware, I connected it to my smart home setup. Here, a bit of configuration was added so we tell it that it has an ultrasonic sensor attached and an additional calculated value that maps the distance to a percentage level.
To calculate this percentage, I replicated the map function implementation from Arduino where I chose 0.1m as the maximum, and 0.8m as the minimum distance, meaning the tank is empty. Anything above or below those values is capped at 0 and 100% respectively so we do not overshoot those values.
For the visual presentation on my dashboard, I added a gauge card to better see the pellet levels at a glance. As the distance changes, that gauge will move—up for a full hopper, down for a refill.
For now, I did not set any notifications as I first want to make sure that the measuring works nicely over time so I will do this in the following weeks after I get a sense of the pellet's behavior.
Step 5: Finalizing the Device


Alright, with our code in place and Home Assistant integration ready to go, it's time to focus on making our pellet level monitor a permanent fixture on our pellet stove. We need to give our little gadget a home - an enclosure that will keep it safe and secure on the stove.
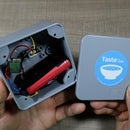
Now, the easiest route would be to 3D print a custom enclosure, but as luck would have it, I don't own a 3D printer. So with some scavenging through my parts drawer, I found a pre-made enclosure in the form of housing from an LED light power supply. It's non-metallic, which is great since I don't want any interference or short circuits, and it's just the right size to fit our sensor snugly. To mount it inside, I drilled precise holes for the sensor's transmitter and receiver.
To attach the enclosure to the inside of the pellet stove's lid, I used a couple of strong magnets. This way, it won't budge once it's in place, but I can still remove it if I need to make adjustments or for maintenance.
For the wiring, I chose a thin cable from a broken charging lead to connect the sensor to the ESP8266 board. It's neat and thin, and I routed it to ensure it doesn't snag or get in the way when the lid opens and closes.
To power the sensor, I used an old 5V phone charger, which is perfect for the job. I connected it to the Wemos D1 Mini board and housed the setup in another electrical box to keep it insulated from the environment.
It is very important the the Wemos D1 Mini is placed outside of the metal storage tank as otherwise it won't be able to connect to the WiFi network.
Step 6: Installation and Calibration


To mount it, I made my way downstairs with the sensor securely encased and the magnets firmly attached. Positioning this setup is crucial, so I chose the underside of the stove's lid as the sweet spot - it's the perfect location for the sensor to get a clear reading of the pellet level with the lid closed.
I fastened the sensor's enclosure to the lid using the magnets, which snapped into place satisfyingly. This positioning ensures that with the lid shut, our sensor is directly above the pellets, giving us the measurements we need. Next, I carefully ran the thin cable along the underside of the lid, ensuring it wouldn't interfere with the stove's operation or catch as the lid opened and closed.
The electrical box was simply placed on top of the stove and the phone charger got plugged into an outlet directly behind the stove.
I plan to let it run for a few days to ensure everything is spot-on and I'll later decide how to create a suitable notification to tell me when I'm running low on pellets. If necessary, I will check on the readouts and modify the 0.1m and 0.8m limits for the levels.
Step 7: Next Steps

With the pellet level monitor installed and running smoothly, it's time to think about what's next. These initial steps have laid the foundation, but as with any good DIY project, there's always room for enhancements and fine-tuning.
The system as it stands is doing a great job at monitoring the pellet levels, but I'm already thinking about implementing notifications. By setting up alerts with Home Assistant, I can receive timely updates about when it's necessary to refill the pellets. Whether it's a pop-up notification on my phone or an audible alert that can remind me, convenience will be key.
Another possible improvement is to replace the ultrasonic sensor with a laser-based time of flight sensor as supposedly, those provide better an more concise measurements.
Lastly, creating a custom, more streamlined enclosure could be on the horizon—especially if I get my hands on a 3D printer.
I'll be monitoring how the system performs over the next days and weeks, taking note of any quirks or improvements that could be made. Your feedback is valuable too, so if you have suggestions or ideas to share, drop a comment, and let's make this project even better.
Stay tuned for updates, as I might add those extra features and share the progress. And don't forget to subscribe to my YT channel if you want to follow along with this project and many others. Thanks for joining me on this build – it's been a blast, and I'm excited to see where we can take it from here.
Cheers!

Participated in the
Stay Warm Contest


