Introduction: Quick and Dirty RC Telemetry


If you’ve spent some time with RC vehicles, whether fixed wing, multi motor, or land based, you’ve probably become curious about telemetry. Parameters like battery voltage and altitude for aircraft are both interesting and often safety-critical.
Many RC outfits offer telemetry systems, however these are plagued with compatibility issues and proprietary setups. You are often stuck with using specific brand hardware and limited to specific brand sensors, and locked out of manipulating your data to do cool stuff (like adding audio call-outs). If you decide DIY isn’t for you, I would recommend just getting an APM auto-pilot unit, which combined with Mission Planner, gives you all the data you could need. However if you want flexibility, control, and simplicity, this DIY telemetry setup is the way to go.
Step 1: System Rundown
For this demo, I’ve created a system based on the Arduino Pro Mini and the NRF24L01+ 2.4GHz wireless module, both of which are very low cost. This one-way telemetry system will send altitude and battery data from the aircraft to the ground station, which will connect to a python script on a computer that will call out these parameters via voice like a commercial airliner. For those of you who fly fixed wing, this is extremely helpful, as taking your eyes off the model for even a second can be disastrous! The next step would be to add two-way communication, allowing us to do something like control lighting or a display from the base station.
The NRF24 is a packet radio. It basically takes in whatever data we send it from the Arduino and takes care of the pesky step of sending it over radio waves. What makes this project accessible is the availability of Arduino libraries that make working with this radio very easy.
So our setup is pretty basic. In our aircraft is an Arduino, a NRF24 radio, a voltage sensor (two resistors arranged to make a voltage divider), and barometer for altitude (BMP_180). On the ground, there is an Arduino, NRF24 for receiving the remote signal , your laptop and a USB-TTL serial link to the Arduino. Running on the laptop is a python script that interprets the telemetry data provides voice updates of the altitude and battery voltage.
Step 2: Parts
- 2 X Arduino Pro Mini (5V are easiest to get and cheap)
- USB-TTL adapter for programming and communicating with the Arduino Pro Mini
- 2 X NRF24L01+ 2.4GHz Wireless RF Transceiver Module
- These are dirt cheap if you get the most basic models, however I highly recommend upgrading to the a high power version with an external antenna
- Display, I'm using Adafruit AlphaNumeric LED Back pact, but anything with simple control libraries is great
- BMP 180 Barometer
- 1M ohm, 470K ohm resistors
- AMS1117 3.3v Regulators
- Alternatively, get a ready to go breakout adapter and you will not need to worry about getting clean voltage to your radio
- Something to fly on, most standard RC systems have a 5V BEC voltage we will piggyback off of.
- Prototyping Breadboard
- Perfboard
- Soldering equipment
Step 3: Circuits


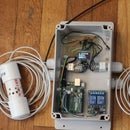
Here are the circuit schematics and how I have assembled them. I have my airborne remote unit soldered on to perfboard for durability and lower weight, though I've left my base station on a breadboard as it doesn't have to make it airborne!
The all important pin-out guides for the NR24 are found at Nrf24L01-2.4GHz-HowTo
Your life will be made much easier if you purchase the NR24 Breakout Adapter, as the voltage regulator is eliminated from the circuit and the pin-outs are much more clear.
If you don't have exactly 1M and 470K Ohm resistors for the voltage divider, you can use different values, but understand that they must reduce your battery voltage below 5V to be read by the Arduino, and you will need to tweak code in the Arduino sketch. More about voltage dividers here.
Step 4: Arduino Code
You need to install the RF24 Library, and the Adafruit BMP_085 Library found in the Arduino Library.
The code for both are sending and receiving unit is pretty simple. The great thing about the RF24 Library is that it let's us pass our telemetry data through defined structures, and we do not have to worry about parsing the data out of a serial signal.
The sketches are available on my Github:
Step 5: Python Code
To run the Python script on your laptop you need to make sure you have the right software installed. Right now I have it set to provide audible call outs of altitude and low voltage, though there is a variometer feature in the works. Along with Python (Anaconda is best), you will need the packages pyttsx and pyaudio.
It's best if you have some basic python skills to get this running. At minimum you need to set the variable comport at the beginning.
The action pretty much occurs in the while loop at the end of the script. Each loop we call telemetry.update() which updates our telemetry values, and then pass them into our speech engine to call out at desired intervals.


