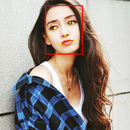
Introduction: Real Time Face Detection on the RaspberryPi-4
In this Instructable we are going to perform real time face-detection on Raspberry Pi 4 with Shunya O/S using the Shunyaface Library. You can achieve a detection frame rate of 15-17 on the RaspberryPi-4 by following this tutorial.
Supplies
1. Raspberry Pi 4B (any variant)
2. Raspberry Pi 4B compliant power supply
3. 8GB or bigger micro SD card
4. Monitor
5. micro-HDMI Cable
6. Mouse
7. Keyboard
8. laptop or another computer(Ubuntu-16.04 preferably) to program the memory card
9. USB Webcam
Step 1: Install Shunya OS on Raspberry Pi 4
You will need a laptop or computer(preferably with Ubuntu-16.04) and a micro SD card reader/adapter to load the micro SD card with Shunya OS.
1) Download Shunya OS from the official release site
2) Flash Shunya OS on the SD-card using the steps given below:
i) Right click on the zip file downloaded and select Extract here
ii) Once the image is unzipped double click on the unzipped image folder in which you will find the image and release info
iii) Right click on the image(.img file)
iv) Select Open with -> Disk image writer
v) Choose Destination as SD Card Reader
vi) Enter your password
This will start flashing the SD-card. Be patient and wait for the Sd-card to be flashed completely(100%)
Step 2: Setup and Connections
As shown in the picture above you need to do the following things:
1) Insert micro SD card into Raspberry Pi 4.
2) Connect mouse & keyboard to Raspberry Pi 4.
3) Connect Monitor to Raspberry Pi 4 via micro-HDMI
4) Connect the USB Webcam to the Raspberry Pi 4
5) Connect the power cable and Power ON the Raspberry Pi 4.
This will boot up Shunya OS on the RaspberryPi-4. The first boot might take time as the filesystem resizes so as to occupy the entire SD-card. After the OS boots up you should see a login screen. Here are the login details:
Username: shunya
Password: shunya
Step 3: Install Shunyaface(face Detection/recognition Library)
To install Shunyaface we need to connect the RaspberryPi-4 to the lan or wifi
1. To connect the RPI-4 to the wifi use the following command:
$ sudo nmtui
2. To install shunyaface and cmake (a dependency) for compilation of the codes and git(for downloading the actual code), enter the following command:
$ sudo opkg update && sudo opkg install shunyaface cmake git
Note: Installing might take about 5-6 mins depending on your internet speed.
Step 4: Download the Code
The code is available on github. You can download it using the following command:
$ git clone https://github.com/shunyaos/shunyaface.git
Code explanation:
The given code captures frames continuously using Opencv's VideoCapture function. These frames are given to the detect function of Shunyaface which in turn returns the frames with bounding box plotted on the face and dots plotted on the eyes, nose and end points of the lips. To quit the code press the "q" button. After pressing "q" the Output FPS is displayed on the terminal.
Step 5: Compile the Code
To compile the code use the following command:
$ cd examples/example-facedetect
$ ./setup.sh
Step 6: Run the Code
Once, you have compiled the code you can run it using the command.
$ ./build/facedetect
You should now see a window open. Whenever a face is in front of the camera, it will plot the bounding box and it will be visible to the user on the window that opened.
Congratulations. You have now successfully completed read-time face-detection on the RaspberryPi-4 using deep-learning. If you like this tutorial please like, share the tutorial and star our github repository given here.


