Introduction: Realtime Event Notifications Using NodeMCU (Arduino), Google Firebase and Laravel
Have you ever wanted to be notified when there is an action made on your website but email is not the right fit? Do you want to hear a sound or a bell every time you make a sale? Or there is a need for your immediate attention because of an emergency at home?
This device can alert you in real time about anything you like.
Step 1: Wire Up the Circuit
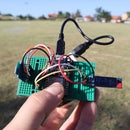
The device I’ve build consists of a NodeMCU board with a buzzer to alert me of sales made on a website. The microcontroller is programed using the Arduino software and the triggering part can be any web, iOS or Android application. I’ve created two simple web applications, one in Laravel and the other in plain HTML and JavaScript for the example.
Since the NodeMCU board can safely operate till around 12mA of current on the pins, the buzzer is connected through a NPN transistor. I’ve used 2N2222 because I have many of them laying around but I’m sure that the principle will be the same with any other NPN transistor.
To wire up the circuit, connect the collector of the transistor to the Vin pin on the board. The buzzer operates at 5V and since we gonna power the device from USB, this pin will give us the voltage before the 3.3V regulator on the board.
Next connect the positive side of the buzzer on the emitter of the transistor, and the negative pin of the buzzer to any of the ground pins on the board. I’ve used pin 2, but you can also connect it at pins 9, 25 or 29.
The base of the transistor is connected to pin D2 which correlates to GPIO 4 on the Arduino software. With this setup, the transistor will effectively function as a switch turning on the buzzer on each event. Instead of the buzzer you can connect a relay in the same way to be able to drive any mains appliance like light bulbs, machines or a siren if you are making some alarm device.
Step 2: Prepare the Web Apps
For the triggering and real time part of the device, we will use Google’s Firebase Realtime Database. This a wonderful NoSQL cloud database made by Google that provides real time data synchronization between each of the platforms it’s being used.
First create the project with a name of your choice. Once created, create a single node called “count” and initiate it with the value if 0. This will be our start count that we want to follow in future.
The Laravel application uses the “firebase-php” package from Kreait, and it is linked bellow. Install the package by running “composer require kreait/firebase-php”. Once the installation is done, we need to create the controller where the action will happen. I named the method “update” and I’ve connected it in the routes on a POST action.
To retrieve the Firebase instance you need a json file that you need to download from your Firebase console. Place this file in the root of your Laravel project and name it firebase.json. When retrieving the firebase instance, we need to provide the path to this file using the withCredentials method.
After we got the firebase instance, we need to get the reference to the database and to the node that we’ve created earlier. On each action, we will get the current value of the node, increase it by one and save if back to the database. This will keep track of our events that we need to notify about.
The same can be achieved with plain HTML and JavaScript, using the provided firebase library. With it we first need to provide the config array with the appropriate settings from the Firebase console and initialize the app. Once initialized, we get a reference to the node where we store the event counts and attach a listener to retrieve any value change.
Additionally, instead of submitting the form as in the Laravel example, we now have a JavaScript function that is being called on the button click, updates the count and writes the updated value back to the database.
Step 3: Program the NodeMCU Board
To program the NodeMCU, I’ve used the Arduino software and after I installed the board to it I made sure to select the proper version and port so I can upload the software. Mine is version 1.0 so double check with your board before proceeding.
The first part of the Arduino code, sets up all the necessary definitions that you will need to adjust on your device. The first such setting is the ssid of the WiFi and its password, then we need to setup the firebase url, and the firebase db secret. Unfortunately, this is not the recommended way of connecting to the database but as of now it is the only way the library supports it. You can find this secret under the Project Settings, service accounts menu in the firebase console.
The next definition is the path that we will be checking for updates and the device id. The device ID is needed so in case we have multiple devices to notify about the same events, we need to know which device notified us for the event and keep a record of that. Last one we need to setup the pin at which we have connected the buzzer and this is D2 in our case.
The setup function defines the built in led pin and the D2 pins as outputs, start the serial communication for knowing what is going on and connects to the specified WiFi network. Once the connection is established, it starts the communication with Firebase and gets the last value we reported for. It then starts to listen for changes on the specified path.
In the main loop, there is a call to the blink function that blinks the built in led for 500 milliseconds in order for us to be able to tell that the device is active. When a change is detected and there is available data we can read with the available function, the new value of the node is being read, the difference is calculated as there might have been multiple events in the meantime and a beep is produced for each time of the difference.
For example if the difference between the last reported value and the new value is 4, 4 beeps will be produced to let you know that 4 new purchases were made. The beep function uses the built in tone function to play a specified frequency through the buzzer for a set period of time.
After the beeps are produced, the new value is updated for the specified device and the streaming is restarted again. Currently there is an open issue on the arduino firebase library that the streaming does not continue automatically after we manually save a value so we need to restart it.
Attachments
Step 4: Enjoy Your Device!
The entire code I’ve used is available on my GitHub account linked below together with the link to the schematic of the project.
The code can be easily adopted to work for a lot of different scenarios and events and I’m sure you will have a lot of fun playing with it.
For me this was a really fun build and I managed to learn quite a lot on it and for that I’m really happy. I hope that it can help you with your project but if you find yourself stuck with any part of it or you need some further clarification, then please let me know in the comments and I’ll do my best to help you out.
If you liked the project then please subscribe to my YouTube channel:

Participated in the
Arduino Contest 2017


