Introduction: Restoring 20 Years Old Bench


In this instructable you will see how I restored bench from completely unusable and rotted to stunning bench. We will go through the few steps of buying, choosing, cutting, sanding etc. I hope that you will learn something from my experience, so lets start.
You can also do this project with hand tools, the main tools that were used are:
- Miter saw
- Table saw
- Drill/Driver
- Orbital Sander
- Router
- Measuring devices and square.
- Brushes
- Spray Gun (optional)
- PlanerThicknesser
- Angle grinder
Other stuff:
- Drill bits
- Polyurethane base coat 0.5L
- Polyurethane finish coat 0.5L
- Base paint for metal 0.2L
- Finish paint for metal 0.2L
- Router fillet bit (roundover)
- Carriage bolts
- Flap disk grinder 40/80 Grit
Costs (without machines):
- Base paint for metal - 5$
- Finish paint for metal - 5$
- Ash wood - 30$
- Polyurethane base/finish - 15$
- Sand paper - 5$
- Bolts, washers, nuts - 10$
- Flap disk grinder 40/80 Grit - 7$
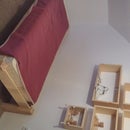
Step 1: Inspecting Bench


So, first we need to see what are we going to do with our bench. On the pictures we have bench that was about 20 years on the street and nobody took care of it. First thing is to scratch the surface on the few places just to see if rust penetrated, in our case somebody painted very well with few coats and it was solid. After we inspected everything, we need material so I have prepared a list of materials that was used to rebuild this.
Material
Wood bench was completely made out of the Ash (25 mm thick). It's hard to find a quality Ash in our neighborhood, but I visited local wood depo that are not fare away from me and got lucky. Bought some Ash that's not "cuped" / "twisted", it took some time to find appropriate wood for the bench.
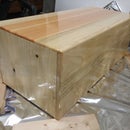
Step 2: Material - Picking the Wood


Just a few images where I bought the wood. It was 4 m long boards, half was sticking outside of the car :) They were cut in half roughly so we can work easily with them. After you bought the wood, you should plan and mark your cutting line, so you can get most of the wood board.
Step 3: Grinding, Sanding, Painting - Metal


We had some problems with removing the rusted bolts, we had to brake the wood so that we get better approach to bolts. I've tried also with heating but it's easier to cut the bolts. Next on the list was grinding. First we used 40 grit flap disk on angled grinder to remove the paint and rust, after that just quick run down with 80 grit. Finally I did it by hand with 120 Grit just to knock down remaining bumps. After this, it's pretty simple 1 coat of base paint for metal (grey) left to dry overnight, so that we can apply finish paint (one bench was black and second brown).
Step 4: Cutting - Wood


From the video you will see that Ash is not perfectly straight, so I've cut the boards into the wider strips and left 1-2 days just to see if the stress in wood was going to pull in some directions. While I was waiting for the wood, I did worked on rest of the metal parts. After wood was left in the workshop for 2 days, I've started to work on the board to make them into the wanted dimensions. Following that I've run down through the thicknesser to make the boards all equal.
Boards in the final dimension was 2000 x 60 x 25 mm (Long x Wide x Thick), The back support was 150 mm wide.

Step 5: Router Part and Sanding


Now when the major part was done, all that was left to do is to run it trough the router. You have to knock down sharp edges, I've used fillet with radius of 9.5 mm. I've have some chip router bits that came in a set and they are pretty good for this stuff. Now was time to sand everything before we can move to painting. You can start with 120 on the orbital sender up to 240 grit, and finish with hand 320 grit so that fillet is really smooth.
Step 6: Painting


My improvised painting booth served the purpose :). I've painted the boards with polyurethane. I've sprayed it with 3 coats of base and 2 coats of the finish. After each coat of base polyurethane, you can slightly touch it with 320 sand paper to smooth everything out.
Step 7: Assembly


Assembly was hard because it's 2 man job, and I was alone. First step was to measure the threaded part of the bolt and drill the holes. Then assemble one side, so you can have reference point for the other side. After first board was done, remaining assembly took 15 minutes. If you have someone to help you with assembly, that will be very helpful and speed up your process.
Step 8: Finish


After you have done everything just sit back, bring some beer and enjoy in your work :)
That's it folks! Also you can see my other projects on this link.
Please if you find some mistake in the text or something is not clearly typed please leave a comment I will try to explain better.