

Introduction: Simple Flat Pack Stool Printed With CNC

I am making a flat pack stool and using a CNC machine to cut out the pieces. The purpose of this project is to provide more seating for willow students, and to have seating that can be easily stored and taken apart to lay flat. Another bonus to this chair is that it doesn't require any wood glue or screws to be held together, so it doesn't require as many materials.
Supplies
4x4 sheet of plywood, CNC Machine, cardboard, box cutter/exacto knife, (optional: wood glue and screws to hold it together permanently).
Step 1: Make of List of Necessary Things to Do

I started by making a list of things I would need to accomplish to create a successful chair.
Step 2: Pros&Cons/Brainstorming
I started by considering pros and cons of flat pack chairs, especially stability, comfort, and ease to cut out and put together. I came to the conclusion to build a chair with cutouts so it would slot together and be the most stable, therefore the best for our school engineering classroom.
Step 3: Research/Prior Solutions
I looked up flat pack stools that slot together and found another instructable about how to build a stable one, and I got a lot of inspiration for my chair from that one. His flat pack stool seemed stable and reliable so I decided to do a similar design. Link to the instructable: https://www.instructables.com/Simple-knock-down-stool-made-from-plywood-flat-pa/
Attachments
Step 4: Drawing
I used my sketchbook to make a drawing of what the chair would look like from all angles and also what all the different pieces would look like. I used this drawing to also choose my measurements for the chair and decide how it would fit together.
Step 5: Cardboard Model

I cut out the pieces for my chair from carboard using the measurements from the drawing I did in my notebook. I did this to see how the pieces would fit together and if I would need to make adjustments to my design. Originally the legs for the stool did not slot together, so I had to make all of the cutouts half an inch larger so the carboard could fit.
Step 6: Create Fusion Design
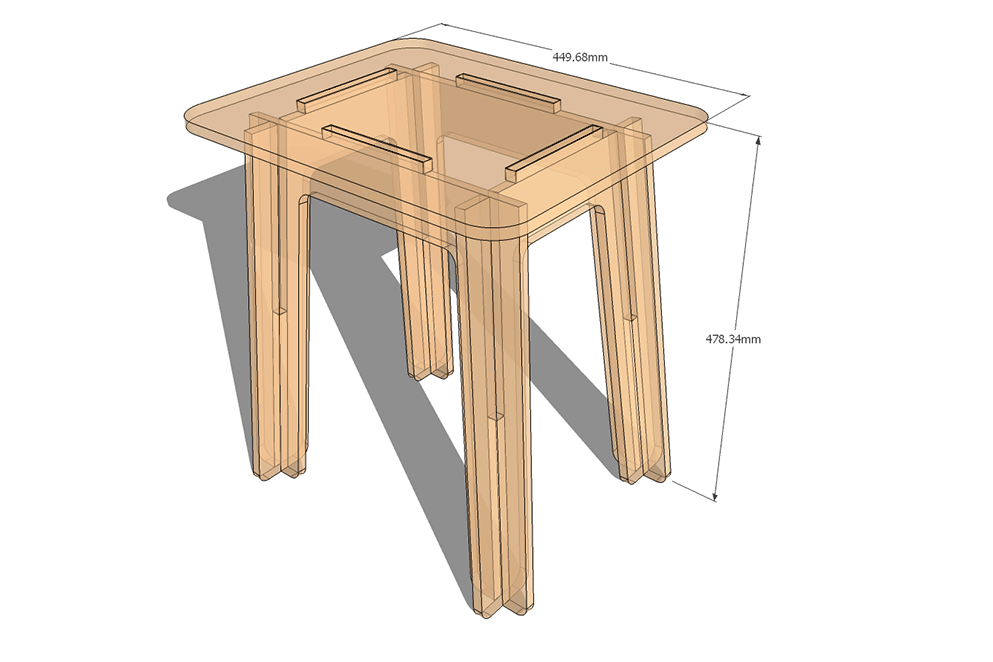
Creating my fusion designed chair was a process of making all of the pieces and then putting them together. I created all 4 legs and the top and then once I had done that, I placed joints to join my stool together. I then realized that the measurements for the top of the stool were slightly off so I had to go back and adjust them by a couple millimeters and check to see that it now fit. The top then fit the second time.
Attachments

Step 7: Carbide Create

I then used the arrange tool to lay my chair's pieces out flat in fusion so it could be imported into Carbide Create. I imported the file to carbide create and created toolpaths and placed tabs. I uploaded this Carbide Create file onto the USB that attached to the computer connected to the CNC Machine.
Step 8: Cut Out Small Scale Chair
I went to cut out my chair and realized I hadn't changed the size of the pieces of wood for my chair to be printed on. Therefore Carbide Create was recognizing my chair as if it was on a bigger piece of wood, so it started to cut incorrectly.
Step 9: Troubleshoot
I went back into Carbide Create and changed the size of the wood for the chair to be printed on, so it would print correctly.
Step 10: Cut Out Small Scale Chair
I have yet to do this step, but the process will be to import my file onto the USB again, zero the CNC machine and cut out the small scale chair I made in fusion. Hopefully it would print out correctly this time so I wouldn't have to go back and troubleshoot again.
Step 11: Assemble the Chair
Once the chair would be printed I would need to sand down the edges of the pieces, break the tabs that were put on there, and slot the pieces together. Assuming that the pieces fit, I could choose to use glue to hold the chair together permanently or I could make it so it could be taken apart and be flat pack.
Step 12: Print Full Size Chair
First, I would have to go back into fusion and scale up my chair to be the correct size for the 4x4 ft piece of plywood to print the full size chair. Next, I would have to repeat the process of importing my file into carbide create, placing tabs, creating toolpaths, and making sure it would be printing on the correct size plywood. I would also have to repeat the process of setting up the CNC and then I could print.
Step 13: Assemble Full Size Chair
Assuming there were no issues with the printing, I would sand down the pieces, break the tabs, and slot the chair together. I want my chair to be able to pack flatly and be taken apart, but others could glue it together so it would stay permanently.


