

Introduction: Slide Sky-Map for Displaying Tropical Stars.


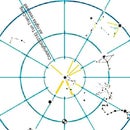

Figure 1: Illustration of a Slide Sky-Map using the mask for 15 degree North latitude.
by tonytran2015 (Melbourne, Australia).
It is an advantage to know the arrangement of stars for the nights before engaging in nightly activities such as going to the country side or navigating your way by stars. It is difficult to have a good display of the tropical night sky with current commercially available circular star maps as they have a lot of distortion for tropical visualization whereas easy visualization requires that groups of stars should appears with the same shape as actually observed in the sky and the constant altitude curves should be nearly circular around the zenith point.
The device given in this posting gives the desired displays with low distortion for the tropical night sky and has been designed for use with latitudes between the two tropical lines. I give it the name Slide Sky-Map (which is similar to the name Slide Rules of similar looking mathematical devices before the age of calculators).
It is made of a Mercator map of stars and of interchangeable viewing grids to give elevation and azimuth angles of stars to observers located near to 0 degree, 15 degrees North and 15 degrees South in latitude.
It will be useful to tropical people who want to learn the stars by themselves or need to refresh their nightly detailed knowledge of the sky before going out. It is low cost, light weight, small, flexible, durable and quite portable. If made from waterproof materials, it may also be used as a low cost standby star map for travelers, hikers and seamen traveling in the tropic (my is made from waterproof sheets).
The device is made by following instructions in the next 4 steps. PLEASE READ THROUGH ALL STEPS BEFORE STARTING ANY CONSTRUCTION.
Step 1: Making the Maps for the Core.


Figures 1: The map on the front of the core of the Slide Sky-Map. Figures 2: The map on the reverse side of the core.
The map on the front of the core of the slide sky-map is a Mercator map with continuation by its repeat copy. The map here wraps around the Celestial equator by 600 degrees, meaning that it has about 1.7 times the width of the minimal Mercator map. The extra length allows the slider covering 180 degree in the East-West direction to be centered on any given longitude.
The two inversion maps of the North and South polar regions of the Celestial sphere are overlaid at the two ends of the same Mercator map and the combined map is placed on the reverse side of the core. The two insets represent the two polar regions of the Celestial sphere not displayed on the Mercator map. They help visualizing the two polar zones of the Celestial sphere, they can be easily joined to the polar sides of the Mercator map using shared common constellation present in both types of maps as anchors.
The core maps are to be printed on both sides of a thick sheet of A4 paper to make a core for the slider of next few step to slide on. Alternatively they can be printed on ordinary A4 papers and pasted on the opposite sides of a piece of cardboard used as the core.
PLEASE READ ALL STEPS BEFORE STARTING ANY CONSTRUCTION.
Step 2: Making Azimuth and Elevation Masks for the Slider


Figures 1, 2, 3: The grid masks for 0 degree, 15 degree North and 15 degree South.
A grid mask is placed on top of the core map to read the azimuth and
the elevation of the stars drawn on the map. An observer must use the mask drawn for his latitude.
Description:
The smallest circle of each grid is graduated into 12 intervals of 30 degrees each to show the azimuth angle of the star or direction from True North. The curves radiating from the center represent the great circles from the zenith to the terrestrial points of 0 degree (North), 30, 60, 90 degree (East) , 120, 150, 180 degree (South), 210, 240, 270 degree (West), 300, 330. The concentric nearly circular curves represent the constant elevation circles in the sky. They are placed at 30, 60 and 90 degrees from the zenith. The curve at 90 degrees from the zenith represents the horizon on flat locations. The graduation can also be read from the horizon circle toward the center to show the elevation angle of the star. The position of any star in the sky can be read against the grid.
There are 3 grid masks given for this design. Select one that is based on a latitude nearest to your current latitude.
For latitude between 8 degree North and 8 degree South select the mask based on 0 degree latitude.
For latitude between 7 degree North and 23 degree North select the mask based on 15 degree latitude North.
For latitude between 7 degree South and 23 degree South select the mask based on 15 degree latitude South.
You can make all three masks as each can be easily fit into and removed from the device as you move to a location with a different latitude.
Make each mask with the CORRECT size and print it at the CENTER of an uncut A4 transparent sheet. Print the selected grid on a waterproof transparent film by a photocopier. If this cannot be done you may have to print the mask on an ordinary piece of paper, place a transparent film on top of it and trace the grid lines onto the waterproof transparent film using a pen with waterproof ink.
Step 3: Making the Slider


Figure 1: Photograph of an actual Slide Sky-Map constructed for the equator. Figure 2: Table of bright stars for the back side of the slider inner sleeve.
The slider consists of a white inner sleeve and a transparent outer sleeve tightly fit together.
Wrap a waterproof, white, thick sheet around the core (printed with maps) to make a white sleeve of no less than 360 degree along its East West direction (that is wrapping no less than two third of the length of the core map). The core should fit snugly inside the white sleeve and should be able to slide smoothly along its East West direction inside the white sleeve.
Cut a rectangular window on the front center of this white sleeve to reveal 180 degree width of the core map. You may like to add the table of bright stars (Fig. 2) to the (uncut) back side of the white sleeve to facilitate calling star names.
Choose the transparent sheet with the printed mask for your latitude. Cut it into the shape of a cross with 4 long arms extending from 4 sides of the transparent grid rectangle window. Each arm has its width equal to the size of the corresponding side of the adjoining window. Its North and South arms will be joined together to make a second, transparent sleeve fitting tightly outside the white sleeve, its long East and West arms will be slipped into the inside of the white, inner sleeve to anchor it on the white, inner sleeve. The East-West arms should protrude slightly out of the inner sleeve to make easy insertion of the sliding core into the white sleeve.
Wrap the transparent sheet tightly outside the inner sleeve and tape its North and South arms together to form a transparent sleeve with its grid right on the cut window of the inner sleeve. The East and West arms of the transparent sheet are slipped into the inside of the inner sleeve to lie along the East West direction underneath the white layer to anchor the transparent sheet on the white, inner sleeve.
In this way, each of the transparent outer sleeve can be fit into or removed from the inner sleeve as the user requires a new mask for his new latitude.
Step 4: Final Assemblage.


Figures 1&2: Front and back views of a Slide Sky-Map constructed for 15 degree South latitude.
Slip the core map into the inside of the cardboard sleeve. Make sure that it goes behind the two transparent arms inside the sleeve so that it can travel fully from East to West.
Step 5: Usage.
The sky at night is represented by the core map going toward its west under the transparent window (that is it goes from left to right under the viewing window).
1/- Check that the center cross of the grid is on the declination line corresponding to your required latitude.
2/- The four vertical lines for equinoxes and solstices are printed on the core map. Other date lines are interpolated from them.
Place the center of the sliding window on the current date to see the mid-night sky for the date.
3/- Then slide the core map by half a division (15 degree on the equator or half a month) to the east or to the west for every hour ahead of or after midnight.
4/- As the latitude for the grid not being exactly that of the observer and the true time at the location is not being equal to the zonal time the slide star map may not give very accurate values of elevation and azimuth angle for the stars within 30 degree of the zenith. However the lines joining these stars still give accurate directions and the stars help identifying other stars near the horizon. The stars near the horizon can be read from the Slide Sky-Map with more accurate values of azimuth and elevation angles.
Reference.
[1]. tonytran2015, Finding North and time by stars in the tropics, Instructables,
https://www.instructables.com/id/Finding-North-and-... posted on May 11, 2016.


