Introduction: Succulent Bed With Seating


For far too long most of our back yard has been a disaster zone! More than ten years of ‘indentured servitude’ AKA teaching high school, left me with barely enough time to keep the front yard looking half decent. The back yard was left to its own devices. Every year since my retirement I’ve taken on a fairly large and challenging project. Last year, I started tackling the backyard… a mammoth task not only due to its size but because it had been neglected for so long!
We happened to plant a fig grove (with a lone-ranger plum among them) in a spot that can be seen from the family room, through a large picture window. For several years this area used to be my pride and joy and you’d want to look out the window but it had been a while since that was a reality. So this year, I decided to take on the eyesore. The fig grove is on a slope. Not because we wanted it that way but because the previous owner had been trying to build a French drain (or something) and had piled up the excavated dirt into a huge mound that we were not inclined to undo and so it stayed pretty much ‘as is’ through all these years. The dirt got eaten up in certain areas due to nutrient/soil depletion as the trees were growing. So while it was still mainly a slope, there were large dips and pockets all over the place. I thought it might be a good idea to terrace the area and put down some groundcover. And since it was going to need a retainer of sorts, I figured I could incorporate some seating into the project.
Around the same time, I got hit by the succulent bug. Inspiration suddenly struck and I decided to make a two-layered succulent bed that would double as seating. I chose to make the front edge/face concave, rather than the standard convex that you tend to see on walls and raised beds; which I think are dictated by how most concrete retainer blocks are designed to be used. I’m not sure about this but it seems to be a bit of a chicken and egg issue… Are most blocks designed for convex walls because such walls are more common or are convex walls more common because that’s how most blocks are designed? Either way, using blocks designed for a convex wall in exactly the opposite way called for some creativity. So why not just flip the blocks? Flipping them would not work because the ones I had on hand were finished only on the wider side with fake flagstone veneer. And why make the outer edge concave, again? Because I wanted it to function as seating. Have you ever tried to have a conversation with someone while sitting on the outer edge of a circular (in other words, convex) seating wall? Not easy - not conducive to interaction.
Supplies
I have addressed this in the following three categories as a separate 'step':
Materials
Tools
Protective Gear
Step 1: Supplies With Explanation


Materials:
Base Rock Type I: This contains various sizes of crushed rock, from powdered to about an inch and a half. Whatever is not powdered rock, needs to have sharp edges. This is important because pieces of river rock (pebbles) are smooth with rounded edges. As such, they do not lock and bind together but roll around and slip past each other, resulting in an unstable base. Not only would you find yourself redoing the project sooner than you would like to but it could be a safety issue because if enough rock shifts from under the retaining blocks, they could topple over while sitting or stepping onto them.
Base Rock Type II: This contains mostly small pieces of rock and sand but no clay-like particles. A small portion of it may be crushed with sharp edges but the bulk of it has rounded edges. It will be used together with coarse sand, perlite, vermiculite, compost, and some of the original dirt to make a well-draining planting mix, perfect for succulents. You don’t want this base rock to compact. Why? Because then it would not be able to hold air and water (with dissolved nutrients) for the roots. Also, the roots would not be able to grow anyway, as trying to grow through compacted soil would be like attempting to grow through brick...
Concrete Sand: This is laid down over your type I base rock, directly under the retainer blocks. It is also part of the planting mix.
Scrap Flagstone: One could always buy large sheets of flagstone, and cut it (or have it cut) to the precise shapes/dimensions that you require (would like) for this project. But half the fun is in the challenge of finding a way to work with materials that are already around, which includes the form in which they exist. For me, there is nothing more rewarding than being able to use stuff that would otherwise have gone to waste!! And when we are speaking of materials that have come directly out of the earth, I feel we should savor every last morsel - or at least try to... The flagstone will be used both as cap-stones for the seating portion and to form the surface of the terraced area where they function somewhat like stepping stones between the succulent plantings. This area is not very different from a flagstone path/walkway - just one that is on the surface of a raised bed! Finally, one could also view the beds as very big, landscaped stairs.
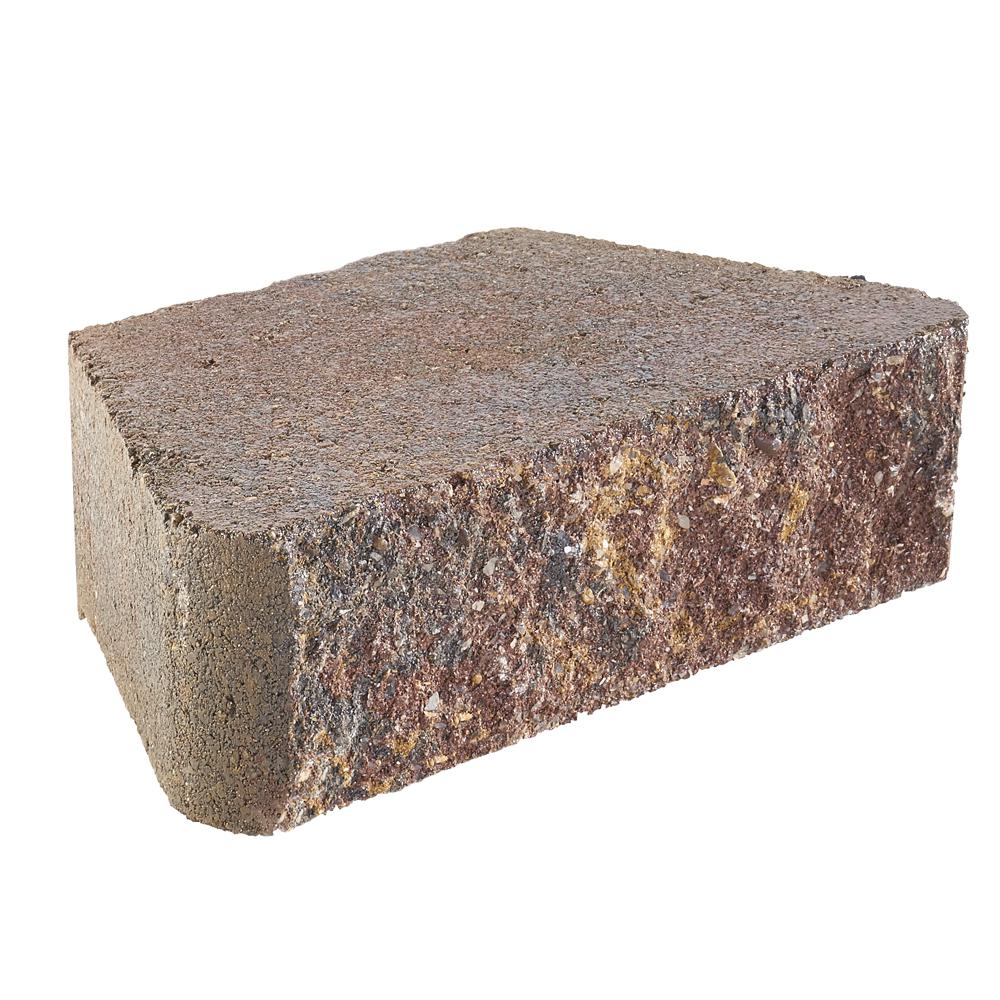
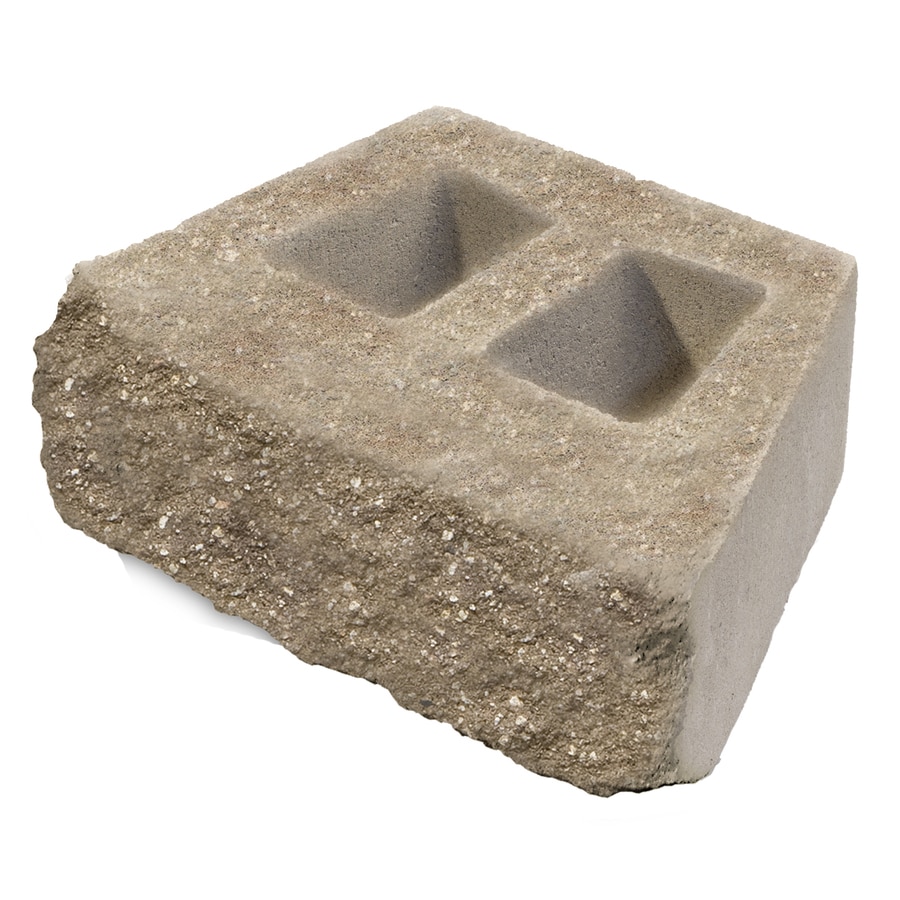
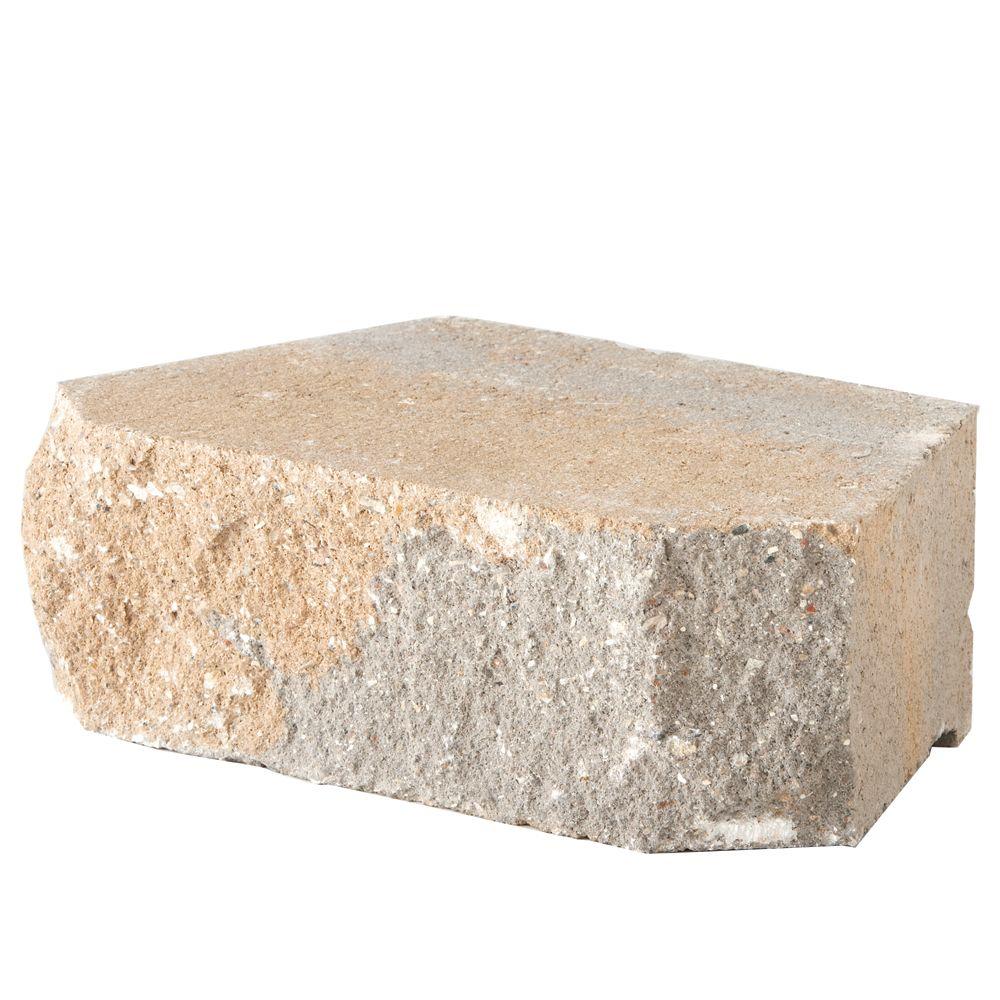
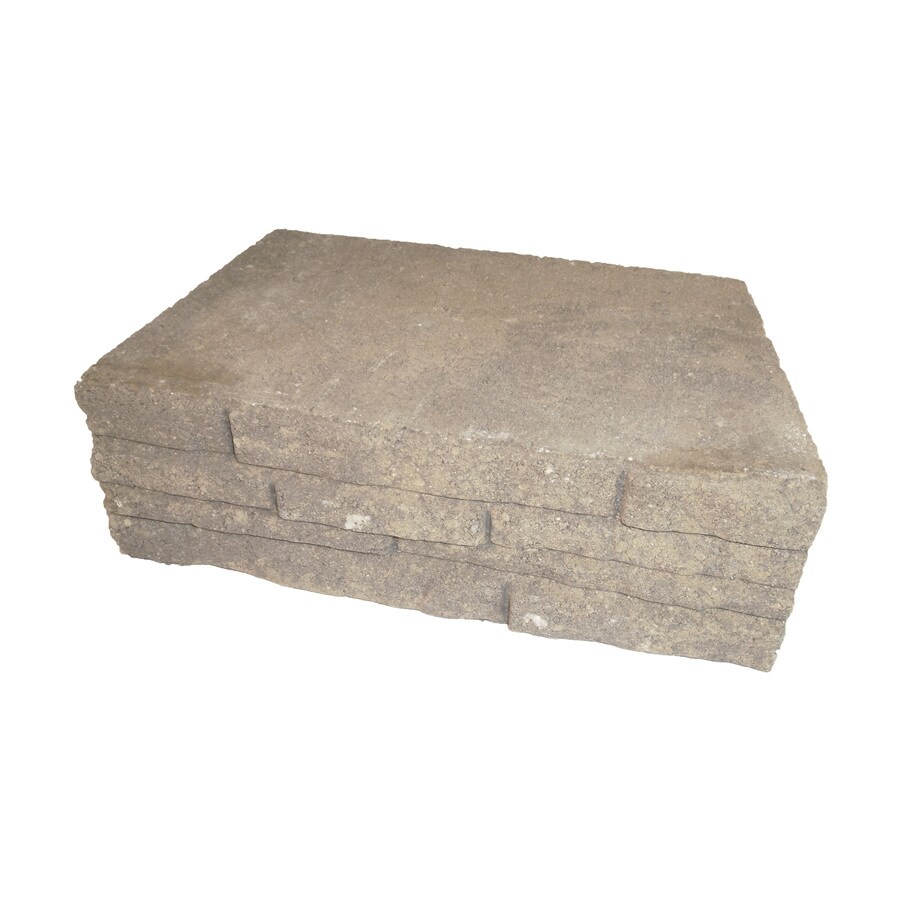
Concrete Retaining Wall Blocks: They are either cuboid or trapezoid. Some are solid while others have a (single or double) cavity. The least common blocks come with all sides finished/textured, giving you the widest range of use. Some might have two surfaces finished but most commonly, they have just one. The finish or texture might be made to look like it has been hewn out of rock and is known as Splitface or it could be made to look like dry stacked stone and is called Ledgewall.
Concrete Bricks: Used to create solid supports under the flagstone. Why specifically, concrete bricks? If you’ve noticed, terracotta bricks have slight irregularities in shape, size and surface texture. While these very properties are what make them attractive, they are not the best material for a stable, level foundation. Also, concrete bricks are made of concrete foam and are extremely easy to shape with hand tools, if needed. Terracotta bricks, on the other hand, are much denser and consequently a lot more difficult to shape.
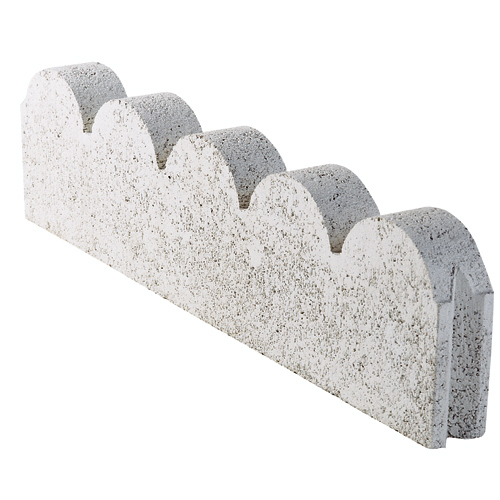
Concrete Scalloped Edging: To serve as dividers within the beds. They will help line the planting holes, especially in places where concrete bricks cannot fit. You want to create distinct little planters so that your planting mix doesn’t seep out from the planting pockets. They also help tie together long stretches of brick.
Outdoor Foam: Either open or closed cell. This is to make cushions for the seating area. You could have one continuous semicircular cushion or create individual cushions and just for fun, make them the same shape as the larger pieces of flagstone that cap the wall (capstones). These cushions can be covered with outdoor fabric like Sunbrella or the surface can be painted over directly. And if you want to have even for fun with the project, paint blown-up images of succulents on the cushions!
Perlite: This is a white naturally occurring inorganic material that is mined from the earth. We call these material minerals. It is chemically identical to sand (made up of silica) but physically very different in that it is highly porous. Its porosity is achieved by heating it to very high temperatures in a blast furnace until it pops much like popcorn! Being so porous, it can hold great amounts of air and water. Just like little reservoirs, they release water to the roots as they need it without the plants becoming waterlogged.
Vermiculite: This is somewhat similar to perlite in that it is made up of compounds related to silica, called silicates and is also produced by the heating of a mineral. It is also light, thus making the soil texture light and airy. Vermiculite holds a lot more water than perlite does so use it sparingly in planting mixes meant for succulents.
Compost: This could be homemade - it’s the best kind - or bought. It does not take very much place or time but I can appreciate that if your space is limited, the last thing you want is to have precious real estate occupied by a compost bin. (Compost piles only belong on acre lots or larger. They have their advantages and disadvantages which we won’t get into here.)
Succulents: Where you get yours from and the type that would thrive for you, will depend upon where you live. You might already have some in your yard or you could scrounge some of friends and neighbors. All you need to do in that case is take some cuttings. I’ve even seen them offered on Freecycle! My main sources were a brick and mortar store in San Carlos, California, called Succulent Gardens and an online store called Mountain Crest Gardens. Both places have an interesting variety of plants at fairly reasonable prices. I also bought a few from J&P while they were on sale - I would not have paid their full price!
Black Mulch: You can get this from any big box store or garden center. You can use whatever color you like but I think black makes the pastel colors of the succulents pop!
Tools:
Pick: For picking up dirt - just kidding! You'll need to do some leveling and removal of dirt. Before attempting to use the shovel on hard and compacted soil, it helps to first break it up with a pick.
Shovels: (both square and spade-shaped, if available): The spade helps with moving materials around and when you need to work in a confined area. The square shovel is great for simultaneous removal of dirt while leveling.
Pry bar: Helps if you have one, for quickly getting rid of roots that might be invading your space and for making fine adjustments to the position of your retainer blocks
Sledgehammer: For tamping down on wood to level the type I base rock, as well for nudging retainer blocks into position and to help with their final leveling
Rubber mallet: For adjusting their position and for leveling of the concrete bricks - which would crumble under a sledgehammer...
Regular hammer (carpenter’s type): To use with the Mason's chisel
Mason’s chisel: For shaping stone or concrete brick by chipping away at it with the help of a hammer
Spirit level: To check the level of your spirits... JK, you know what it's for!!
Old Flathead screwdriver: For creating little openings in the planting mix to help plant the succulents
Small (about 1 sq foot) flat, preferably square piece of wood for tamping down the base rock
Piece of cardboard, discarded fabric or an old pillow to dampen the impact of pounding down on retainer blocks and chipping away at flagstone or concrete bricks
Protective Gear:
Safety glasses: Because you only have one pair of eyes!
Leather gloves: So you can have more skin in the game!!
Dust mask: Since your lungs are not dust bags...
Step 2: Definition of Terms (Standard and As Used Here):


Depth = length measurement or distance between the two extremities of what is being measured (item or construction) in the direction away from you.
Depending upon the orientation of the item, it could be considered the ‘length’ (longer horizontal measurement) or the ‘breadth’ (shorter horizontal measurement). Some might also refer to this shorter measurement as the ‘width’ but I will reserve the term width to be used as functional.
Width = length measurement in the left-right direction as you are squarely facing the item or construction
Height = length measurement in the vertical direction
Concave = bulging inwards
Convex = bulging outwards
Blocks = Concrete Retaining Blocks (used to build the wall around bed)
Bricks = Concrete Bricks (used to create support/foundation under surface flagstone)
Capstones = those pieces of flagstone that are placed directly on top of the wall surrounding/defining the bed
Surface stones = those pieces of flagstone that are placed directly on top of solid support/foundation within the bed and visually define the planting holes
Substructure = solid support/foundation for the surface stones, made with concrete bricks as well as concrete scalloped edging on top of type I base rock
Step 3: Building the Wall


1) Use a spray can and draw, or lay an old hose down to mark the outer edge of your bed’s first/lower layer
2) Dig out about 3 to 4 inches of dirt in an area that goes a little beyond the depth of your blocks. Save this dirt as it will be amended and used in the planting holes.
3) Replace the dirt with Type I Base Rock (the one with jagged-edged pieces)
4) Spray lightly with water
5) Pound down
6) Check with a spirit level and either scrape off some base rock or add a little and check again. Repeat until level
7) Spread about ½ an inch to 1 inch of coarse AKA concrete sand over the base rock
8 a) If your retainer blocks are such that both sides are finished (makes life so much easier), then place the retainers with their narrow end outwards since we want to make a concave (bulging inwards) edge.
8 b) If, however, the blocks have only their wider ends finished (as mine did), then you have no choice but to place the wide end outwards. Place them such that there is about a cm between them to allow for expansion. You will end up with large V-shaped openings between them which will be filled with type I base rock
9) Check again, with a spirit level. If not satisfactory, then holding your sledgehammer vertically (with some cushioning directly on top of the area that needs to be lowered), gently pound down on any blocks that are higher than the rest. Note: You are NOT swinging the sledgehammer onto the blocks but rather lifting and pounding down on them in a vertical direction, using only your own body weight and that of the sledgehammer
10) I made my wall 6” high using two layers of 3” high blocks. If you are constructing your wall in two layers, then be sure to stagger the joints. This helps tie the two layers together. Otherwise, the wall can collapse.
Step 4: Next Steps...


At this point, you do the following - not necessarily in the exact same order:
1) Fill the entire bed with a few inches of base rock followed by planting mix up to the top
2) Place the capstones
3) Arrange surface stones over the planting mix, leaving openings for planting
4) Create a support structure under the surface stones
Of the steps listed above, it is really difficult to position the capstonesafterthe surface stones are in place - unless, of course, you designed the entire project in CAD and cut the pieces from whole sheets of flagstone on a CNC machine (seeing a LOT of such projects on Instructables these days…). Then every piece would be deliberately cut and laid down precisely at one shot in a very specific place. But how much fun do you really have, working this way? To make no mention of the material that would be wasted, dust generated and power consumed! Not to put down such projects, IMHO those techniques are just not relevant here! Besides, how many of us own or have access to a CNC machine? Now, if you were to do this kind of work for a living, especially in today’s world where efficiency is of utmost importance and time is money - then, I guess, it would make sense to go the ‘tech’ route...
But let’s assume that you’re a low-tech DIYer, like many of us and are using leftovers from some other project, which is the essence of this Ible! In that case, attempting to place the capstones later would force you to make cuts on practically every stone in order to get as continuous a concave edge as possible. Translation - it would be wise to do 2) before 3)
Further, as logical as it might seem to create the substructure that goes under the surface pieces ahead of time, one cannot go this route. For the simple reason that it is near impossible to predict exactly where the surface pieces will end up being placed - unless of course…… you know the rest! If you decide to create the substructure first, then you could potentially have situations where it is simultaneously surplus and encroaching into the certain planting areas, while being insufficient under the surface stones in other areas. So although it seems tricky - and it is - I think it is actually much better (and easier) to develop the layout of your surface stones first and then create the support system directly under. In other words, step 3) must be done before step 4). This means you will have to excavate the planting mix etc from directly under the surface stones to create their support system. Putting these together, it follows that it is best to do steps 2), 3), and 4) in order.
That leaves filling the bed with planting mix as the only somewhat flexible step. Since it is independent of, in that it is neither affected by nor does it affect the placement of your capstones, step 1) and step 2) are interchangeable. Step 1) just needs to be done before step 3) so that the surface stones have something to sit on when being positioned in level with the capstones. Now, if some of your capstones are large enough that they would need support beyond the top surface of the blocks, then step 1) would need to be at least partially done before step 2) so that you don’t have capstones that are teeter-tottering over the bed until they get some support under them.
Bottom line: I think it would make the most sense to actually do all the steps in said order: 1), 2), 3), then 4) and that is the order in which the steps will be presented here.
Step 5: Filling in the Bed

First, put down a couple of inches of base rock type II. This is to ensure that the bed drains well without the slightest possibility of becoming water-logged, especially when it rains. The actual planting mix that is specially designed for succulents, will go over this. At this point, you can fill the entire bed all the way to the top with the planting mix which consists of the following:
Base rock type II: Yes, you will use this in the planting mix as well. It will make up about a 3rd of the mix
Compost: This too, will comprise about a 3rd of the mix
The remaining 3rd of the mix will consist of the following 4 materials in decreasing order of volume.
Concrete sand: The same stuff that you used under the blocks
Perlite: Use a dust mask to avoid breathing in fine particles. Moisten, to keep the dust down
Vermiculite: Use a dust mask to avoid breathing in fine particles. Moisten, to keep the dust down
Original dirt: Which you removed to create a stable base for the wall
It is easier to mix your perlite, vermiculite, and compost (lighter materials) together first. Then add the concrete sand, original dirt and type II base rock in that order.
Once the bed is filled with planting mix, we can start working on placing the capstones that go directly over the retainer blocks. The planting mix will help support any extra-large capstones, part of which would otherwise have temporarily hung unsupported over the inside of the bed.
Step 6: Capping the Wall


This will serve as the main seating area.
1) Look for pieces of flagstone that are of more or less the same thickness and have one dimension that is a little more than the depth of the retainer blocks. The other dimensions can be anything. Try to find pieces of varied shapes.
2) Lay them down side by side on top of the blocks such that they fit together like a jigsaw puzzle. Don’t feel afraid to keep moving them around until you get a configuration that you really like. Sometimes it seems like you’ve almost got it but there’s one annoying piece that just does not fit and much as you want to avoid doing so, you end up rearranging the entire thing!
3) This is when you see the value of taking pics - tons of pics. Why?
a) You might find you’ve reached a dead-end and feel that something you had done earlier was really preferable. Instead of standing there, scratching your head, trying to remember what you had done - you can always go back to your pics and simply re-create it.
b) You can try out several different iterations and compare them side by side for the one that best pleases your eye.
c) You tend to notice some subtle little things almost immediately on a pic but they are not so apparent when looking at the construction itself. For this particular benefit, most of the time, you don’t have to actually take the pic but merely looking through the view-finder reveals them. Fixing those things can only enhance your project!
d) You could write an instructable... You already have the pics so why not? :)
4) Now imagine that you’ve exhausted all your options and are back to your ‘best possible’ arrangement, with that same small, annoying amount of material (referred to in #2. above). If removing it would make the edges fit perfectly together - and make you happy - then, remove it! But how?
With a chisel, dear Liza, dear Liza, dear Liza;
with a chisel, dear Liza; dear Liza - a chisel!
Just make sure it’s a masonry chisel, or you won’t get very far... other than ruining your carpenter’s chisel (sob!!) Oh, and a hammer as well!!
5) When you think you have the best fit you can possibly come up with, then slide them slightly apart, leaving about a cm to a half-inch gap between them. This will be your grout line. If you don’t have the patience to get such narrow gaps, then, by all means, go with wider grout lines. Whatever works for you!
6) Now, look at the exposed (front) edges of the capstones. If you need to ‘fix’ any of the edges, do so with your hammer and chisel. Details in the next step.
Step 7: Using a Mason’s Chisel and Hammer


The first thing you do before even thinking about chipping away at any rock is to don your safety glasses. Splash goggles are preferable as stone chips can sometimes fly off at unexpected angles and regular safety glasses might not be sufficient. You’ll want to protect your fingers from any hammer strikes that have a mind of their own… So leather gloves are a good idea! And since this process can get a little dusty - even though you keep moistening the stone (or brick) - you might want to wear a mask as well.
To Reshape a Piece of Flagstone:
Mark off what needs to be removed. A small, sharp stone works perfectly as a piece of chalk and the markings it makes don’t keep rubbing off while you're working.
Wet the stone and place it on top of something soft to absorb the mechanical shock of all that hammering and prevent unwanted cracks from developing. This is not standard practice but I think it makes sense and so I do it. An old pillow, discarded fabric, or foam will work just fine.
Position the chisel at one end of the mark such that the blade edge is at a slight angle to the stone and tap lightly with the hammer. You are using only one corner of the chisel, here. Keep moving the chisel along the mark while continuing to tap. Don’t be in a hurry or else the stone may crack where you don’t want it to. This happens because the stone has natural fractures (internal cracks) that develop while the stone is being formed during the geological process.
NOTE: Make sure the stone remains moist throughout this process. This is something I haven’t seen recommended anywhere but I’ve found that it helps immensely, not only to reduce the amount of dust produced during the process (well duh!) but by actually the chipping process. I feel that wetting the stone also makes it just a little easier on you.
To Fix the Edge on a Piece of Flagstone:
Sometimes, the piece that you have chosen had been cut halfway through on a tile saw and then split mechanically. So now you have an edge that is part smooth cut and part split-face (see pic). If exposed, it looks weird!!
To fix this, prop the stone on its edge with the one to be fixed facing upwards. Again, it should be on top of some shock-absorbing material.
Position the chisel such that the edge of the blade is perpendicular to the long edge, and the face of the blade (or the chisel itself) is between 30 and 45 deg to the edge.
Start at one end of the stone and keep gently chipping away. Focus on blurring the demarcation between the cut and split areas of the edge while roughing up the smooth cut portion.
Step 8: Covering the Surface and Creating Planting Pockets


When you are satisfied with the capstone layer, then start filling in pieces over the main surface, leaving openings for planting. Matching up the edges of the flagstone on this area should be easier since you can always create a planting pocket anywhere that you are having trouble finding a piece to fit.
Again, play around with the configuration of flagstone pieces and planting pockets until you like the way it looks.
Step 9: Creating the Base/Foundation/Support Under the Flagstone


Once you are satisfied with the arrangement of flagstone and the placement of your planting pockets, you need to work on creating supports under the areas that will be covered by flagstone - almost like the foundation of a house. Why do we need to do this? If the flagstone is not supported, it will slowly but surely sink into the planting mix. Over time, you will end up with an uneven surface, at best and flagstone pieces sticking out of the mix at strange angles, at worst. If it were merely a raised bed, then the aesthetics (or lack thereof) associated with sinking stones might be your only problem. But since this instructable involves creating a seating area, having an unsightly surface would be the least of your worries. These ‘beds’ also serve as large stairs (landings?) that are meant to be stepped on or walked over. Obviously, you - or anyone else - would only step directly onto the flagstone covered portions of the bed. So those would need to be on a secure and stable base that is capable of supporting the weight of an adult without wobbling or shifting.
So how do we do this?
1) Before proceeding, take a picture of the surface with all the flagstone arranged the way you would like it to be.
2) Work with small sections of flagstone at a time and place them nearby in the same configuration
3) Scoop out only the planting mix from this area and keep it aside to be used as needed in other places, for topping up, etc.
4) Now remove the Type II base rock (for drainage) that was under it and replace it with type I (the kind that compacts and forms a stable base). I know, I know, this seems like a lot of double or wasted work but it is the best way to go about getting the job done, unless/until someone comes up with a better idea - anyone? Yeah, you could design the entire thing in CAD... you know the rest!
5) Temporarily, put down two concrete bricks, one on top of the other. Estimate the height between the top surface of the upper brick and the top surface of the retainer blocks. That is the height to which you will be filling the area with (compacted) type I base rock.
6) Take the bricks out and fill the area with sufficient type I base rock to leave enough space above for your two layers of concrete bricks. Barely moisten the base rock and tamp it down with your block of wood and the sledgehammer. Check with a spirit level. Remove or add base rock as needed. This process may take longer than you think because you are trying to achieve a certain height of base rock and you want it to be compacted.
7) Try to eyeball exactly where the flagstone would be going down and place a couple of concrete bricks within that area. Angle them so that their edges will line up with the edges of the flagstone when placed over it. If you have some that are chipped, you could use them to your advantage at the corners. Otherwise, just don your safety glasses and dust mask, pick up your hammer and mason’s chisel and chip away. Check that the set of bricks are level with each other and adjust accordingly.
8) Use smaller pieces of concrete scalloped edging - with the scalloped side down - in areas where you need more support yet putting down another horizontal layer of bricks next to what you already have, would encroach too much into the planting space. Use the bigger or whole pieces (up to 2’ long) alongside back-to-back lengths of brick to tie them together and stabilize long stretches of flagstone.
While building supports under the flagstone, you are also lining your planting holes; creating individual little planters that will prevent your planting mix from seeping out.
Step 10: Planting Up the Planting Holes


This is the fun part!
At this point, you can top up (or if you work backwards, as I did, then fill) all the holes with planting mix
One more of my kinks is that I like to organize plants into themes by color and form. All those that have some pink go together, those with chartreuse go in another planting hole, the purples in yet another and a separate one for the reds/browns. And oh, there had to be one of mainly rosettes! You don’t have to do this, just do whatever floats your boat!
Step 11: Advice, Bloopers & Confessions (ABCs):

Advice: Take it sloooooow. Rome wasn’t built in a day and neither could your yard be - not unless you're lucky enough to have it crashed by Ahmed of the original ‘Yard Crashers’!! If you try to rush things or get so over-enthusiastic about a project that you can’t wait to see it done and push yourself to complete it, then the project might just push back at you… Ask me how I know! I was unable to complete the second layer. Had I exerted the least bit of patience, it would have been well underway by now. With what I learned from all the mistakes that I made on the first one, and the fact that it is to be smaller than the first, the second might actually have been fully completed by now. The first one took me two weeks but I’ve been out of commission for four… Right after hammering and chipping, and digging and shoveling, and lifting and moving concrete blocks, I launched right into more digging and shoveling to plant some roses that needed to go in ASAP! Then came back and continued working on the project. That might have been what broke the mule's arm… Four weeks of some very painful tendonitis later, my hope is that I’ve learned my lesson. But old habits die hard, don’t they? Oh well!
Bloopers: I bought succulents from three sources, two of which were online. We were expecting some unseasonal rain soon after, so I left them out in the open, in the middle of the yard in the hopes that they would get rained on. It did rain - barely - but a few days later, we had triple-digit temperatures and I forgot to bring the little babies into the shade. Within a day or two, they looked more appetizing than KFC and some did not recover… RIP!
Confession: Right after I built the front wall, I placed the capstones on it, which was okay. But at least one of them was big enough that it needed temporary support. I placed most of the surface stones in this manner, which took a LOT longer because I had to keep moving the supports or erecting new ones every time I decided to try a different configuration. That was not exactly the easiest thing to do - or the smartest way to work… Had I built the entire wall around the bed first and filled it with planting mix, I would have been able to move the surface stones around much more easily until I got the configuration that I was happy with. Do as I suggest, not as I did!
This is an entry in the Backyard Contest
Now put on your coat,
pick up your tote
and give this a vote... if you like it!
Step 12:
This is a postscript to the original project that I published about two years ago. This past summer I took the entire thing apart and reworked it, adding a layer. The reason I had to redo it from scratch and could not simply add a layer is that I expanded it very slightly and so I had to reconfigure the supports in the internal portion of the bed.
I do hope you like this new version. As you can see, the succulents have grown quite a bit - which was the reason I decided to expand it!

Second Prize in the
Backyard Contest


