

Introduction: The Ancient Game of Senet - 3D Printed


A little while ago, I became very interested with ancient games of Egypt and Mesopotamia and the like. I was fascinated by their simplicity yet seemingly unending complexity. This is where I discovered the ancient game of Senet. Senet is one of the oldest games ever discovered, dating back all the way to 3100 B.C. There is even evidence of it's use inscribed inside of the tomb of Tutankhamun, demonstrating its significance in ancient Egyptian society. After playing it for the first time and realizing how genuinely fun it is, I was enthralled. I felt compelled to bring this beautiful game back to life in the modern day and set out to make a board of my own. I'm sure this board will fit right in in my family's board game collection and will hopefully be played by everyone who wants to try it and will learn something about the wonderful world of ancient games in the process. I think that games are an essential part of human connection and am thrilled to provide a modern day, open-source example of such.
The Inspiration
When I set out to design my own board, I searched online for examples of Senet boards that others have made for inspiration. Although these boards were beautiful, they tended to remain faithful to the original stylings of Senet boards of the past. They were constructed out of wood, metal, precious material such as ivory, jade, gold, etc. and although I greatly respect their craftmanship, I felt that they were uninspired. So when designing my board, I set out to create something that feels much more modern while still being pleasing to the eye.
My Design
I am an avid fan of the"art deco" art style and wanted to design a board that reflected that. I found several designs online on places like Pinterest of art deco design schemes that I liked. I went through about 6 different versions of the board, each using different styles before deciding on a simple, square-based design. I knew I wanted to use gold as an accent color so my original idea was to use some of my silk gold PLA to create a "backdrop" however I chose against this as I believed it would be wasteful of materials and it would also limit what kinds of designs I could put on top of it.
Conclusion
I'm very excited to share this design as it's one of the largest things I have designed and printed myself. I believe it's a great piece of physical poetry, being one of the oldest games ever discovered being designed in a style from the 1940s, being built by a 3D printer. I hope that you enjoy building your own as much as I did.
I am a senior at Hopkins High School in Minnesota and proud to be apart of this student design contest!
Attachments
Supplies

Materials
~1kg(2.2lbs) Inland Marble White PLA Filament (any color works)
Gold Enamel Modelling Paint (any color works)
1x Very Fine Tip Paint Brush
200 Grit Sandpaper
800 Grit Sandpaper
SuperGlue/PLA Cement
Any FDM 3D Printer (I used an Ender 3 Pro)
Step 1: Print All Pieces

All Pieces:
Frame
1x Frame_A
1x Frame_B
Board
1x Board_A
1x Board_B
Side Panels
2x Side_Panel_A
4x Side_Panel_B
Doors
2x Side_Door
Game Pieces
5x Senet_Pieces
5x Senet_Die
If your printer is large enough to print these pieces in their full size (not split in 2), I have included versions of these files that have not been split in the step below.


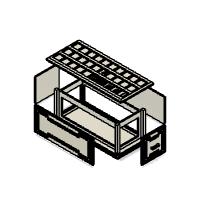
Step 2: Assembling Pieces

Assembling Pieces
Unfortunately, my printer does not host a large enough build plate to print these components whole which is why each piece is split in half. I have provided a diagram of how each of the pieces should be arranged to be glued together above. Do note that the surfaces of each piece where they are to be glued may not be entirely flat depending on how successfully they printed. As such, I recommend sanding the surfaces with a low grit sandpaper until they are roughly uniform before taking a higher grit sandpaper to finish the surfaces and prep for glue.
If your printer is large enough to print these pieces in their full size (not split in 2), I have included versions of these files that have not been split below.
(skip this step if you print them whole)


Step 3: Painting

Painting
I chose to use gold in my build however you may choose just about any color you have on hand. I used a very fine tip brush to work the paint into the tiny cracks of this build. Note that there's a very high chance that paint will end up on the surface of the piece instead of inside the crevices however this is easily fixable. First, wait for the paint on top of the piece to dry, then take a high grit sandpaper to the surface until the paint has been removed. Make sure to blow out any plastic dust to prevent it from sticking to the inside paint. Also, paint each of the game pieces however you wish, however, when it comes to the die, paint only the numbers 1, 4 and 6.
I have also found that placing a large dab of paint inside the cracks then "rolling" the bead around also works but is tricky. This step is by far the most finicky and I recommend going with whatever you have found to work.
Step 4: Final Assembly

Final Assembly
First, glue the 2 side panels that you assembled earlier onto the main frame (that should also already be assembled) as shown in the diagram above. Then, place a dab of glue onto the 4 "pillars" that rise slightly above the rest of the frame. Then slide on the already assembled board onto these pillars until it is snug and flush with the top of the frame. Note that these pillars might not be perfectly sized to fit into the board holes. They can be shaved down with a box cutter, sandpaper, Dremel, etc.; whatever works for you.
Do NOT glue the two side doors onto the frame. They are meant to be removable to allow for storage of the game pieces when not in use. If you wish to, you can glue one of them down and leave the opposite one removable.
Step 5: Rules of Play

Now that your board is finished, you need to know how to play! Note that the instructions listed below are simply the most commonly accepted rules of play and that there are several different versions of these rules as well as several different house rules that can be played at your own discretion. Senet is an ancient game and its rules are difficult to determine as there is no clear, single artifact detailing them. These rules have been constructed by modern-day historians to describe how the game might have been played based off of hundreds of snippets spanning thousands of years. Please do not treat these as law and instead, play the game however you seem fit.
Setup
Set up the board by placing all of the game pieces along the top row (the one opposite of the symbols) in alternating order. It does not matter which type is placed first. There should be 5 pieces belonging to either player. However, this number is not crucial to the function of the game and in fact, the game can still be played and won with only 1 of each type of piece on the board. How many pieces are on the board is up to the discretion of the players. Generally speaking, games with fewer pieces go by faster and vice-versa.
Winning
A match of Senet is won by one player getting all of their pieces off of the board; it is the job of the other player to stop this from happening. A match cannot be won otherwise. There are no ties and no draws.
Turns
Each turn, the die is rolled. The player who rolled the die will then move one piece of their choosing ahead to the right according to the number shown. If a move cannot be made with the given number, the turn is forfeited and the other player's turn has begun. If a play can be made with the given number, the player who rolled said number is forced to make a move, AKA, there is no "opting out" of a move. The number rolled cannot be split between two pieces. Note that when rolling the die, if a player lands on a 1, 4 or 6 (marked in gold), the player is then able to roll once again after finishing their turn. All of the game pieces move from row to row down to the bottom right corner in a "snake-like" or "s-shaped" fashion meaning that the direction of play reverses in the middle row before reverting to the original direction in the final row.
Piece Interactions
If a number is rolled that will result in a given piece ending up in the same square as an enemy piece, the two pieces swap places. This is called "taking". Players are also permitted to "jump" or "pass" over another player's game piece. However, there are limits to these two abilities. If a player has two of their game pieces arranged in a row, the enemy piece is not able to take either of them but is still able to pass. If a player has three of their pieces arranged in a row, the enemy is not permitted to take OR pass any of them. Note that for both of these conditions, a "chain" of pieces is broken if it passes around a corner. Eg. If a chain of three is split around a corner with one piece on a lower row than the rest, that last piece may be taken or passed while the first two act as a standard chain of two and cannot be taken.
Special Tiles
The first special tile is titled the House of Life and contains an Ankh symbol. This is a safe spot, any piece landing here cannot be taken but may still be passed. The next special tile, containing three instruments, is also a safe spot. Next, the House of Water, containing three waves, flings the given game piece back to the House of Life when landed upon. If a piece is already occupying the House of Life, the flung piece takes the tile nearest behind the House of Life. The next 3 special tiles are the numbered tiles in which one MUST roll the inscribed number in order to exit the board and score with that piece. III must roll a three, II must roll a two and I must roll a one.
With this, you are now ready to play Senet!

Participated in the
Game Design: Student Design Challenge


