Introduction: The Paracord Stubbie Holder


Here in "The Land Downunder" we do things often in different ways than the rest of the world.
So why not try it with a way to store huge amounts of paracord with a tangle free and fast release system?
A Stubbie Holder is what we here use to keep our cold drinks cold - or better we pretend as usually they won't last enough to really get warm.
Modern desings come in all sorts of materials, some even claim to keep your beer cold for over an hour.
Of course my only intention is to have some additional Paracord at hand when I really need it.
The finnished piece won't really take much space, tolerate abuse and adds that special "Downunder" feeling to your drink.
The best part however is that you store as much Paracord as you like this way and you will never have to feed the long end through any loop for hundreds of times.
So let me ask you:
Did you every wanted to make your own Stubbie Holder from Paracord?
Are you always looking for new ways to store more than 30m of Paracord in a special way?
Do you have too much free time and far too much Paracord?
Ever wanted to make that special gift for your beer drinking buddy that actually has a purpose?
Tired of the usual knots and stitching with a fid only?
If you can say YES to one or more you have to continue reading.
For everyone else: Come on, give me a break here, I am really trying here to make it interesting you know? ;)
Step 1: Doing It Like Gandma Did....
If you ever took these dreaded classes in school that teach you how to use yarn one way or the other than you might remember Crochet...
Yes, that's right I am talking about using a hook the same way we did in school to make drink casters or a scarf.
Just that I use a latched hook and paracord.
You might know me already a little bit and expect that I am a bit lazy if I can avoid repeating what other people can explain much better, so...
Please check the Ibles about the topic first ;)
Instructables has very good Ibles explaining all the details you need, which saves me the time to do it again.
Plus you can use them as a very good reference for your own designs in Paracord.
The things we do different compared to the normal crochet work are basically just this:
The cord just runs free and not around your fingers as it is quite thick and the right tension is not a matter of having this tension when pulling the loops ;)
The hook could be a normal Crochet one I guess but I had a hard time finding one in this size.
Plus having the latch makes things much easier IMHO.
You need to stretch and straighten your work every now and then as it tends to twist if you don't alternate the loop pattern.
Thats it, very easy, really....
Step 2: How It All Started
Assuming you did check some of the great Ibles out there we can now jump right into using this knowledge.
The tools are what you might expect:
# Paracord fid - to open some loops if too tight, you could do without it
# Latching hook needle - you will need one to fit the cord properly
# Losts of paracord, for the stubbie holder at least 30m, 50m if you add a bottom and some sorts of handle
Here is an image of my first attempts that I did not like at all:
I tried some different stitches and ways to change the pattern but did not like how it developed.
As this way of making wrist band or similar allows to work with an endless cord I thought it would be better to fix the length required first before adding the amount of cord I need.
Too bad I only realised after wasting a few hours of trying different things without paying attion to the size LOL
The next thing I noticed that a "wrist band" that wide needs to be adjusted to fit where the arm gets a bit thicker...
Considerations:
Making a wrist band to store huge amounts of cord means you either need to go wide or you need to go thick.
I did not like thick as a double layer of paracord as used with crochet seems to be thick enough already.
The first attempt showed that for my wrist I would need to go about 7-9 loops wide.
But getting a nice start and finnish to match a standard shackle or clip is a different story.
So I left a bit of cord at the start to allow me the use for the connection once the band is complete.
This way it is possible to match the lenght for the wrist while adding as much cord as needed.
You might have guessed so already, unless you also require a bow for hunting your dinner a wrist band or in this case arm band is just too big to run around with.
If you follow below instructions and want to use this as an actual wrist band you should only use 6- 8 air loops.
With this the band won't go too wide and you can store 15-20 depending on wrist size.
Let's try it...
Starting with some air loops I create a chain that is just a bit too short to fit my wrist with the added connector.
In my case 12 air loops plus one extra to start the next row.
This left a gap of about 2cm when around my wrist, which will be used up by the added thickness during the making of the band.
If not completely then it won't matter as we make the connection once the band is finnished.
Keep in mind we fix this once the band is finnished with the leftover cord from the start and the last bits of the length towards the end.
The air loops can be done with the fingers quite quickly but once the first row is done we definately need the latching hook.
For your first band I suggest to stick to the same simple and basic loop type that you found to be best from the Crochet Instructables.
I did not care too much and experiment along the way by changing how I go into the existing loops.
Sometimes I push the hoock through from underneath, the next row I push through from the top.
And depending on the mood I might even switch between the top and bottom loops of the previous row just to make it look different.
Does not really matter as long as you make sure the long end of the cord that you use is always fed so it is on the correct side of the loop you made.
For example if you go from left to right you want the end on the right side of loop so it won't be required to force its way around the long end when you pull.
I tried to take a video of the start of the second row, the one after the air loops, till the end of the third row.
Turns out to be quite hard to record this in a way that you can properly see what I do :(
But if it is not detailed enough I again suggest to check how the crochet stuff is done with yarn and standard crochet hooks.
Had to make a second video after my cat knocked my camera stand over LOL
It really helps a lot to work with only little tension as you need to feed two lines (a loop) through the loops of the previous row, or the air loops when you start.
If you watch the above video very carfully you can see how I "cheat" to get the correct tension to make the band strong without struggling to feed the loops through with the hook.
I leave the existing loop on the hook quite big - this gives me room to work.
When I pull the cord through the loop of the previous row I twist the hook to align the loop already on the hook with the loop of the previous row - this leaves just enough room in the webbing to work with.
If in doubt keep it loose for your first attempt to get a feeling how big the loops need to be for easy work.
Once the new loop is through I pull the loop already on the hook again if required to make sure it is a nice match.
You will get a feeling for it really quick and after a few rows you don't even think about what you do anymore.
As with the normal crochet we also need one additional air loop at the end of each row.
I sometimes won't do this air loop but instead go through some previous loop segment of the outside to get an easier way for the unwrapping - unless look is very important it only counts that it is straight ;)
Pay attention along the way as it is quite easy to forget or to even add another loop.
Sad thing is that you only really see the mistake a few rows later when the thing becomes longer or shorter.
If in doubt count the loops before you start a new row - trust me I failed often enough ;)
The one thing that is really different compared to working with yarn is that whatever you create becomes really stiff and rigid.
There is no need to pull hard or make really tight loops, once you have a few rows finnished it will be sturdy enough.
Using up 30m this way goes quite quick compared to standard paracord quick release bands but don't be fooled to think it will be faster!
Some fancy, old style bands can take several hours to finnish, using a hook and more than 3 times the length can fill your evening watching a movie while doing it.
But as with our grandmothers: Do it often enough and you won't even look at your hands anymore.
And for obvious reasons you want to finnish the band on the opposite end from where you started.
Otherwise you have two cord ends on opposite sides of the finnished stubbie holder.
You need the extra from the start to attach the shackle or connector and same story for the other side - if in doubt add another row to get there.
Main reason for me leaving that much cord at the start was to have enough options to finnish.
With my extra wide band I wanted to store at least 30m of paracord in a neat way.
Turns out it makes a nice pad to keep your pots warm if you make a square with 12 or 13 air loops at the start.
Depending on how tight you do the loops for pretty much extactly 30m you would use around 15 loops for a loose design allowing very easy deployment.
At this stage I needed a break and decided on a cold beer - which give me the idea of the Stubbie Holder.
Step 3: Ok, Let's Finally Do the Stubbie Holder
We start the same way as in the previous step by making a bunch of air loops.
Anything from 12 - 15 is fine for cans, for bottles you can do more to fully cover the straight length of your favourite drink.
And as before we keep adding row after row.
Did I mention to add more rows already? ;)
Trust me, it will take some time to get around a can or bottle with a hook and paracord but well worth to try.
Here is a picture of the thing after 25m of paracord and 13 air loops for the start to cover the right height on the can.
Second pic is from the backside.
I did not bother yet to strech the webbing to get it even.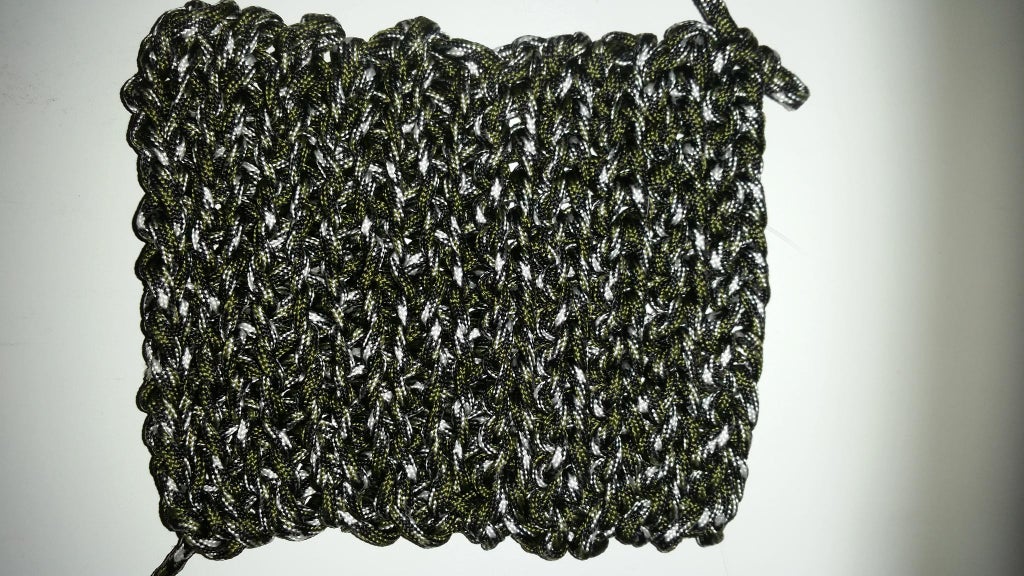

At this point I will make a fast forward here and continue row after row without paying too much attention on keeping a consistant loop pattern from one row to the next - I go along as I feel it ;)
Unless you desire a nice pattern on top of the huge storage of Paracord it really does not matter too much how you do the rows as long as you stick to the same width.
I did not include a bottom for the Stubbie Holder at this stage but this will be added later to get 50m of cord used up.
I advise against it for backpack use because it makes folding it flat a bit of a pain.
To avoit the bottom while getting 50m try to use a drink bottle instead as they are higher than cans.
For you a split second to read on, for me several hours later....
I am now able to get the thing around a beer can with just a little gap.
A slightly larger gap won't matter you can stretch the design quite a bit if you must.
A really good fit will be made if the gap is slightly over 1cm - or the "width" of one row.
If you kept your loops quite loose go for 2cm so your drink won't fall out unintentionally.
The problem I faced now was that I did have a lot of cord stored already but as it was going so nice....
I continued by making a few rows on the later inside to add a bottom in an attempt to get closer to the 50m mark now.
There will still be too much left when done so I figure something out to add a handle for the rest.


As you can see above I just added a few rows sideways to form a little bottom for the holder.
Ok, time to close the thing up and move on.
I did not make the last loop on the bottom as, when rolled together, this gap is required for the finnish to get the other side to fit in.
Right now the end of the cord is on the inside but it come up when going through a loop of of the other side to close the bottom.
After that it continues in the same way to get the cord up to the top where we have the leftover from the start.
Not sure how good I will get it to show in the video but I will give my best.
You can see I struggled a bit with getting the loops right and having the cord on the outside, but it was a quick and easy fix so I left it in the video.
Now that we are up on the top it would be possible to cut and hide the ends to finnish off.
But to get to 50m I decided to add a simple handle to somehow use up the remaining parts.
Here I say to use your phantasy a bit if you end up with a lot more or just a little of paracord.
I tried a simple wrap, some simple "quick release" knots used for wrist bands and even just the remains braided like a rope and then secured at the lower end of the stubbie holder.
It all depends with how much excess at the start and how much leftovers you work with.
In my case I had a bit more than twice the length left over than what I had for the start.
And well, if the 50m target is not that important you can always end here.
Here is how I finnished it off:


I just made one and a half loop with the leftovers from the start and used the same "stitching" as the air loops when we started.
Only difference is that I fed the loose end around every second loop to wrap the leftovers.
Two loops through the previous webbing secure the end, with a lighter the end could now be fixed in place but that makes the unwrapping quite hard, so I left it this way.
Since I did not feel the right mood to unwrap 50m of paracord just to start all over again I make a small coaster type thingy to show how easy it releases without causing a tangled cord.
Step 4: Releasing the Cord
Just a quick one to show how the cord comes off without tangling or curling up.
The only way to make it curl up is during the making.
If the cord is fed straight and without twists then it comes off the same way.
Just the bends from the loops stay in the cord until you put some tension on it.
In this little coaster I stored around 20m or cord and it releases the same way as the stubbie holder.
You can literally fix the short end somewhere, grab the other end of the cord and keep walking until it is all unwrapped.
In case you only need a certain amount you can either cut it off or make a quick loop through the last open one to fix the rest in place without further unwrapping.


