Introduction: The Walking Dead Intro Knife
This project combine the two things that I enjoy the most: knifemaking and aluminum casting.
Step 1: Where to Start
In this video I make the knife from start to finish, I suggest you to watch it first: most steps are self explaining!
Step 2: The Blade
Trace the blade template on a piece suitable steel stock: I used 1070 high carbon steel 5mm thick since is easy to heat treat like most high carbon steel.
Cut the knife black with watever you have aveiable. I have a metal cutting bandsaw so of course I use that but any angle grinder with a cut off wheel or even an old hacksaw can do the job.
Drill some hole in the tang to reduece the weight and most importantly to give something at the aluminum to hold to later on.
You can find the template attatched here for free, I made it on cad following reference image found on Google.
Step 3: Grind Time
Tune up the shape of the blank and grind the bevels. Mark lines to help you out get consistent grinds.
If you don't have a belt grinder this can be done even with a regular bastard file and a file jig, there are many tutorial about making one.
Step 4: Hardening
The heat treatment will vary depending on the steel you are using, for high carbon steel like the one I use you just need to let the steel heat up over the curie temperature and quench the blade in oil. I used vegetable oil and a magnet to check the steel temperature.
Step 5: Shaping Foam for the Aluminum Handle
Using the template cut and shape the high density foam for the handle.
Then slice it in half and make a slot for the blade tang, I've used a broken hacksaw heated with a blow torch for that.
Step 6: Aluminum Casting
Combine the two parts already done and bury them under casting sand. Mine is an oil based clay, but there are also diy sand called "green sand" that work the same way.
Leave a piece of foam uncovered to pour the molten aluminum.
Step 7: Finishing
Temper the blade by heating it to 200°C for 1 hour. That might seem like a short tempering process but some of the hardness must already have been taken off by the molten aluminum at over 700°C.
Take away the sprue and start refining the aluminum with files and sandpaper. For extra shine butt if on the wheel when you reach at least 600grit with the sandpaper. On the blade I polished only the bevels, I left the other parts with scales from the hardening for estetic reason.
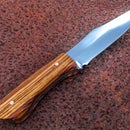
Step 8: Walking Dead Approved!
Feel free to ask me anything, this is my first instructables article so I might have missed some important stuff that I don't know about. Thank you for reading through the end :)

Third Prize in the
Survival Ready Contest

Participated in the
Halloween Props Contest 2016
22 Comments
6 years ago
Cast Aluminum can be very brittle, did you find that tempering the blade and handle together lowered the brittleness of the handle? Was that Borox that you put in the melted Aluminum?
Reply 6 years ago
Cast aluminum isn't brittle, work hardening makes it brittle.
6 years ago
I absolutely love this! Great design!
Reply 6 years ago
Thank you mate! :)
6 years ago
excellent instructable and i really appreciate the template design for download, plan to make a couple in brass, recycle a bit of rifle brass for it.
Reply 6 years ago
That's great! :) thank you! sorry i reply only now, I must have missed this comment. Have nice holidays :)
6 years ago
Great job for your first 'ible!
Reply 6 years ago
Thank you mate! :D
6 years ago
ok... sooooooooo this is awesome. you combined many 'ibles into one... and this is your first one?! showoff!
But this is excellent....like really really excellent.
As far as instructables go... I know ill get some backlash for this, but add more details... steps....and pictures, even the mundane ones. I find MORE info is better. I have a couple of instructables up...and there is WAY to much detail. I try to approach these as if I were teaching someone who has NO idea about what things are....the more veteran of the group will fly over the mundane details but the beginners will appreciate the details.
cheers!
Reply 6 years ago
Haha! Thank you sir! :) I really appreciate your kind words! You are right, those who never saw any other aluminum casting and knifemaking video won't understand much from this article probably :( The main reason I didn't added many extra information is that I didn't wanted to overcomplicate this and also because I struggle a bit trying to explain myself well in written english :'D But I should definitely add a "more info" paragraph to every step! Thank you again for the suggestion, I will keep your point it mind to improve my articles :)
6 years ago
This is awesome! I have questions about casting the handle though. Did you leave the styrofoam in the mold when you poured the aluminum? I would guess the styrofoam would just evaporate. But does that cause any risk of melted aluminum blowing out of the mold? Thanks.
Reply 6 years ago
Thanks! You are right, this is called "lost foam" casting method, the molten aluminum replace foam. By doing stuff this way there are many things that can go wrong, when I cast with foam I have a success rate of 50% more or less :'D Making a proper 2 or more part mold gives much cleaner result but in some application it is not really easy. This project was perfect for foam because I was able do carve the handle really easily :)
6 years ago
that is one sick knife m8 plz make more survival kit things and that no ordinary people can do it only blacksmiths or a person who are good at using metals
Reply 6 years ago
Haha! Thank you mate :)
6 years ago
You did a fantastic job. Thanks for sharing and welcome to the instructables community
Reply 6 years ago
Thank you a lot! :)
6 years ago
I've build home made knifes myself and I know what it takes. You've done a great job on yours for sure. Nice cast handle as well. Only thing I would say is you should have polished off the black marking material off the blade to give it a super shine. Other then that, absolutely great. Thumbs Up!
Reply 6 years ago
Thank you sir! :) I didn't polish all the knife because I was worried it was going to be too shiny, like if it would have looked like a one solid piece of shiny stuff. I know I'm not explaining myself well :'D Thank you again for the kind comment!
6 years ago
Nice instructable. It's good to see you on here as well as youtube!
Reply 6 years ago
Thanks! :D I always wanted to make instructables articles of my projects so I can explain a bit better what I do. Hopefully with time I'll have one for each :)