

Introduction: To Get Start With STM32 Black Pill and STM Cube IDE to Blink External Connected LED Using HAL Programming.


Welcome to the tutorial of STM32CubeIDE to control the on-board LED of the STM32 Black Pill microcontroller. This guide is crafted to provide professionals with a clear walkthrough for engaging the LED, demonstrating the STM32 Black Pill's functionalities and the versatility of STM32CubeIDE. As we explore the essentials of embedded development, you will learn to configure your environment, understand the Black Pill's hardware specifics, and write effective code to manage the LED.
Supplies
To start with the embedded programming, the following equipment and software installations are essential:
1. A laptop or desktop computer equipped with STM32CubeIDE and STM32CubeProgrammer.
2. An STM32 Black Pill development board.
3. A compatible USB cable for connection and programming purposes.
Step 1: Open STM32CubeIDE

GOTO---->> File>New>STM32 Project
Step 2:
Step 2: ADD Configurations ToYour STM32Board
Search For Component- STM32F401CEY6TR

Step 3:
Step 3: Configuration of Stm32 Bord
Configure Your Board As Shown
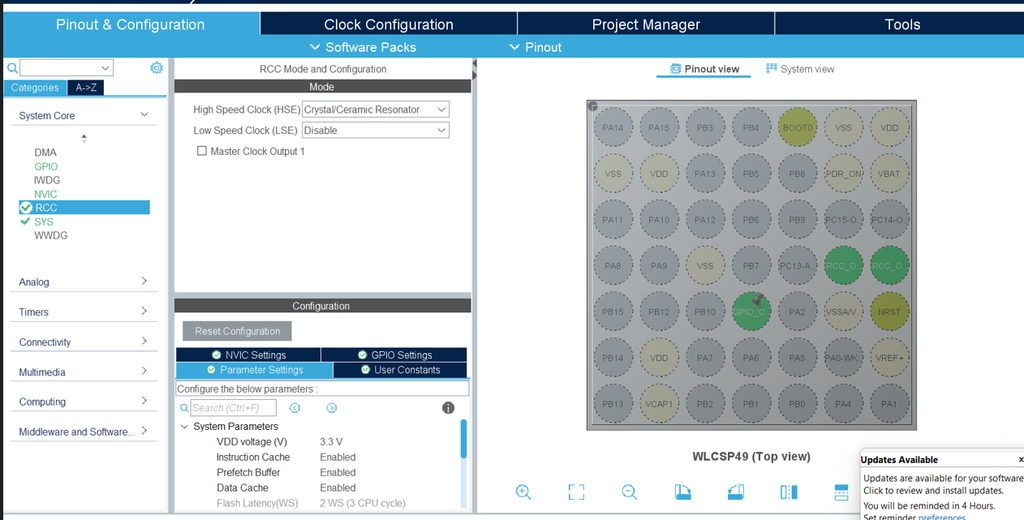
Step 4:
Step 4: Configure Your Clock

Configure your clock as shown
Step 5:
Step 5: Open Main.c File
GOTO--->>>>Project and find main.c file

Step 6:
Step 6: Goto While(1) in Main() and Add Your Code
HAL_GPIO_WritePin(GPIOC, GPIO_PIN_13, 1);
HAL_Delay(500);
HAL_GPIO_WritePin(GPIOC, GPIO_PIN_13, 0);
HAL_Delay(500);
Step 7:
Step 7: Debug
Open and Click On Debug(1)

Step 8:
Step 8: Copy Path of .elf File Generated
Right click on Project and click on show in system explorer and copy the path

Step 9:
Step 9: Open STMCubeProgrammer and Connect your STM32Board Via USB

Step 10:
Step 10: Click on Open File and Paste the Copied Path

Step 11:
Step 11: Go to Download Options (Found in Toolbar on the Left)

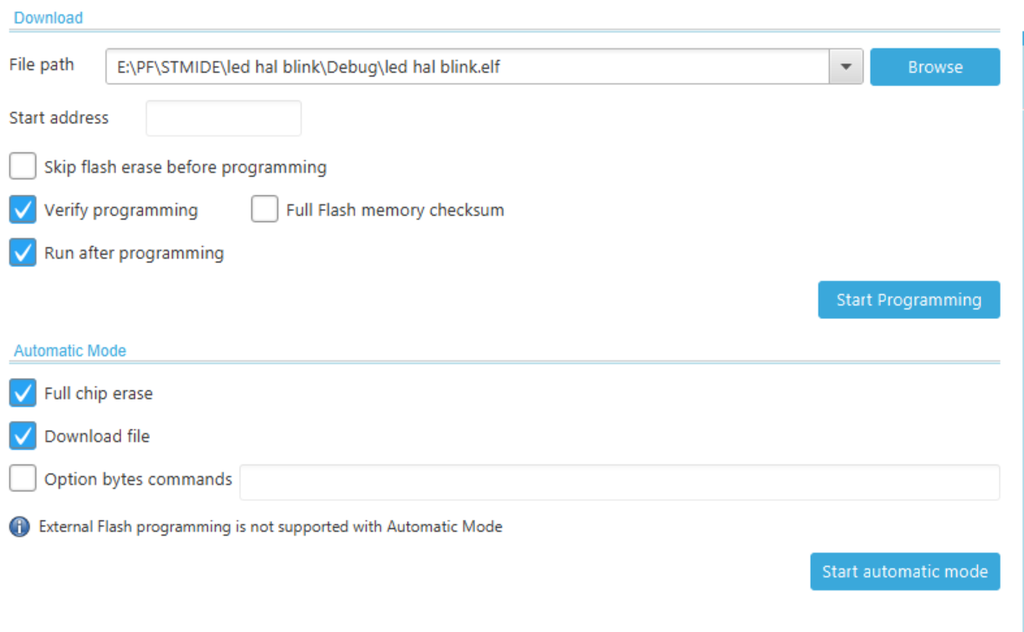
Step 12:
Step 12: Change Download Options and Click on "Start Automatic Mode"
Step 13:
Step 13:Results


![Tim's Mechanical Spider Leg [LU9685-20CU]](https://content.instructables.com/FFB/5R4I/LVKZ6G6R/FFB5R4ILVKZ6G6R.png?auto=webp&crop=1.2%3A1&frame=1&width=306)


