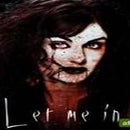
Introduction: Turn Your Photos Into Super Scary Halloween Masterpieces!
Halloween can be so much fun! All the kids run around dressed up, so why not dress up your profile pictures to a scary halloween masterpiece and join in on the excitement?? With a little knowledge of public photo editing sites, a computer, and a camera, you too can enjoy photo manipulation! Picnik.com is a photo editing site avaliable for both free and subscription use. Though you can make quality photos using a free account (or sign in as a guest), I chose to upgrade for a few additional features.
Step 1: Upload Your Photo
Click on Upload on the left-hand side to choose your photo. Opt for one with desireable angles. The face has a lot of room for intensity, as you can make the eyes more dramatic. Choosing a shot which accents the face is the easiest way for a new photo editor to start. To upload, simply go through your files and select your photo. Click "Go" or "Upload", and just wait for the magic to start!
Step 2: Fix Exposure
Step 3: Visit the "Featured" Tab
Because Halloween is coming up, scary effects can be found in the "feautred" tab. (NOTE: If halloween is over, never fear! Simply click on "Seasonal" instead and find the halloween option.) To get started, and to inspire yourself, start with the eyes. EYES ARE EVERYTHING! The more intense the eyes are, the more intense the picture is. You want intense pictures to give people that "feeling" in their chest. You want your picture to be FELT, not seen. Vampire Eyes Effect is a mask that goes over the eyes, and can be faded in and out to adjust intensity. Simply position the circle over the iris (the circle size can be changed on the right hand side under the effect) and click. If you mess up, "Undo" can be found in the upper left-hand side. :) Next, Vampirascope can be used to make the picture look like a vampire movie. This effect really helps if the person in the photo has an uneven skin tone.
Experiment! Use blood stains, wounds, etc to make your picture as scary as possible. When you're done, revisit VAMPIRASCOPE to make everything look real. make sure you fade it out quite a bit so you don't "Overdo" it.
Step 4: Add a Scary Texture
Add in a scary texture and fade it over your image to create an eerie graveyard feel. It makes the viewer feel like someone is watching them-secretly-which is ALWAYS scary. Textures can be found under Seasonal, Featured, or Effects depending on what type you are wanting.


