Introduction: Using Ultrasonic Distance Sensor and Serial Monitor Output.
Hey guys! Want to learn how to use a serial monitor output. Well here you've got the perfect tutorial on how to do so! In this instructable, I will guide you through the simple steps needed to detect the distance using ultrasonic sensor and report it on the serial monitor.
Step 1: Step 1: Downloading the Arduino IDE
Download and Install the Arduino IDE (Interactive Development Environment) using the link below:
https://www.arduino.cc/en/Main/Software Choose and save the version that best suits your operating system and configuration.
Step 2: Step 2: Hardware Materials
- 1 Arduino board
- 1 breadboard
- 1 Ultrasonic sensor
- Jumper wires
- Resistors
Step 3: Step 3: Building the Hardware
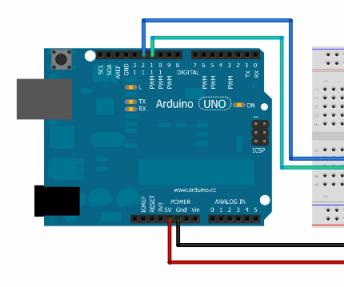
1) Add the ultrasonic sensor to the breadboard. There are 4 pins in the ultrasonic sensor. They are Vcc (5V power supply), Trig (Trigger), Echo, Gnd (Groud). Connect Vcc to 5V power supply, Gnd to Ground, Echo to pin 13, Trigger to pin 11 with jumper wires and resistors shown in the diagram.
2) Above picture shows how the connections should look like.
Step 4: Step 4: Downloading and Running the Program
Download the attached arduino program to your laptop. Connect the arduino to your laptop, and run the program.
In the arduino IDE, Open Tools->serial monitor Place an onstacle close and far from the ultrasonic sensor. Observe the output in serial monitor. This should show the distance between ultrasonic sensor and the obstacle.
Step 5: Step 5: Understanding the Program
First let's understand how ultrasonic sensor works. An Ultrasonic sensor is a device that can measure the distance to an object by using sound waves. It measures distance by sending out a sound wave at a specific frequency and listening for that sound wave to bounce back.It works by sending out a burst of ultrasound and listening for the echo when it bounces off of an object. It pings the obstacles with ultrasound. The Arduino board sends a short pulse to trigger the detection, then listens for a pulse on the same pin using the pulseIn() function.
pulseIn() function will wait for the pin to go HIGH caused by the bounced sound wave and it will start timing, then it will wait for the pin to go LOW when the sound wave will end which will stop the timing. At the end the function will return the length of the pulse in microseconds. For getting the distance we will multiply the duration by 0.034 and divide it by 2 as explained in this equation. At the end we will print the value of the distance on the Serial Monitor.
In setup method, declare pin 4 as Input and intializes buttonOn as false.
In loop method, the current value of button input is read. if it is pressed, it toggles the button from off to on. Next time the button is pressed it toggles from on to off. Delays are added to reduce noise and avoid changing the output too quickly.


