

Introduction: Walter- the Junk Robot


This is how I made my junkbot Walter.
He's just a desk item/decoration buddy that sits by my computer. The process of building him, and your own junkbot, can be fun and interesting as you may never quite know how they'll come out when you start. This tutorial is how I built my junkbot, but each junkbot is of their own uniqueness and likely wont come out the same way.
Materials List:
Old Tech (This can be anything around the house that you'll no longer use. In my case I used an old stereo, an amp, a cd player, and an old dish network dvr box. But you can use anything that you would be able to pull parts from like old clocks, monitors, lamps, etc.)
A soldering tool and Solder
Hot glue (High or Low temp)
Any tools needed to disassemble your old tech(i.e. screwdrivers, pliers, etc.)
Step 1: Deconstruction

This step is where the majority of the labour comes from but also where the majority of the creativity that will go into this project is born.
Be careful with disassembly, you don't want to electrocute yourself so discharge any capacitors.
You maybe want to grab a magnet to keep any screws or fasteners together.
Separate pieces and parts into piles based on sizes, what they're made out of, or function. Essentially just keep yourself and your pieces organized.
Make space to work and put any casings, shells, or other large parts of your old tech aside but together.
Something you want to keep in mind for this step is that you will be looking for pieces and parts of which to build your little junkbot. They can be any shape, size, weight, so long as it fits its function. Obviously, this is up to your own creativity but in general you want to look for things that satisfy four regions, legs, arms, a torso, and a head. Obviously it is up to you to find what fits and if you don't want your robot to have legs but wheels, then that is fine just look for parts that fill out the robot of your mind's eye.
Step 2: My Body & Arms


From Here on is where is will only describe how I built my robot if it helps you to build your own.
I used this small rectangular piece I found from the stereo system as Walter's body. On one side was a small belt attached to two plastic wheels which I used hot glue to attach the rake-like right arm of Walter, which I found in the old Dish network DVR box, so one of his arms had rotation. On the other side was a flat piece of circuit board to which I attached a strange straight plastic arm-like piece to form his zombie left arm.
Step 3: My Head


For Walters head, I used the base of a knob of a radio and soldered it on its flat bottom to the upper rectangular portion I was using as the torso. I took the actual plastic knob from the exterior of the stereo system an attached it to the base I was already using, then glued one blue gasket and then a spring in the place of eyes on the circumference of the knob. I later found a fork-shaped plastic bit that fit into the spring to serve as a second eye.
Step 4: My Legs


At the bottom of the piece I was using as a torso was a lip which had a hole for a screw to fit through. From a 6-disk CD player there was a small L-shaped bracket which attached to a wheel which I put a screw through and fastened on the other side of the lip coming from Walter's torso with hot glue to form a left leg. For his right leg, I just found a much thinner L-shaped bracket and both soldered and hot glued it to the back of Walter's torso to get it to stick.
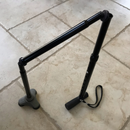
Step 5: My Back Brace and Completion


As a final addition, I used a small metal rod I found...somewhere in the pile of junk...and glued it to Walter's back. It extended far enough up his back and reached under his head to block it from being able to rotate 360 degrees. It did this by reaching up and colliding with the x-shaped fill on of the plastic knob.(Sort of pictured here though it may be hard to see.)
And when it was all said and done, Walter the Robot could stand on his own two legs and be my little desk buddy.
This project was done in four hours for a competition and so yes, while there are some parts that could be improved or have been done better, this is what I was able to accomplish given time and resource constraints.
Enjoy.


