Introduction: Wire Picture Hooks - Zero Cost. + Bonus Mini-instructable


More by the author:


About: I am a massive fan of the Instructables community, but these days I spend more time sculpting than Instructabling. See my art work on Instagram @de_burgh_steel
Why spend money buying hooks for hanging things from walls when making your own is simple and free?
In this Instructable I'll show you how, and offer further proof that wire is up there with duct tape as a universal super-useful resource.
In this Instructable I'll show you how, and offer further proof that wire is up there with duct tape as a universal super-useful resource.
Step 1: What You Will Need.

All you need is a pair of pliers (or better still a DIWire CNC wire-bending machine from Pensa Labs) and some wire. And a hammer to install the hook.
Chose wire that is thick enough to support the load you are hanging. This will require some guesswork.
Whenever I see discarded fencing wire I usually pick some up so I always have a good supply of it for little jobs.
Chose wire that is thick enough to support the load you are hanging. This will require some guesswork.
Whenever I see discarded fencing wire I usually pick some up so I always have a good supply of it for little jobs.
Step 2: How to Shape the Hook


1. Cut a length of wire about 150mm long.
2. Bend the wire in half.
3. Bend the wire into a hook shape at the bend.
4. Separate the two ends slightly and bend them to form an "s" shape. See the picture.
5. Cut the two ends about 5-10mm from the last bend. This forms the part that is driven into the wall. I make these cuts with the pliers at an angle so it leaves a sharp point.
Step 3: Installation


Simply place the hook against the wall and knock the sharp points in with a hammer.
The points should be angled down slightly so the weight on the hook doesn't pull them out. In fact the weight will actually make the grab the wall tighter.
Now you hook is ready for use.
The points should be angled down slightly so the weight on the hook doesn't pull them out. In fact the weight will actually make the grab the wall tighter.
Now you hook is ready for use.
Step 4: Testing


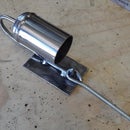
These hooks may not look strong, so I tested this one out with a couple of items that are much heavier than your average picture frame.
First I tried a block of steel that weighed about 10kg. No problem.
Then I tried a length of railway track. This bit was about 20kg. Still no problem.
First I tried a block of steel that weighed about 10kg. No problem.
Then I tried a length of railway track. This bit was about 20kg. Still no problem.
Step 5: Bonus Mini-Instructable - Free Nails.


Don't stress if ever you run out of nails. They are easy to make from fencing wire.
Just cut the wire into the length if the nail you need and maybe straighten it a bit with a hammer, and that's it.
They aren't quite as easy to use as bought nails, but they do the job nearly as well.
I hope you liked my simple Instructable. Please feel free to comment or ask questions. And don't forget to vote for me in the contests.

Participated in the
Unusual Uses Challenge

Participated in the
Metal Contest


