Introduction: 3D Printing Guide - Surface Finishes and Print Accuracy


3D printing is not only a great tool for engineers and drone enthusiasts, it can be just as applicable for fashion and jewelry design. 3D printing is an especially good choice for small quantities without sacrificing quality. There are so many different techniques and materials out there like rubber, precious metals and porcelain, that you're sure to find what's right for your project. But where to start?
After working with different additive manufacturing machines and materials, it's time to share some my experience. In this Instructable I'll give you an overview of the three most common 3D printing processes:
- Fused Deposition Modeling (FDM)
- Stereolithography Light Processing (SLA)
- Selective Laser Sintering (SLS)
For each technique, I prepared a print of the same complex object to show you the difference in print accuracy and surface finishes. I'll focus on each printing procedure as well as the pros & cons like accessibility, the look and touch of the printed objects and the end product usage. Let's start with a quick 3D printing overview...
Image credits: Ana Catalá/ElektroCouture
Step 1: What Is 3D Printing?

3D printing, also known as additive manufacturing, is a process of creating a three dimensional object from a digital file. Although there are many different printing techniques, they’re all based on the same principle: the physical object is created by laying down layers of the chosen material until the object is created.
In the early 2000’s, 3D printing was mostly limited to industrial uses but has become more and more popular over the last ten years. One of the main reasons was the expiration of the patent for fused deposition modeling (FDM), which is nowadays the most popular 3D printing technique. Since more and more patents are expiring for other techniques, the additive manufacturing industry is developing very fast and introducing more techniques to the general public. Today, various professions like dentists, architects, and aircraft manufacturers, are taking advantage of creating one-of-a-kind objects.
I recommend reading 3Dhubs' very detailed 3D printing guide, if you want to lean more. Okay, let's get started with preparing a file before printing...
Step 2: Preparing Your 3D Print

First of all, you need your three dimensional object you'd like to print. You can design your own model with your preferred software like Rhino, Fusion360 or the browser based service Tinkercad. However, if you don't want to model your own design, there are multiple websites like Thingiverse, Tinkercad or Free3D offering free .obj or .stl files to download.
In the next step, your file needs to be prepared for printing with a so-called "slicing" program. In general, slicing software splits the whole design into many thin layers, adds a support structure (optional) and creates the specific path the laser beam or nozzle will follow to create your object. Some printers have their own slicing software, for others you can use general ones like Cura from Ultimaker, which you can see in the picture above. Nevertheless, if you're using a printing service like i.materialise or shapeways (more in step 7), you'll just have to upload your design and they'll slice it for you.
Let's take a look at the three different techniques and their corresponding materials...
Step 3: Fused Deposition Modeling - FDM


Technology
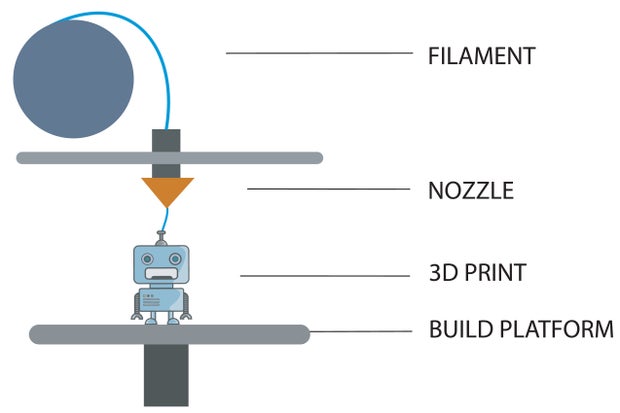
As already mentioned, FDM, short for Fused Deposition Modeling, is the most widely used desktop 3D printing technique. FDM technology works by using a solid material made out of plastic, plastic-mix or metal, called filament. During the printing process, the filament is unwound from a coil, supplying material to a heated extrusion nozzle, which melts the filament. As the material melts, the nozzle moves in predetermined horizontal and vertical directions, which are determined by the slicing software. While moving along its specific paths, the nozzle extrudes a layer of melted filament, which immediately cools down and solidifies as a layer of the object until the whole form is printed. Objects which have overhanging parts (empty space below them) will require so-called "supports". These supports are like columns which hold up the overhangs as they are printed. These can be added by your slicing software. After your print is finished, you break them off and discard them. In the second picture you can see this support structure inside the print.
Materials
The two mostly used materials for FDM printing are ABS (Acrylonitrile Butadiene Styrene) and PLA (Polylactic Acid). However, there are many more types available, like wood fiber based, biodegradable, flexible or magnetic filament.
Step 4: Pros + Cons of FDM Printing


Pros
- FDM machines are affordable desktop printers, starting at about $300, which you can easily set up at home.
- You can print in almost any imaginable color and there are many different materials available.
- Some machines let you change filament while printing - great for multi-colored objects.
They're great for quick and low-cost prototyping.
Cons
- It takes a bit of time and practice to tweak your machine and get good results - be patient.
- Prints fail quite often... you should always check on your print (2nd image shows a failed print).
- Extruded layers of melted filament are visible: FDM prints have a low resolution.
- When printing complex three dimensional objects, a support structure is required.
Experience and Conclusion
FDM machines are great for getting started with 3D printing, especially considering their relatively low cost. There are different techniques to post-process your prints for a cleaner finish, like epoxy coating or vapor smoothing. In the second image you can see the print after I applied one layer of epoxy coating. However, I personally don't like the plastic look and touch of the general material. Especially when creating fashion designs or jewellery pieces, you want a more valuable touch and feel to the material. So all-in-all, FDM printing is great for prototyping your design to get a general idea of how your three dimensional object will look. However, I wouldn't suggest using it for a final print if you need it to be high quality.
Step 5: Stereolithography Light Processing - SLA


Technology
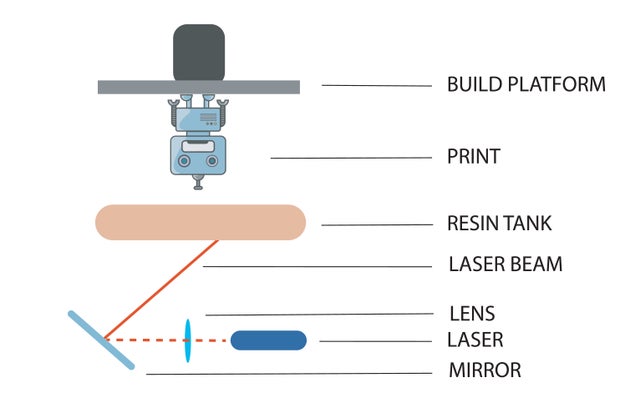
SLA, short for Stereolithography, uses a light source to create an object on a build platform from a liquid. While the laser beam traces a pattern on the surface of the photopolymer resin, it cures the liquid one layer at a time. As each layer is printed, the build platform lifts a certain distance out of the resin bath so the next layer can be printed. This repeats until the object is fully printed. SLA prints need a support structure which is attached to the build platform to hold the object. After printing, the rather sticky photopolymer resin must be washed off the print using isopropyl alcohol. SLA prints have high accuracy and their surface is very smooth.
Materials
Most companies sell their own resin cartridges like inkjet printer companies do. The materials are limited to photopolymer resin. However, there are a variety of materials with different characteristics. For example, Formlabs offers flexible resin, castable resin for jewellery design, and even resin with a color kit to mix your own colors.
Step 6: Pros + Cons of SLA Printing


Pros
- Even though it's more advanced, SLA printers are stil available as desktop machines.
- SLA prints are super accurate and have a very smooth and shiny surface.
- Wide variety of materials for almost every purpose.
- Easy setup and high print success rate (my experinece with Formlabs' Form2).
- It's a smart machine - you can print without always having to check on your print.
- Formlabs has great customer service.
Cons
- Not recommended for larger objects due to the relatively small build platform.
- Print needs to be cleaned with alcohol.
- The resin is quite sticky and not skin friendly - you need to wear disposable gloves.
- All prints need a support structure that needs to be removed manually.
- The machine needs to be super clean from the inside so the laser can work accurately.
- Machines are rather expensive. A decent one starts at $2,000 and up.
- Compared to FDM printing material, resin cartridges are quit pricey.
Experience and Conclusion
Due to a collaboration, I was using Formlabs' Form 2 for a project last summer. After a few prints, I was fascinated by the high accuracy and the great surface finish. Form 2 is a very reliable machine and each print turns out very well. The layers of high resolution prints are almost invisible (check out the pictures of my SLA prints). Also, once cured in UV light, the material has a nice feel to it.
However, the biggest negative aspects are that the resin is rather sticky and that the machine needs to be super clean. A little bit of dust or a smear from dripped resin will manipulate the laser beam and the print can fail. Failed prints can fall into the resin tank and you'll have to filter the resin to catch all cured parts floating inside the liquid. Also the resin tank needs to have a perfectly clean surface - tiny scratches or fingerprints will affect the laser beam. Cleaning the finished prints from the sticky resin by rinsing them with isopropyl alcohol is also quite a bit of work. Always make sure to wear gloves when touching the resin.
All-in-all it's a great machine and definitely worth getting if you need high quality prints on a regular basis. It's very convenient to print such high resolution objects any time you want. You just have to be very careful and considerate with each step if you're not familiar with the printing routine yet.
Step 7: Selective Laser Sintering - SLS

Technology
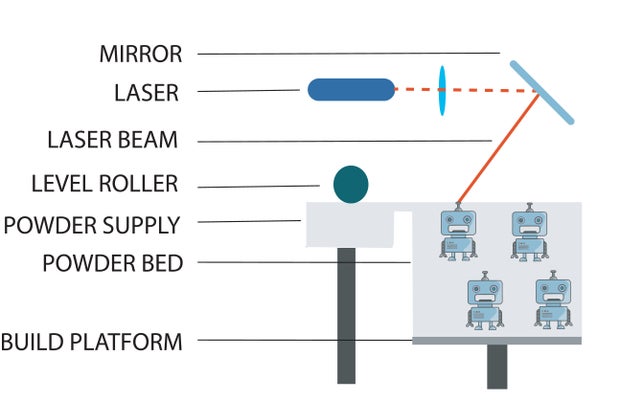
Selective Laser Sintering, also known as SLS, works by using a laser beam to melt layers of powdered material into a three dimensional object. On the first out of two beds, the lasers follows a certain path on the first powder layer, selectively melting (sintering) the material. Once the layer is solid, the first bed moves slightly down while the second bed moves up and a roller spreads a new layer of the powdered material on top of the first layer. This repeats until the whole object is printed. SLS is common for industrial uses (a machine costs $10,000 and up) but the technology is improving rapidly and becoming more affordable for smaller businesses. SLS printing technology has high accuracy and the surface of the prints is rather matte and grainy.
Materials
SLS printing includes plastics such as polyamides, also known as nylon, polystyrenes and thermoplastic elastomers. After printing the white powder, the print can be dyed in a color bath in any color. The bath ensures even coverage of every surface. The prints can also be coated with spray paint or lacquer for a shiny finish. There are various materials to choose from, like elastic or metallic plastic as well as castable wax.
Step 8: Pros + Cons of SLS Printing

Pros
- SLS prints can be quiet big - depending on the machine size of the service provider.
- SLS prints are very accurate and have a high resolution.
- The surface has a smooth finish.
- There are different materials and colors to choose from.
- It's possible to print very complex forms without support structure; no extra finishing of the surface necessary.
- The left over unsintered powder supports the object.
Cons
- There's no desktop machine available yet. You'll have to outsource the print, which takes at least a few days.
- The available colors are limited by the manufacturer.
- Large prints get quiet pricey.
Hollow bodies need a hole in order to not trap powder inside the print.
Experience and Conclusion
I really enjoy using services like shapeways or i.materialise to order high quality prints. Their customer service is normally very good. Even more impressively, these manufactures can also produce prints in precious metals, plated metal or ceramic. Even though some people don't like the rather rough surface of SLS prints, I think it has a nice touch to it and the surface feels less like plastic. Also it's not ideal for last-minute projects, since the object will always take some time to be printed and delivered.
SLS prints are a great choice for a final print. However, the quality and convenience comes at a price.
Step 9: Conclusion

By now, you should have a good overview of the different printing technologies and materials available as well as their pros and cons. As you can tell, each printing technique is very different. Therefore, in deciding which one is the best for your needs, consider:
- If you don't need high resolution prints, or would like to prototype and outsource final prints (to be printed via SLS), choose an FDM printer.
- If you need small- to medium-sized high quality prints fast and on a regular basis, you should definitely consider getting an SLA printer.
For my designs, I prototype with an FDM printer to print the object at least once to take a look at the three dimensional form and verify it's what I want. Then, I order an SLS print for the final print.
Have fun printing your designs!