

Introduction: 4-3/4 Oz Ultra-light Backpacking Kitchen (video Demo)


Update: here is my version of the stove instructions: https://www.instructables.com/id/Ultralight-Backpacking-Stove-Only-38oz-video-d/
I have seen similar things like this done before. The beer can pot is an old one, but a good one. It is usually done with a 24oz. Heinecken keg can. I made a heiny-pot a couple years ago and I have used it a lot, it is just over sized for most of what I do. Most of the meals I make take only 1 or 2 cups of boiling water. The heiny-pot is twice as large as needed. I was initially reluctant to use a fosters can because they are so much more flimsy, but I thought if I could make it a double wall construction, it might work.
As far as the container for the boiling pot, I have seen this done with the heiny-pots too. the only difference is the size. i think the first time I saw this was on an ultralight forum by a person with the handle "Skidsteer"
You can also get a very similar set up from a guy named Tinny. He runs a great site called http://www.minibulldesign.com
The pot stand in the video is just something I threw together to shoot the video, the final pot stand will be documented soon.
Step 1: Gather Materials


To make this kit all you need is:
1. 2x Fosters 24oz cans of beer
2. 1x Ziploc 2 cup twist'n-loc container
3. 1x Ziploc 1 cup standard container
from other instructables:
4. 1x Ultralight Alcohol stove
5. 1x Ultralight spice kit
Step 2: Tools You May Need
Here are the tools I used:
To score and cut the cans:
- Large "C" clamp
- Razor blade
- Various pieces of wood to be used as spacers.
- Petroleum jelly
- Small piece of plywood
- 1 small nail
- hammer
- Can opener
- A utility knife
Step 3: Scoring and Cutting the First Can


First Setup:
This set up is to make the score line on the lower half of the first can.
1. Clamp a razor to your workbench 1.5" above the surface of the bench.
2. With the can upright, slowly rotate the can against the razor with only slight pressure.
3. Once you have made several passes around move to the next setup. try not to puncture the can
note: do not open the can of beer, it is easier to work with the can pressurized.
Second Setup:
This setup is to make the score line on the upper half of the first can.
1. Clamp a razor to your workbench 2.5" above the surface of the bench.
2. With the can upside down slowly rotate the can against the razor with only slight pressure.
3. Make several passes to insure a good score line.
4. Use the clamped razor to carefully puncture the can along the score.
Be ready with a sink or bucket or be able to get outside quickly. (things get messy here)
5. Carefully work your thumb in to the puncture as shown in the picture, and slowly work your
way around the can. The can should separate along the score line if it was done properly.
6. Go back to the first setup and repeat steps 4 and 5 with the other score line.
Step 4: Stretch the Top & Bottom Sections


Use the remaining unopened can of beer to pre-stretch the top and bottom sections.
1. Rub a small amount of petroleum jelly on the bottom of the full can of beer.
2. Carefully insert the bottom of the full can in to the cut bottom from the first can.
3. Using a small piece of plywood or the like, apply firm and even pressure to force one can in to the other.
note: Do this step incrementally; Press the can in a little way and let the pressure build up push it back out. then repeat until you can force the can about half way in to the bottom section.
4. Repeat these steps with the top section of the fist cut can.
note: Continue using the bottom of the full can to stretch the second piece.
Once both can section have been properly stretched, puncture the bottom section as shown. Puncture the top section anywhere you like, as it will be removed later.
Puncturing the cans now will allow you to fully insert them in the following steps.
Step 5: Marking & Cutting the Second Can


The idea here is to cut the second can so that the finished boiling pot fits together tightly with out crumples. If the second can is cut too tall it will crumple where the top section narrows.
1. Stack the two cut sections and place the full can next to them.
2. Mark the full can at the height just below the taper. (in this case, just about the silver line on the stacked cans.)
3. Once the can has been marked. install the bottom section. Use the same method as when stretching, but this time, insert the can until it bottoms out.
note: Doing this step now is important because of the amount of force required to do the insertion.
note: It is also important that the can be unopened, so that the pressure inside will keep it from collapsing.
Now that the bottom section is installed score the second can at the height you just marked. Use the same method as before with the "C" clamp and razor.
Step 6: Fitting the Top Section


Using the plywood board once again, apply firm and even pressure to slowly seat the top section on to the can just previously cut.
Once the cans have been fully seated, cut the center section out of the top with a utility knife. Insert the knife and slowly work your way around the can, using the groove as a guide.
Step 7: Make a Lid

Cut a Lid from the remaining top section of the second beer can.
Us a can opener to cut the lid. I have tried several ways to do this an this is definitely the cleanest way to do it. You will notice in the picture that the knife wheel is not actually doing the cutting. The friction wheel on the other side of the lid is making a fine score line that will separate after about twice around.
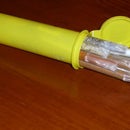
Step 8: Make a Case for the Kitchen Kit


To provide protection from crushing and to keep everything in one place, it is nice to have a case for the kit. The case is made from 2 Ziploc containers.
1. Using a utility knife, cut the center of the Twist'n loc lid
2. Place the the resulting ring over the standard 1 cup container
3. Screw the new lid on to the original Twist'n loc 2 Cup container.
Optional
4. Use a standard household clear silicon adhesive to glue the ring to the 1 Cup container. (I do this so I don't lose the ring.
Step 9: Pack It All Up


Now that all the pieces are made you can pack it up and head out on the trail.
I would like to mention a couple things about the use of this kit.
1. I do not eat out of the boiling pot, because it is a pain to clean.
2. I am careful not to let it boil dry. the coating on the inside of the can is strong but if there is no water in the pot the coating will start to bubble.
3. I only boil water in the pot to rehydrate meals, I do not actually cook in it, again because of cleaning.
4. the case is definitely a multitasker, The 2 cup container has 1 and 2 cup increments on the side, so you can measure water, you can use both containers as bowls, the list goes on...
5. If I want a hot drink I take off my "LiveStrong" style silicon bracelet and use it as a lip guard.


