

Introduction: Arduino Color Mixer

The purpose of this instructable is to show how to use an Arduino to create a color selector, for full color LEDs. The selector will have a gui interface which runs on a computer connected to the Arduino. The interface allows color selection by the use of red, green and blue slider gradients.
A video of the mixer controlling 3 LEDs is located here http://www.youtube.com/watch?v=9VBWqkRLqNs
what you'll need,
-breadboard
-full color LED's (as many as you want to use, I used 3)
-Arduino Uno
-breadboard, wire, ect..
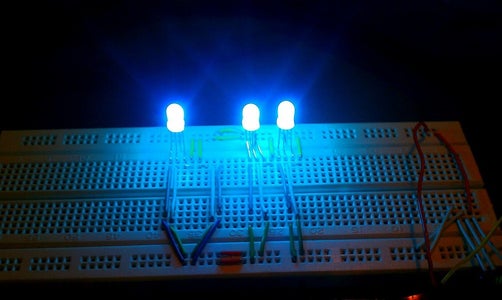
Step 1: Connecting and Testing LEDs


the first thing to do is to connect 1 led to the breadboard, and the arduino. Each full color LED has 4 connections, it has a shared anode which is connected to one of the digital pins set as a +5V output. The LED also has a cathode for each color, red, green, and blue.
the easiest way to test the LEDs is to put them into the bread board, then set 1 of the arduinos digital pins to an output and the other to a input, the code to do this(using pins 11,and 12) is:
void setup() {
pinMode(12,OUTPUT);
}
void loop() {
//this sets pin 12 to 0 volts so it allows a full voltage drop accross the LED
digitalWrite(12,LOW);
//I used analogWrite here because applying the full 5 volts to the LED may damaged it.
// or you could just use resistors
analogWrite(11,10);
}
Once you have figured out which cathode is which for each LED connect them in parallel, so that the +5V is shared by each Anode, and each red cathode for each LED is connected to pin 3, each green cathode is connected to pin 5, and each blue cathode is connected to pin 6. Once this is done the following code can be used to control the color of all of the LED simultaneously.
// with all values set to 255 the led will not light up, to test each color independantly just change the value
// of that color, the closer the value is to 0 the brighter that color will shine. Color mixing is achieved by having different values for red,
// green, or blue.
int rval = 255;
int gval = 255;
int bval = 255;
void setup() {
pinMode(12,OUTPUT);
}
void loop() {
digitalWrite(12,HIGH);
// Note you may need to re-order wich value goes to wich pin depending on how the LED is wired in.
analogwrite(3,rval);
analogwrite(5,gval);
analogwrite(6,bval);
}
Step 2: Color Mixer Software
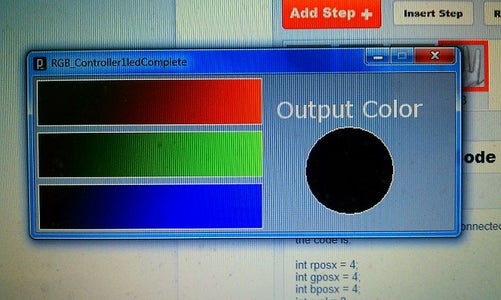
Once You have all of your LEDs connected, the next step is to write the mixer software that runs on the computer.
the code is:
int rposx = 4;
int gposx = 4;
int bposx = 4;
int rval = 0;
int gval = 0;
int bval = 0;
int output = 0;
PFont fontA;
import processing.serial.*;
Serial port;
void setup() {
size(480,180);
background(170);
stroke(255);
fill(255);
rect(4,4,257,52);
rect(4,64,257,52);
rect(4,124,257,52);
fontA = createFont("Verdana",26);
textFont(fontA);
textAlign(CENTER);
text("Output Color", 360, 50);
// this will allow for serial port communication with the arduino
println("Available serial ports:");
println(Serial.list());
//selects the first port in the Serial.list() for use and speed of 9600
port = new Serial(this, Serial.list()[0],9600);
}
void draw() {
// this draws a circle wich displayed the mixed color that is being output to the Arduino
fill(rval,gval,bval);
ellipse(360,110,100,100);
// these draw the red, green, and blue gradient lines, as well as a verticle bar in each one to denote what amt of that color is
// being selected
for (int i = 0; i<256; i++) {
stroke(i,0,0);
line(i+5,5,i+5,55);
}
stroke(255);
line(rposx,5,rposx,55);
for (int i = 0; i<256; i++) {
stroke(0,i,0);
line(i+5,65,i+5,115);
}
stroke(255);
line(gposx,65,gposx,115);
for (int i = 0; i<256; i++) {
stroke(0,0,i);
line(i+5,125,i+5,175);
}
stroke(255);
line(bposx,125,bposx,175);
}
void mouseDragged() {
// this allows you to drag the bar in the gradient to select the color, by determining if the mouse is inside one of the gradient
// bars and which gradient bar you are in.
if (mouseX < 260 && mouseX > 5 && mouseY > 5 && mouseY < 55) {
rposx = mouseX;
rval = rposx-5;
float rout;
// for rout,gout,bout rather than sending out the 0-255 value for each i remapped the values to 0-85 for red,86-170 for green,
// and 171-255 for blue. this allowed me to only send a single serial port message from the computer to the arduino each time the
// color is changed
rout = map(rval, 0, 255, 0, 85);
int routp = int(rout);
port.write(routp);
}
if (mouseX < 260 && mouseX > 5 && mouseY > 65 && mouseY < 115) {
gposx = mouseX;
gval = mouseX-5;
float gout;
gout = map(gval, 0, 255, 86, 170);
int goutp = int(gout);
port.write(goutp);
}
if (mouseX < 260 && mouseX > 5 && mouseY > 125 && mouseY < 175) {
bposx = mouseX;
bval = mouseX-5;
float bout;
bout = map(bval, 0, 255, 171, 255);
int boutp = int(bout);
port.write(boutp);
}
}
Step 3: Updating Arduino Code to Respond to Mixer

Once the Mixer Software is complete the final thing to do is to update the arduion sketch so that it can recieve the Serial commands from the computer. The code for this is:
int rval = 255;
int gval = 255;
int bval = 255;
int input;
void setup() {
//this allows for Serial communication with speed of 9600
Serial.begin(9600);
pinMode(12, OUTPUT);
// because of power needs i am using 2 +5V sources.
pinMode(11, OUTPUT);
}
void loop() {
digitalWrite(12,HIGH);
digitalWrite(11,HIGH);
analogWrite(3,rval);
analogWrite(6,gval);
analogWrite(5,bval);
// this detects weather or not there is any available incoming serial data.
if (Serial.available()) {
input = Serial.read();
//I then re-map the values from there 0-85,86-170,171-255 back to the corresponding 0-255 values.
if (input > 0 && input < 86) {
int rin = map(input, 0, 85, 0, 255);
// because we are connectiong the PWM port to the cathode, we need to change the values instead of 0-255 to 255-0
rval = 255 - rin;
}
if (input > 85 && input < 171) {
int gin = map(input, 86, 170, 0, 255);
gval = 255 - gin;
}
if (input > 170) {
int bin = map(input, 171, 255, 0, 255);
bval = 255 - bin;
}
}
}

![Tim's Mechanical Spider Leg [LU9685-20CU]](https://content.instructables.com/FFB/5R4I/LVKZ6G6R/FFB5R4ILVKZ6G6R.png?auto=webp&crop=1.2%3A1&frame=1&width=306)


