

Introduction: Arduino IR Remote Control


Source: https://theorycircuit.com/arduino-projects/arduino-ir-remote-control/
By using arduino and IR Receiver TSOP 1738 (in our project, you can use any ir receiver available) we can decode any infrared remote code into hex or some other format. Before constructing the circuit check datasheet of IR receiver having in your hand, hence you can connect proper bias pins and output pin.
Step 1: Wiring Components

To read the IR rays from remote control by arduino board we need external library that is IRremote library, you can get IRremote library here. (how to insert new library in arduino IDE)
Step 2: Receiving IR Hex Code
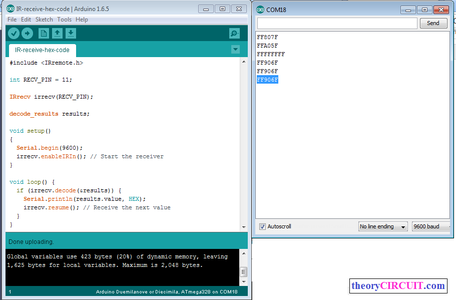
In this project first we have executed the IRrecvDemo example program from the arduino IR library example and decoded IR rays from remote.
(Note: If you have any error while running this library, remove “IRremoteTools.cpp” from libraries\RobotIRremote\IRremoteTools.cpp)
Arduino Code for Receiving IR as Hex code
#include <IRremote.h>
int RECV_PIN = 11;
IRrecv irrecv(RECV_PIN);
decode_results results;
void setup()
{
Serial.begin(9600);
irrecv.enableIRIn(); // Start the receiver
}
void loop(){
if (irrecv.decode(&results)) {
Serial.println(results.value, HEX);
irrecv.resume(); // Receive the next value }
}
Attachments

Step 3: Remote Control With Arduino
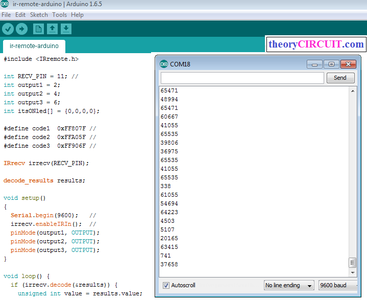
Then we used decoded data as switching condition in arduino sketch to turn on and off the three LEDs.
Arduino Code
#include <IRremote.h>
int RECV_PIN = 11; //
int output1 = 2;
int output2 = 4;
int output3 = 6;
int itsONled[] = {0,0,0,0};
#define code1 0xFF807F //
#define code2 0xFFA05F //
#define code3 0xFF906F //
IRrecv irrecv(RECV_PIN);
decode_results results;
void setup() {
Serial.begin(9600); //
irrecv.enableIRIn(); //
pinMode(output1, OUTPUT);
pinMode(output2, OUTPUT);
pinMode(output3, OUTPUT);
}
void loop() {
if (irrecv.decode(&results)) {
unsigned int value = results.value;
switch(value) {
case code1:
if(itsONled[1] == 1) { //
digitalWrite(output1, LOW); //
itsONled[1] = 0; // } else { //
digitalWrite(output1, HIGH); //
itsONled[1] = 1; //
}
break;
case code2:
if(itsONled[2] == 1) {
digitalWrite(output2, LOW);
itsONled[2] = 0; } else {
digitalWrite(output2, HIGH);
itsONled[2] = 1;
}
break;
case code3:
if(itsONled[3] == 1) {
digitalWrite(output3, LOW);
itsONled[3] = 0; } else {
digitalWrite(output3, HIGH);
itsONled[3] = 1;
}
break;
}
Serial.println(value); // you can comment this line
irrecv.resume(); // Receive the next value
}
}
Attachments
Step 4: Prototype

