

Introduction: Arduino Pac-Man Ghost Costume


Pac-Man is a CLASSIC video game.This year, our school staff are dressing up like the Pac-Man game characters. Subject heads are Pac-Man, teachers are ghosts.
It's easy to get a coloured piece of Bristol Board, cut a semi-circle off the top, saw-tooth cut for the bottom and put on some white and black paper eyes.
Since I'm a Computer Studies teacher, paper eyes Won't Cut It! Let's put Arduino on the case and animate the eyes!
This project replaces the paper eyes with two Arduino Unos and two mcu_friend 320x240 TFT touchscreen shields.It's a great demonstration of serial communications between two Arduinos.
The size of this project is 18 inches wide by 24 inches tall. So it can be made from 1 piece of Bristol Board and 1 piece of cardboard from a large box.
Let's make it!
Supplies
- Two Arduinos (Uno or Mega 2560) (see pictures above)
- Glue and duct tape to assemble your costume
- Corrugated cardboard to stiffen your ghost.
- Coloured Bristol Board to make your ghost.
- Soldering Iron and some short lengths of wire
- Two alligator clip patch cords to connect the Arduinos
- Two 9V batteries and connector clips
- Two mcu_friend 320x240 TFT Touchscreen Display Shields. Make sure they are a matched pair. My original set had screen origins (0,0) in opposite corners. If you don't have matched pairs, you'll just have to make one Arduino do it's eye shift in the opposite direction to make them match up.
Step 1: Assemble the Arduinos and Screens


Make sure your Arduinos are NOT connected to a computer or power source.
It's important to make sure you carefully line up the pins on each screen shield with the Arduino. If you don't connect them correctly, you'll fry the shield and HALLOWEEN WILL BE RUINED! DO YOU WANT TO RUIN HALLOWEEN? DO YOU?
I didn't think so..Moving on!
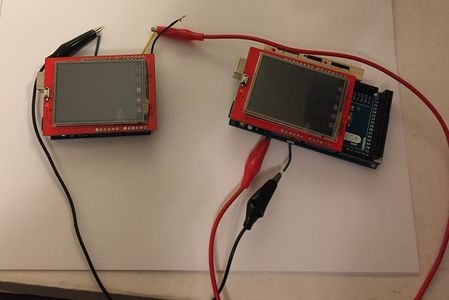
Each Arduino has a Serial Rx0 pin and a Serial Tx1 pin. Solder a short length of wire to the MASTER's Tx1 pin.
Solder a short length of wire to the SLAVE's Rx0 pin.
Solder a short length of wire to a GND pin of each Arduino.
Connect each shield to it's respective Arduino.
Don't connect the Arduinos together yet.
Step 2: Load the Sketches on to Each Arduino
The sketches require two graphics and screen libraries to be loaded into your Arduino IDE.
Under the 'Sketch' menu, choose 'Include Library', then 'Manage Libraries'.
In the Search field, search for 'Adafruit GFX' and add it to your IDE.
In the Search field, search for 'MCUFriend' and add it to your IDE.
The Arduinos each have a sketch that cycles an eye from left to right across the screen. The right-eye Arduino is the MASTER and the left-eye Arduino is the SLAVE.
The basic sketch draws the eye (a black rectangle and circle) on the left side of the display, then uses two FOR loops with the vertical scroll command to shift the eye from left to right and back for a cycle.
As the Master starts a cycle, it sends a character '1' through its Serial port to the Slave. When the Slave receives the '1', it starts its cycle. The Master endlessly cycles its eye and sends the pulse. The result is the left-right shifty eye motion of the Pac-Man Ghost characters!
Open and upload the MASTER and SLAVE sketches on to their respective Arduino/Screen sets.
Temporarily disconnect both Arduinos from the computer.
Connect the two GNDs together with a patch cord.
Connect the Master's Tx1 pin to the Slave's Rx0 pin with a patch cord.
Reconnect your Arduinos to the computer. The eyes should start cycling.
Woohoo!

Step 3: Make the Ghost Costume


Cut your corrugated cardboard into the classic ghost shape. My dimensions are 18 inches wide by 24 inches high.
Glue the corrugated cardboard cutout onto the Bristol board.Let it dry. As some glues shrink as they dry, you may want to put the assembly on the floor and put weights on it to make sure it stays flat as the glue dries.
Once the glue is dry, trim the excess Bristol board from around the corrugated cardboard.
Now turn the ghost over so the corrugated side is face up.
Remember, the costume is now reversed.
Position the MASTER Arduino on the RIGHT side of the cardboard and the SLAVE Arduino on the LEFT side, spaced as you wish. Make sure the alligator patch cords can connect the two Arduinos.
Trace the shields with a pencil.
Carefully cut out the eye holes.
Now attach each Arduino/Display to the costume with duct tape. Attach the two 9V batteries nearby for easy connection to the Arduinos.
Power up your Arduinos and let's go trick-or-treating!
Needless to say, you may want to put tape on the backsides of the Arduinos so there are no short-circuits if they come in contact with rain and/or metallic zippers on coats/jackets etc. Be safe!
Put a strap around it for you to hang it around your shoulders, wear a black top and black pants and you're all set to chase PacMan around your neighbourhood! Make the whole set!
Happy Halloween!

Participated in the
Halloween Contest 2019


