

Introduction: Arduino Powered Scoreboard

3D – printed arduino nano powered scoreaboard
Supplies
University of Turku
Finland
Tuomas Silvola
Step 1: OVERVIEW
I am studying at University of Turku, Finland to become a handcraft teacher. One of our course managed about intelligent products and programming arduino. I decided to make a arduino powered scoreboard.
I found a website link: https://www.brainy-bits.com/using-7-segment-displa... and based on those link directions I began to do my own version of scoreboard with a couple of modifications.
I have used almost the same components as that link project with a few execptions.
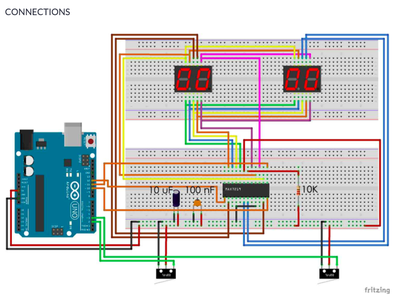
Step 2: COMPONENTS
Components I used:
- Arduino uno or nano
- Two pieces of 7-segment displays
- MAX7219 LED driver
- One 10 uF electrolytic capacitor
- One 100nF electrolytic capacitor
- One 10K ohm resistor
- Three switches (one for power/on/off, two for roll the numbers)
- Power supply (I have used batteries)
- Wires/cables
- Circuit board
I ordered some of these on ebay and a few of these I bought in a local electronic company.
Step 3:
Step 4: CODE
I used the ready code which I got in the link I mentioned earlier. Remember to use LedControl library to communicate with the the MAX7219 from the Arduino.
In this code when you click a switch, the corresponding display number should increase by one, like a scoreboard. YET, I haven`t been able to make a code work properly for unknown reason. Although, this link: https://www.brainy-bits.com/using-7-segment-displa... the code seems to work like it should. I believe that one of the reasons why the code not work in my project is that I have done my connections to a three line circuit board instead of one line circuit board. So, I need to work for my projects further in the future more and figure out where the problem is.
However, there is the code:
/* Arduino 7 Segment scoreboard
* Using the MAX7219CNG LED Driver Created by Yvan / https://Brainy-Bits.com
This code is in the public domain...
You can: copy it, use it, modify it, share it or just plain ignore it! Thx!
*/
#include "LedControl.h" // Library used for communcation with 7 segment
LedControl lc=LedControl(12,11,10,1); // (DIN, CLK, LOAD, number of Max7219 chips)
// Variable to hold current scores int displayone=0; int displaytwo=0;
// Variables to split whole number into single digits int rightdigit; int leftdigit;
// Switches pin connection to Arduino UNO #define switchone 2 #define switchtwo 3
void setup() { pinMode(switchone,INPUT_PULLUP); pinMode(switchtwo,INPUT_PULLUP); lc.shutdown(0,false); // Wake up MAX7219
lc.setIntensity(0,7); // Set brightness to medium
lc.clearDisplay(0); // Clear all displays connected to MAX7219 chip #
// Put zeros on both displays at startup lc.setDigit(0,0,0,false); // (Max7219 chip #, Digit, value, DP on or off) lc.setDigit(0,1,0,false); lc.setDigit(0,2,0,false); lc.setDigit(0,3,0,false);
}
void loop() {
// If switch 1 is clicked if (!digitalRead(switchone)) { displayone++; // Increase score by 1 // convert whole number to single digits rightdigit=displayone%10; leftdigit=displayone%100/10;
// Display extracted digits on the display lc.setDigit(0,0,leftdigit,false); lc.setDigit(0,1,rightdigit,false);
// Wait until switch is released to continue while (!digitalRead(switchone)) { } delay(5); // Small delay to debounce the switch }
if (!digitalRead(switchtwo)) { displaytwo++; rightdigit=displaytwo%10; leftdigit=displaytwo%100/10;
lc.setDigit(0,2,leftdigit,false); lc.setDigit(0,3,rightdigit,false);
while (!digitalRead(switchtwo)) { } delay(5); } }
Step 5: BOX WITH THE THINKERCAD

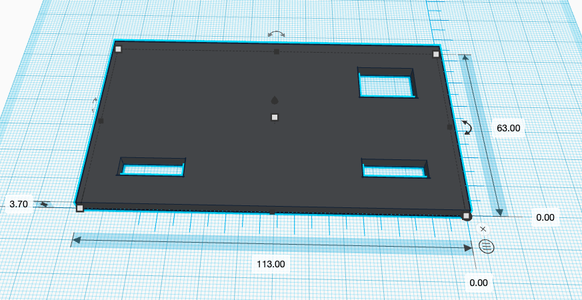
One of our course contents was learning the usage of 3D-printer. Such a fun machine with many uses. First I draw box in tinkercad, which is web browser – based drawing software that everyone can be use.
Step 6: 3D PRINT WITH THE ULTIMAKER 3+
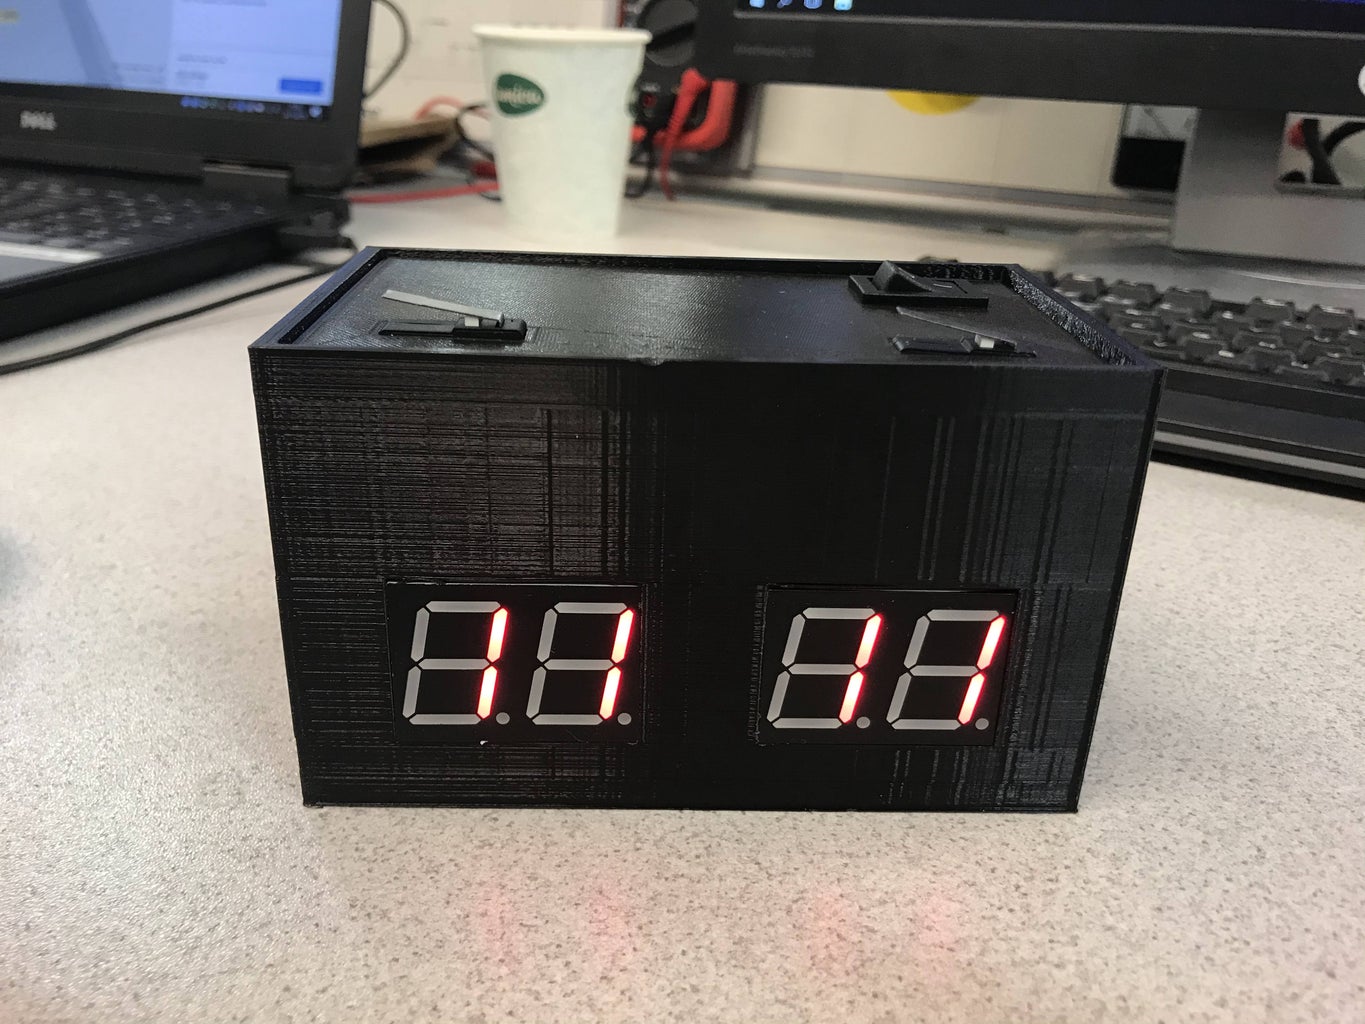

After drawing the box in tinkercad, I exported it in Ultimaker Cura 3.0 – program. There you make settings like layer thickness and filling. The more you want to fill your object, the more durable it will become and the more time it takes to get ready. Same thing with the layer thickness. So, you can choose the settings according to what criteria your item have to follow.
I used PLA plastic as a material, there are other option too, depending what kind of items you are doing.
Step 7: SUMMARY


Now, I have not been able to get this project work properly, so I need to work on that a little bit more. I hope that this cover and helps someone with a similar projects.

Participated in the
3D Printed Contest


