

Introduction: Articulated Utility Arm


Hey everyone!
So I finally got around to making an Instructables for a tool that has become super helpful around the shop - The Articulated Utility Arm. It's super simple to make and comes in handy in a plethora of ways. This tool was inspired by my TinkerToys that I had as a child and I'm very happy with how it turned out!
So without further ado, let's get building!
Step 1: Creating the Circular Joints


So to start off I cut out some 3" circles from some scrap oak I had around the shop for a total of 8 circular joints.
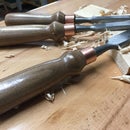
Step 2: Cutting Out the Copper Arms


Next I cut out the 1/2" diameter copper pipe 'arm' sections. I measured out three 12" pieces and one 6" piece.
Step 3: Drilling Out Holes for the Bolts

Fortunately, the hole cutting saw uses a drill bit in the center, which made the pivot points in the circular joints for the articulated arm.
Step 4: Drill Out Holes to Connect Wood & Metal


For the next step I took seven of the eight 3" circular joints to the drill press and drilled out a hole on their sides to fit the 1/2" diameter copper arms.
Step 5: Drilling More Holes...

On the remaining circular joint (the eighth one left out from the previous step) I drilled out a hole on it's face (slightly offset from the center) instead of it's side, as this joint will be used as the piece allowing the articulated arm to hang (and rotate) from the ceiling.
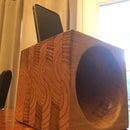
Step 6: Hose Holder Attachment


Next I took my jigsaw and cut out another piece of oak scrap in a rough shape for what would become my vacuum holder attachment. Back at the drill press I cut out the opening where the hose end would fit and lastly I took out my Japanese saw and cut a narrow slit to allow the opening some flexibility.
Step 7: Dry Fitting


Next I made sure that everything fit nice and snug before the glue up.
Step 8: Epoxy Time!


So to glue up the pipes and wood together I used a quick setting epoxy, however construction adhesive would work just as well. This was a pretty simple glue up: on each of the 12" copper pipes I glued up a side cut circle joint. Then on the 6" pipe I glued up a side cut circular joint and the lone face cut circular joint.
Step 9: Staging


After that all glued up nicely, I went and did a staging to see how they'd all fit together.
Step 10: Bolting Together


Now I attached all the pieces together using 3" bolts to fit through the tiny holes in the circular joints. I accompanied each bolt with a washer and a wing nut. After it was all assembled I sanded and buffed out the copper pipes to make everything look and felt nice!
*Note*
Later on, I upgraded the wing nuts to oak knobs. This made loosening and tightening the joints a lot easier.
Step 11: Ceiling Attachment


Now to get the articulated arm to hang and swivel from the ceiling, I cut out and made a small section for it to bolt to, similar to how the circular joints bolted together. I marked and drilled out holes for me to attach it to the ceiling, making sure to counter sink where the bolt would go, so it would fit flush with the ceiling once it was hung.
Step 12: Attaching the Articulated Arm to the Ceiling


Now reaching the end I started attaching it to the ceiling! To install the articulated arm I first drilled in the the ceiling attachment to (go figure) the ceiling. I then attached the arm, using a washer and a wing nut to allow me to lock the articulated arm in place when needed. Voila, it's complete!
*Note*
One person suggested gluing sandpaper between the articulated disks for better friction when tightening the joints. This would be an excellent enhancement.
Step 13: Articulated Goodness!


So now you can bend and rotate where ever you need the articulated arm to be, to help you out around the shop or wherever you decide to use this. I've used it a lot so far to help with dust collection while sanding and such, and as well as getting close up shots with a GoPro!
I hope you enjoyed this project and I hope that it'll bring you some good use. Be sure to check out the video for a making of the articulated arm and thank you so much for checking this out!


