

Introduction: Atmel Studio With Usbasp on Atmega 8 Target.


AVR micro controller series has gained lots of popularity since
Arduino boards and software is one of the most common for people who wants to learn about making use of micro controller by writing sketches (.ino files). Due to it's ease of use API and hardware format, user can easily stack hardware shield on top of Arduino boards and write code sketches to do any operation on hardware hooked up to the Arduino board. It opens up user to various kinds of boards, sensors and actuators which designed to be compatible with Arduino software. Atmega8 is being used as an early Arduino boards (Arduino NG). And still being supported by latest Arduino software. For some user who wants to use the Atmega 8 power's will want to try Atmel Studio 7. It's free development tools from Atmel, and designed for it's micro controllers. The code generated is much smaller compared to one generated by arduino and no need to use bootloader for atmega 8 to save space. Some setting is needed in order to write code using atmega 8 with Atmel studio 7 such as hooking up with usbasp on a breadboard and fuse settings.
Step 1: Hookup USBASP and Atmega8 on the Breadboard.

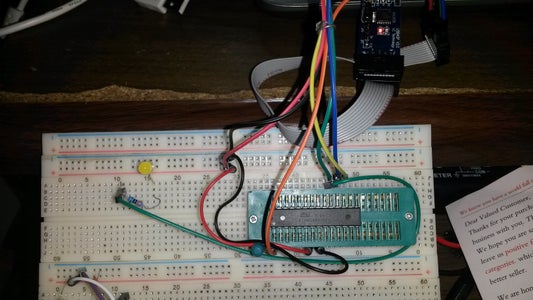
Using usbasp, we hook the MOSI, MISO, CK, GND, VCC, RST according to the diagram.
Also uploaded the sample of breadboard wiring. I use zif socket so that i can easily change the microcontrollers easily. This zif socket is not necessary unless you want to change micro controllers very often like I do.
Step 2: Setup Fuse


Here is some copy from avr, datasheet.
You probably will want to use default fuse setting if you want to run with Atmel studio. As shown on the right side of datasheet. You might notice that all fuses are active low. it means programmed = 0(LOW), or not programmed =1 (HIGH). so value 0xFF means all bits not programmed and 0x00 means all bit is programmed;
WARNING: Be careful if you program fuse, if you disable reset, or disable serial programming, or you set external clock but you don't have external clock source connected, you cannot use the micro controller anymore unless you have hi voltage (12 volt) fuse reset circuit or fuse doctor.
Fire up the avr dude and type this command to setup the fuse.
avrdude -c usbasp -p m8 -B12 -U lfuse:w:0xe1:m -U hfuse:w:0xd9:m
Step 3: Create Project on You Atmel Studio 7


This one is the easy part assuming you already have Atmel Studio downloaded and installed.
- Create project File -> New project
- Choose GCC Executable project
- Choose Atmega on top of filter device selection and
- Choose Atmega8
- Click OK
Step 4: Code Blink Led, Comple and Flash It to Target.

1. Using the code attached, you can code copy paste main.c. and hit f7 (build solution).
2. If everything ok than it will show "build succeeded."
3. using command prompt, go to your project file location that is out put window.
cd (your project directory)/debug/
check if hex file exists
4. make sure avrdude.exe is in your system path
(Control Panel\System and Security\System click advance system setting and set path like on the screenshot)
and run:
avrdude -c usbasp -p m8 -B12 -U flash:w:GccApplication1.hex
this will flash your blik to your target.

Step 5: Automation

You can automate the flashing by setting external tools on Atmel Studio.
1. select tools ->external tools, image above will be shown
2. input this parameters:
a. command :
example: D:\arduino\avrdude-6.2-mingw32\avrdude.exe
b. arguments:
-c usbasp -p m8 -B12 -U lfuse:w:0xe1:m -U hfuse:w:0xd9:m -U flash:w:$(TargetName).hex
c. initial directory:
$(ProjectDir)Debug\
or check avr dude parameters for more information regardin parameters.

![Tim's Mechanical Spider Leg [LU9685-20CU]](https://content.instructables.com/FFB/5R4I/LVKZ6G6R/FFB5R4ILVKZ6G6R.png?auto=webp&crop=1.2%3A1&frame=1&width=306)


