

Introduction: Automated Web Testing in Ruby With Watir-Webdriver


This instructable is about automated web application testing with the Ruby programming language and the Watir-Webdriver gem. These can be found at http://rubyinstaller.org/ and http://watirwebdriver.com/ respectively.
Ruby is an easy to learn and easy to use scripting language which has been around for many years. It was built with taking the best features from every language in mind, and it has pulled it off decently well. It has a wide follower base and is widely used from system administrative tasks to web programming via Ruby on Rails. Although in this instructable we will be using the Watir-Webdriver gem to create automated web application testing application.
Watir-Webdriver is a Ruby gem which allows you to control a physical web browser with Ruby code. The advantages of this compared to something that does not use a physical web browser is that this allows javascript, ajax, and other client side technologies to run and manipulate content allowing you greater control on the data you have access to. The downside to this though is that having a physical web browser is a bit slower then other technologies that do without.
Warning: This is not an introduction to Ruby so a basic understanding of Ruby or programming in general will be required. This instructable is to cover the basics of the Watir-Webdriver gem and display some of its uses. It is also important that you have the Watir-Webdriver gem installed by running `gem install watir-webdriver` within your terminal.
Step 1: Basic HTML Knowledge

In order to use Watir-Webdriver efficiently you will need a basic understanding of HTML and your browser of choice. A good web browser is needed in order to be able to quickly inspect elements on the web page to find their class and id names in order to interact with them. Without these it is difficult to tell Watir-Webdriver what to preform tasks on.
For the majority of your Watir-Webdriver applications you will be simply navigating to web pages and interacting with web forms or searching the page for data for your application to interpret. The most common web form elements you will be working with are check boxes, buttons, radio buttons, text fields, and list boxes. For searching for data you will be mostly using divs, tables, and list items. These items are not the end all be all to using Watir-Webdriver although a vast majority if your time will be devoted to using these in most cases.
Here are a list of HTML tags and their descriptions, If you are already familiar with HTML you may skip this step. Make sure you can easily identify these inside HTML source code as the quicker you can, the faster you will be able to create a application modifying your web application.
<input type="checkbox"
Creates a check box. These are used to allow users to select multiple options and are usually only set/cleared (clicked or not clicked).
<input type="button"
Creates a button. These are used to allow users to send information back to the web server when a form is completely filled out. There are also a handful of other types of button such as "image" which behave the same way but allow different styling to be applied. These are normally just clicked.
<input type="radio"
Creates a radio button. These are used when there are multiple options, but only one can be selected. These are normally set/cleared (clicked or not clicked).
<input type="text"
Creates a text field. These are used when a web application is requesting a users typed input. These fields are usually set to a specific value.
<select
Creates a list box. These are normally used when a web application has to allow a user to add and remove options in a list like fashion. These fields are normally read for their values.
Other common HTML tags you will need to be able to identify are
<div
<td
<li
Step 2: Setting Up Watir-Webdriver

The first thing we need to do before we can use Watir-Webdriver is to create a new ruby project and include the gem inside the project.
require "watir-webdriver"
After this we must setup our browser. You have the options of attaching Watir-Webdriver to IE, Firefox, Safari, or Chrome, although I will be using Firefox for this demonstration.
driver  = Selenium::WebDriver.for :firefox
browser = Watir::Browser.new(driver)

browser.driver.manage.timeouts.page_load = 30
browser.window.resize_to(1000, 600)
browser.window.move_to(0, 0)
Here we can see that I've created a new driver for our web browser object with the firefox profile, and then used that driver to create a new browser. Afterwards I set some OPTIONAL options to resize the browser window and move it to the corner of the screen.
Now we have our browser object created and setup and it is ready to be used for web application automation.
Step 3: Interacting With Our Web Application

Interacting with web applications with Watir-Webdriver is fairly easy most of the time unless advanced usage is required. For the following examples we will be using a simple HTML document stored on our computer and interacting with it with our Ruby script. The HTML document we will be using is attached to this step.
The thing to understand with Ruby and Watir-Webdriver is that most of the time what you think you want to do is most likely what you need to type in order to achieve that effect. For example if you would like to go to a specific web page you would use the `goto` method, or if you would like to do tasks using checkboxes you would use the `checkbox` object within the browser object.
For example lets navigate to our simple web application and click the first and second checkbox.
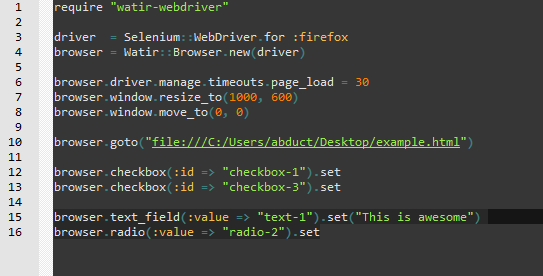
browser.goto("file:///C:/Users/abduct/Desktop/example.html")
browser.checkbox(:id => "checkbox-1").set
browser.checkbox(:id => "checkbox-3").set
From this code snippet you can see using our browser object we have told it to "goto" our web application. Then using the browser object again we told it to search for a checkbox with the ID's "checkbox-1" and "checkbox-3" to set them to true (click them).
This kind of example can be applied to almost any form object and generic HTML tag like those listed on the previous steps. You can also search for other identifiable traits other than ID's such as name, class, value, and even regex (using css or xpath searching).
For the next example lets search for the text field by value and enter the phrase "This is awesome" into it along with clicking on the middle radio button.
browser.text_field(:value => "text-1").set("This is awesome")
browser.radio(:value => "radio-2").set
For the most part anything you wish to interact with can be called by its name from the browser object. For example if I wanted to search for a "div" that has the class name "div-1" and click a single checkbox within that div with the name "checkbox-14" you would simply do:
browser.div(:class => "div-1").checkbox(:name => "checkbox-14").set
As you can also see creating a quick script to automate tasks is fairly straight forward for beginners. Although setting each form value one by one gets the job done, it is mostly too slow typing wise to get any sort of work done when working with web applications with many more HTML objects.
Attachments

Step 4: Iterating Through Multiple HTML Objects

Up until now we have been interacting with single objects by directly calling them within our code, but this is very inefficient since most web applications have many divs, forms, buttons, check boxes, and the like on a single page. There is nothing wrong with doing actions on each HTML object, but you will be spending a lot of time editing your code.
For example if a website has 100 check boxes and you wish to click all of them you would need 100 lines of code to do so if you are following the previous method. Although Watir-Webdriver has built in technologies to help aid us in doing this as fast and simply as possible.
For the most part creating the plural form of the object you are wanting to do work on will return a collection of all HTML objects that match. A collection is simply a grouping of objects which you can then loop through and interact with allowing fewer lines of more concise code. Along with these collections, you might need to use regex in order to tell Watir-Webdriver what you want inside this collection.
Back to our 100 check boxes example, lets say that they all have the ID "checkbox-X" in which X is the numeric value of the checkbox. If we tell Watir-Webdriver to search for a specific checkbox ex: "checkbox-10" that is the only checkbox that will be added to the list. In order to resolve this we can use simple regex to make a "wild card" match for all the checkboxes we wish to collect.
checkboxes = browser.checkboxes(:id => /checkbox-/)
checkboxes.each do |checkbox|
    checkbox.set
end
In this example we created a new variable called checkboxes to hold our collection, and we used the plural form of checkbox (checkboxes) to tell Watir-Webdriver to give us all checkboxes that match our ID name we have supplied. The ID name is a regex match that is essentially saying "if the id of a checkbox contains 'checkbox-' then add it to the list". Afterwards we iterate (loop) through our checkboxes and set each one to true (click on it).
As you can see we have just trimmed down 100 lines of code to click on 100 checkboxes into 4 lines of code which does the same task. This can be applied to almost any HTML object that as a singular form such as button, radio, checkbox, li, div, text_field, and many others.
Step 5: Applying Logic to Our Collections


In our last step we learned how to collect a group of HTML objects and interact with them all, but what if we only want to interact with specific HTML objects within the collection? This is easily done by applying if-then-else logic on the attributes of the HTML object inside the collection.
For example what if we only we only want to interact with the HTML objects that have the value of "yes" skipping all the other objects inside the collection? This is as easy as accessing the attribute of our HTML object by its name.
checkboxes = browser.checkboxes(:id => /checkbox-/)
checkboxes.each do |checkbox|
    if checkbox.value == "yes" then
        checkbox.set
    end
end
Here we can see we are accessing the checkbox object inside our collection and checking if its value is equal to "yes". This method of logic can be applied to almost any HTML attribute such as name, class, value, id, etc. A even better solution is to make the checkboxes capture more strict limiting the number of actual objects within the collection. With Watir-Webdriver, the fewer things it has to do the faster it preforms so the more concise you be the better you application will become.
In this example we would have 6 checkboxes that match, but only 3 of them actually get set. If we changed our search terms to
checkboxes = browser.checkboxes(:id => /checkbox-/, :value => "yes")
instead, we would have only 3 objects inside our collection allowing us to preform our work faster.
This iteration (looping) and logic flow allows you to make highly complex web application testing scripts that will only interact with HTML objects that match your designed logic flow.
Attachments
Step 6: Watir-Webdriver Cheat Sheet

Here is a list of the most commonly used Watir-Webdriver function and their uses. This step can act as a quick reference guide in case you forgot what a method is called or what it was used for. This step will also include methods that were not covered in this instructable but are easy to figure out as per their name. For more in depth information you can use the rubydoc web site which lists all the information related to Watir-Webdriver (http://www.rubydoc.info/gems/watir-webdriver/0.6.11/Watir)
Browser object:
#Setup the browsers driver and create the browser
#driver  = Selenium::WebDriver.for :firefox<br>#driver  = Selenium::WebDriver.for :chrome
#driver  = Selenium::WebDriver.for :ie
browser = Watir::Browser.new(driver)

#Setup misc browser settings
browser.driver.manage.timeouts.page_load = 30
browser.window.resize_to(1000, 600)
browser.window.move_to(0, 0)

#Interact with the browser
browser.goto("http://website.com")
browser.refresh
browser.quit
Textbox object:
#Collections
browser.text_fields(:id => "text")

#Set value
browser.text_field(:id => "text").set("This is text")

#Get value
browser.text_field(:id => "text").value

#Clear value
browser.text_field(:id => "text").clear
Button object:
#Collections
browser.buttons(:id => "button")

#Check if button is enabled
browser.button(:id => "button").enabled?

#Get buttons text
browser.button(:id => "button").text

#Click on the button
browser.button(:id => "button").click
Checkbox object:
#Collections
browser.checkboxes(:id => "checkbox")

#Check the checkbox
browser.checkbox(:id => "checkbox").set
browser.checkbox(:id => "checkbox").set(true)

#Uncheck the checkbox
browser.checkbox(:id => "checkbox").clear
browser.checkbox(:id => "checkbox").set(false)

#Check if checkbox is checked
browser.checkbox(:id => "checkbox").set?
Listbox object:
#Collections
browser.select_lists(:id => "list")

#Select from list using text name
browser.select_list(:id => "list").select("var")

#Select from list using value
browser.select_list(:id => "list").select_value("var2")

#Check if value is selected
browser.select_list(:id => "list").selected?("var2")

#Get current selected value
puts browser.select_list(:id => "list").value

#Iterate through all values and print them
browser.select_list(:id => "list").options.each do |i|
  puts "#{i.text}"
end
Radio object:
#Collections
browser.radios(:id => "radio")

#Select the button
browser.radio(:id => "radio").set

#Check is button is selected
browser.radio(:id => "radio").set?
Image object:
#Collections
browser.images(:src => "img.gif")

#Check if image is loaded
browser.image(:src => "img.gif").loaded?

#Get the image height
browser.image(:src => "img.gif").height

#Get the image width
browser.image(:src => "img.gif").width

#Click on the image
browser.image(:src => "img.gif").click

#Click on the first image loaded on the page
browser.images[0].click
Div object:
#Collections
browser.divs(:class => "body")

#Get div text
browser.div(:class => "body").text

#Get text of second div when it appears
browser.divs[1].when_present.text
Table object:
#Collections
browser.tables(:id => "table")

#Get row 1, col 1 text
browser.table(:id => "table")[0][0].text


#Get row 1, col 2 text (alternitive)
browser.table(:id => "table").tr{0}.cell{1}.text

#Get row 2 entire text
puts browser.table(:id => "table")[1].text

#Click on row 4
puts browser.table(:id => "table")[3].click

#Get column count
browser.table(:id => "table").row.cells.length

#Get row count
browser.table(:id => "table").row_count
browser.table(:id => "table").rows.length
General
#[exists?] - See if object exists
browser.text_field(:id => "text").exists?

#[enabled?] - See if object is enabled
browser.select_list(:id => "list").enabled?

#[present?] - See if object is present
browser.element(:id => "e").present?

#[tag_name] - Return objects tag name
browser.element(:id => "e").tag_name

#[screenshot] - Save screenshot of current page
browser.screenshot.save("c:\\page.png")

#[to_subtype] - Returns HTML object
browser.element(:id => "button").to_subtype

#[index] - Click 2nd image on page
browser.image(:index => 1).click

# [loops] - Get names of all text-fields
browser.text_fields.each do |i|
  puts i.name
end

#Get the name of first text-field
puts browser.text_fields[0].name

#Get the name of second text-field
puts browser.text_fields[1].name
Waiting
#[wait_until_present] - Do nothing until object is present
browser.button(:id => "button").wait_until_present

#[when_present] - Only do something when object is present
browser.button(:id => "button").when_present.click
browser.button(:id => "button").when_present(10).click

#[wait_while_present] - Do nothing while object is present
browser.button(:value => "submit").click
browser.button(:value => "submit").wait_while_present
Step 7: Final Thoughts

Watir-Webdriver is a powerful tool that will allow you to easily create web application testing scripts. These may be as simple as filling out a form a few hundred times to testing dynamically generated content.
Projects that can be created using Watir-Webdriver include web spiders, text RPG bots, and any kind of task that requires programmatically automation. I have personally used this web automation platform for a while to create quite a few tools (mostly web text rpg video game bots) and I have yet to find a task that it doesn't suitably handle.
As a final code snippet here is how to log into instructables and search for my instructable just to show how easy it truly is!
require "watir-webdriver"

driver  = Selenium::WebDriver.for :firefox
browser = Watir::Browser.new(driver)
browser.driver.manage.timeouts.page_load = 30
browser.window.resize_to(1000, 600)
browser.window.move_to(0, 0)

##############################
username = ""
password = ""
##############################

browser.goto("https://www.instructables.com/account/login")

browser.text_field(:name => "u").set(username)
browser.text_field(:name => "p").set(password)
browser.button(:type => "submit").click
browser.button(:type => "submit").wait_while_present

browser.text_field(:name => "q").set("Automated Web Testing in Ruby with Watir-Webdriver")
browser.button(:id => "header-search-btn").click
browser.button(:id => "header-search-btn").wait_while_present
Thank you for reading my instructable.
Attachments

Participated in the
Automation Contest

Participated in the
Coded Creations

![Tim's Mechanical Spider Leg [LU9685-20CU]](https://content.instructables.com/FFB/5R4I/LVKZ6G6R/FFB5R4ILVKZ6G6R.png?auto=webp&crop=1.2%3A1&frame=1&width=306)


