

Introduction: Basic Arduino MIDI Controller

Intro:
I am new to working with Arduino but I hope to expand my knowledge by teaching others and receiving feedback. This is a very basic MIDI controller with 4 buttons and a potentiometer. The outline for this project looks like this:
1. Build out the breadboard
2. Upload the Sketch to the Arduino
3. Understand Hairless MIDI and internal MIDI loop (loopbe1)
4. route your MIDI to a DAW (Ableton)
Supplies
1 x Arduino Mega 2560
1 x Bread Board
1 x USB Cable
1 x Potentiometer
4 x Tact Buttons
4 x 120Ohm resistors
14 x jumper cables for breadboard
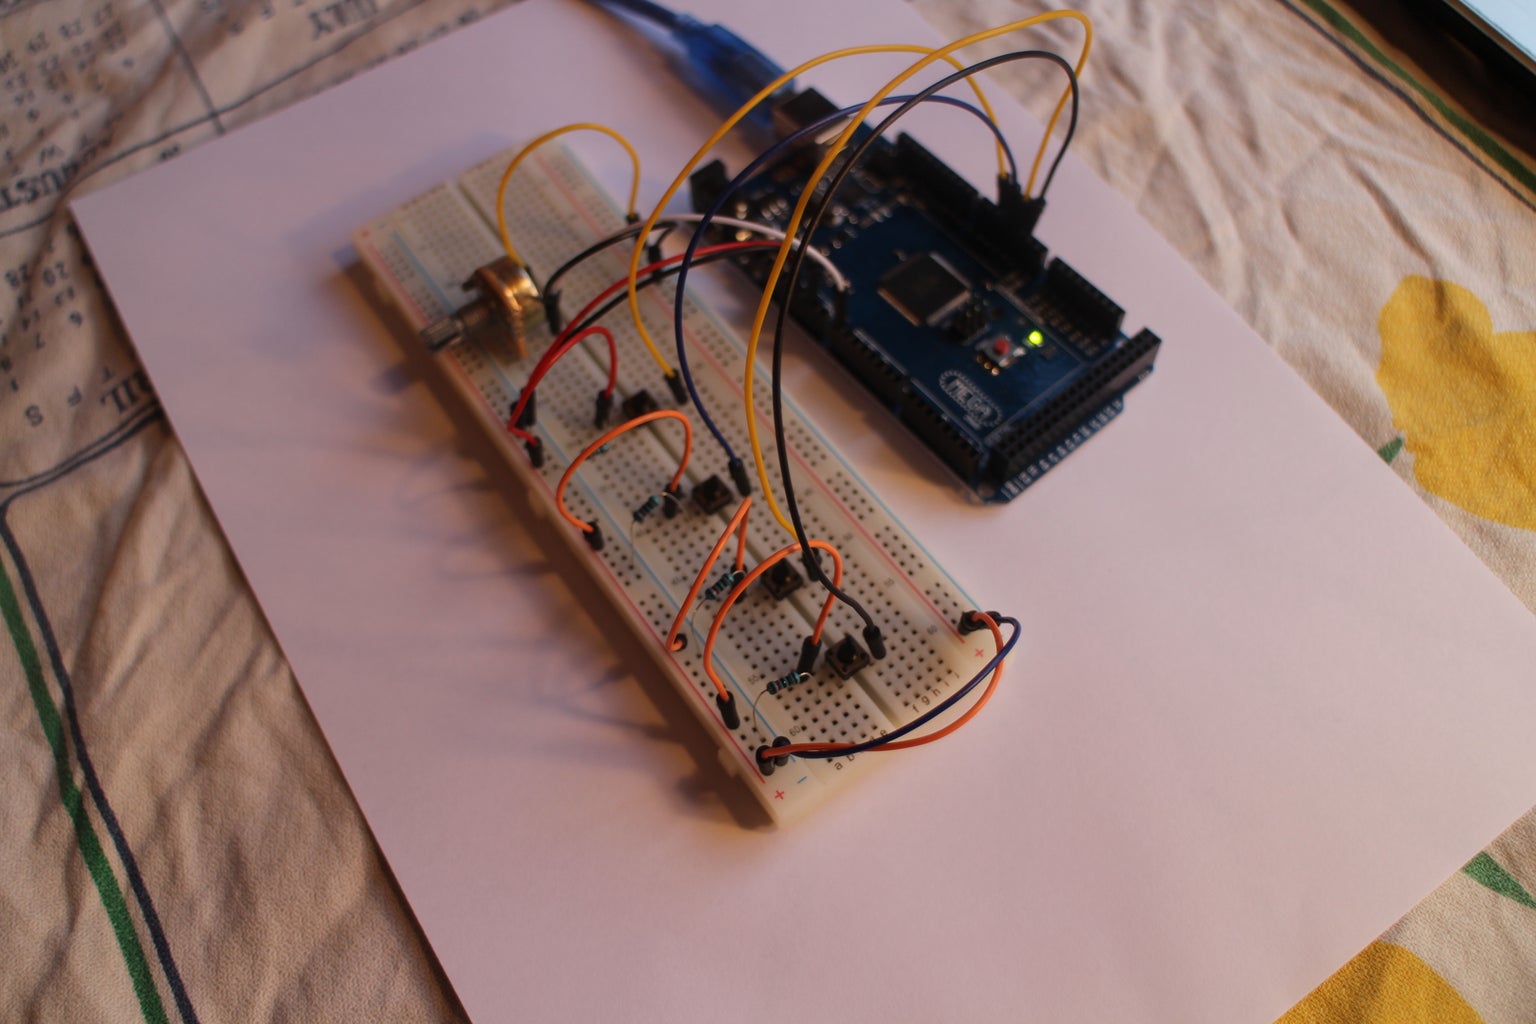
Step 1: Building Out the Breadboard


Connect your breadboard so all the components match image 1 above. Each button should look the same as image 2. Button inputs are 2,3,4 and 5 on the Arduino and the middle pin of the potentiometer is connected to ANALOG input A0.
Step 2: Uploading the Sketch

Copy and paste the code below into the Arduino IDE. Select the correct board under "tools" and upload the sketch to the Arduino.
<p>byte noteON = 144;//note on command<br>byte note;//storage for currently playing note
int buttonPin1 = 2;
int buttonPin2 = 3;
int buttonPin3 = 4;
int buttonPin4 = 5;
int potPin = A0;
boolean currentState = LOW;//stroage for current button state
boolean lastState = LOW;//storage for last button state
void setup(){
  pinMode(buttonPin1, INPUT);
  pinMode(buttonPin2, INPUT);
  pinMode(buttonPin3, INPUT);
  pinMode(buttonPin4, INPUT);
  //this time we will set the pin as INPUT
  Serial.begin(9600);//initialize Serial connection
}
void loop(){
  int PotVal = analogRead(potPin);
    byte velocity = map(PotVal, 0, 1023, 0, 127);

  currentState = digitalRead(buttonPin1);
  if (currentState == HIGH && lastState == LOW){


    MIDImessage(noteON, 60, velocity);//turn note 60 on with 127 velocity
    delay(200);//crude form of button debouncing
  } else if(currentState == LOW && lastState == HIGH){
    MIDImessage(noteON, 60, 0);//turn note 60 off
    delay(2);//crude form of button debouncing
  }
  lastState = currentState;
  currentState = digitalRead(buttonPin2);
  if (currentState == HIGH && lastState == LOW){//if button has just been pressed
    MIDImessage(noteON, 61, velocity);//turn note 60 on with 127 velocity
    delay(200);//crude form of button debouncing
  } else if(currentState == LOW && lastState == HIGH){
    MIDImessage(noteON, 60, 0);//turn note 60 off
    delay(2);//crude form of button debouncing
  }
  lastState = currentState;
  currentState = digitalRead(buttonPin3);
  if (currentState == HIGH && lastState == LOW){//if button has just been pressed
    MIDImessage(noteON, 62, velocity);//turn note 60 on with 127 velocity
    delay(200);//crude form of button debouncing
  } else if(currentState == LOW && lastState == HIGH){
    MIDImessage(noteON, 60, 0);//turn note 60 off
    delay(2);//crude form of button debouncing
  }
  lastState = currentState;
  currentState = digitalRead(buttonPin4);
  if (currentState == HIGH && lastState == LOW){//if button has just been pressed
    MIDImessage(noteON, 63, velocity);//turn note 60 on with 127 velocity
    delay(200);//crude form of button debouncing
  } else if(currentState == LOW && lastState == HIGH){
    MIDImessage(noteON, 60, 0);//turn note 60 off
    delay(2);//crude form of button debouncing
  }
  lastState = currentState;
}
//send MIDI message
void MIDImessage(byte command, byte data1, byte data2) {
  Serial.write(command);
  Serial.write(data1);
  Serial.write(data2);
}</p>
I am still very new to writing code in general..... those with a little more experience could probably clean this up...
Step 3: Understanding Hairless MIDI and Internal MIDI Loops


The Arduino needs to run through a serial bridge like Hairless MIDI then through an internal MIDI loop such as loopbe1 (or IAC bus for Mac).
Note: you cannot upload a sketch to the Arduino while it is connected to the hairless MIDI serial bridge.
Select your Arduino in the Hairless MIDI serial port and loopbe1 or IAC Bus in the MIDI out.
Note: be sure that mute is not on when using loopbe1.
Step 4: Connecting to Your DAW

If you are getting signal to the Hairless MIDI app when you press a button on the breadboard (lights will flash) you should be able to send MIDI data to a DAW. I used Ableton but any DAW should work. Be sure that your internal MIDI loop (loopbe1) is enabled in your DAW preferences (in Ableton you want "track" to be enabled). Next, select one of your MIDI track inputs to the MIDI loop (loopbe1) as shown in the image above.
Step 5: Play!

The buttons will now work like any other MIDI controller! The potentiometer will change the velocity of the notes being sent to the DAW. The (very dark...) video above shows a grand piano sound in action!


