

Introduction: CUSTOMIZED DESKTOP BACKGROUND for Streamlined Computer Use


In this tutorial we're going to be designing a customized desktop background to streamline computer use. This background adds labels to the applications on your desktop, so the user knows exactly which ones to click to do what.
Feel free to make this background for yourself, but it also makes a great gift to make one for a grandparent, parent, or someone else who may have purchased a new computer and is overwhelmed by all it can do. Make this background using the applications they most frequently use so they never have to waste time figuring out where to click to find them, or what each one can do.
To make this instructable, you will need a Mac computer. Personally, I used a MacBook Pro running OS X El Capitan version 10.11.1, however any Mac should work.
(The basic idea for this instructable also works on computers running Windows, although some steps will have to be modified a bit. When I made one on Windows in the past, I used Microsoft Paint as the program to edit the background with.)
Step 1: Change Desktop Background

Let's begin by changing the desktop background. Currently, our background is of a galaxy, but we would like to change it to something simpler.

A. Start by clicking the Apple icon in the top left corner.
B. In the dropdown menu that appears, select System Preferences.
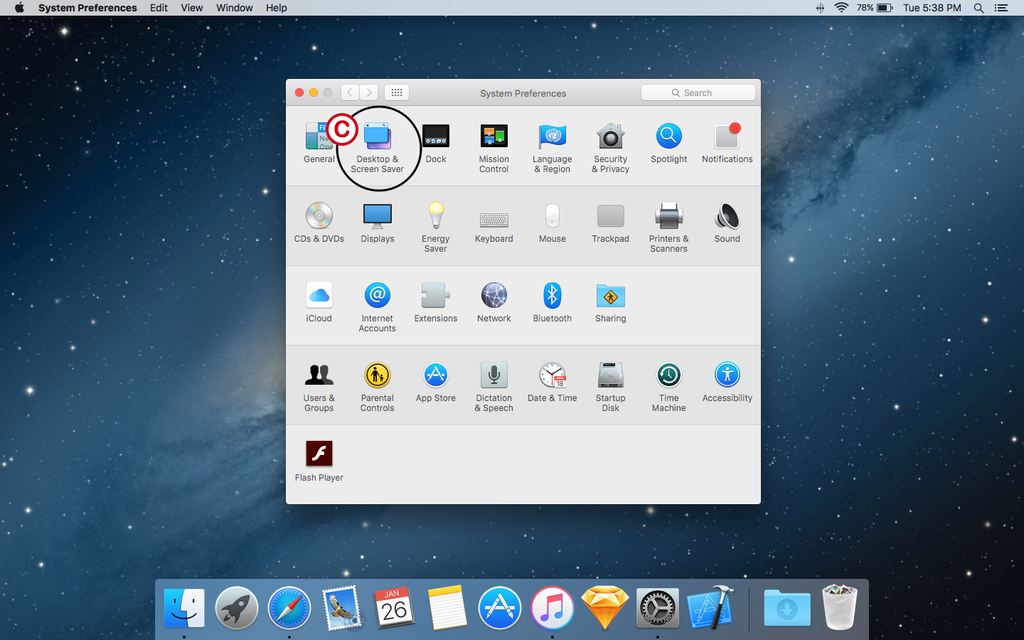
C. Select the icon labeled Desktop & Screen Saver.

D. In the list on the left, select Solid Colors.
E. For this tutorial, we are going to use the Solid Aqua Dark Blue background. Click on it.
Step 2: Place Desktop Icons
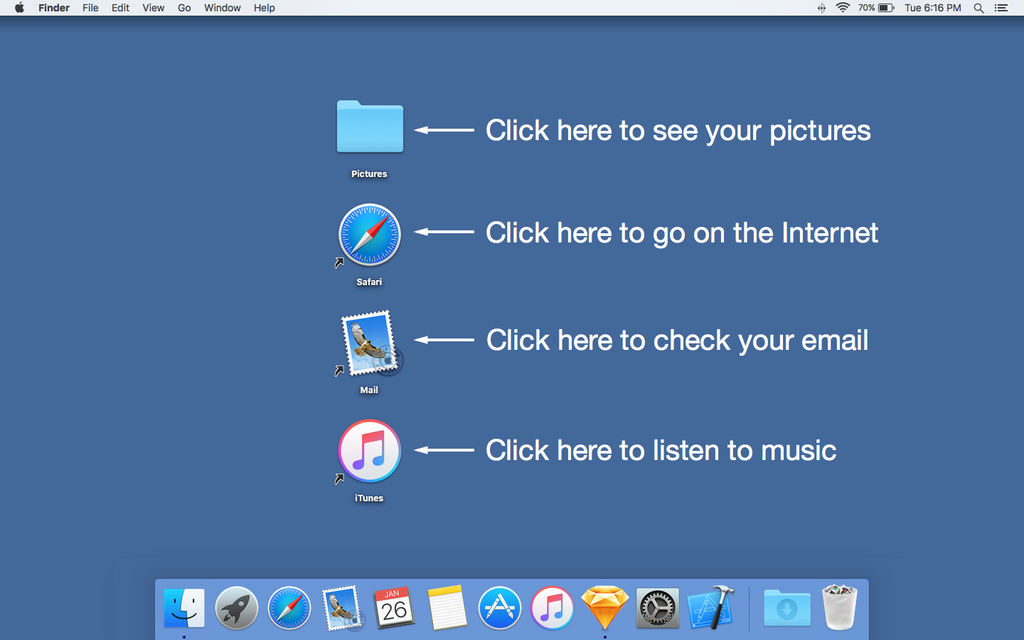
We are now going to decide on which applications we use the most on our computer, and add those icons to the desktop. Let's try to keep it to the essentials. In this example, we have iTunes, Mail, and a folder named Pictures on our desktop, but we would also like to add Safari.

A. To place an application on the desktop, begin by opening Finder. Finder is the rectangular smiley-face on the left of the dock at the bottom of the screen.
B. In the Finder window that opens up, select Applications from the list on the left.
C. Locate your desired application and drag it onto the desktop.
If you would like to add a folder instead of an application to the desktop, this same procedure applies, except that folder may be located somewhere on your computer other than Applications.
Step 3: Enlarge Desktop Icons
In order to make them stand out more, we are now going to increase the size of our desktop icons.

A. To do so, first place your mouse anywhere on the desktop and right click. In the dropdown menu that appears, select Show View Options.

B. In the window that opens up, there is a slider at the top indicating icon size. Drag the pointer to set the icon size at 100 x 100.
Step 4: Take a Screenshot

Now that we have the desktop prepared for our customized background, let's take a screenshot of it.

A. On your keyboard, press command, shift, and 3 at the same time. Your screen should flash white and make a shutter noise.

B. In the top right corner of your desktop a file should have appeared.
Step 5: Download Sketch

We are going to use an application called Sketch to produce the customized background. Sketch is a professional digital design program for Mac computers.
Find it here: https://www.sketchapp.com
The website gives you the option of downloading a free trial version or paying $99 for the full version. Download whichever you choose.
Step 6: Add Screenshot to a Sketch Document

With Sketch downloaded, go ahead and open it, then start a new document. Drag the screenshot file on your desktop into the open Sketch document.
Step 7: Insert Text
We are now going to label the applications on our background by inserting a text box.

A. In the top left corner of the screen, you should see a button labeled Insert. Click on it.
B. In the dropdown menu that appears, select Text.

C. Click your mouse next to one of your background's icons. The phrase "Type something" should appear.
D. To change the size and color of the text, take a look at the menu on the right. For this tutorial, select the Helvetica Neue typeface, color white, and size 40.
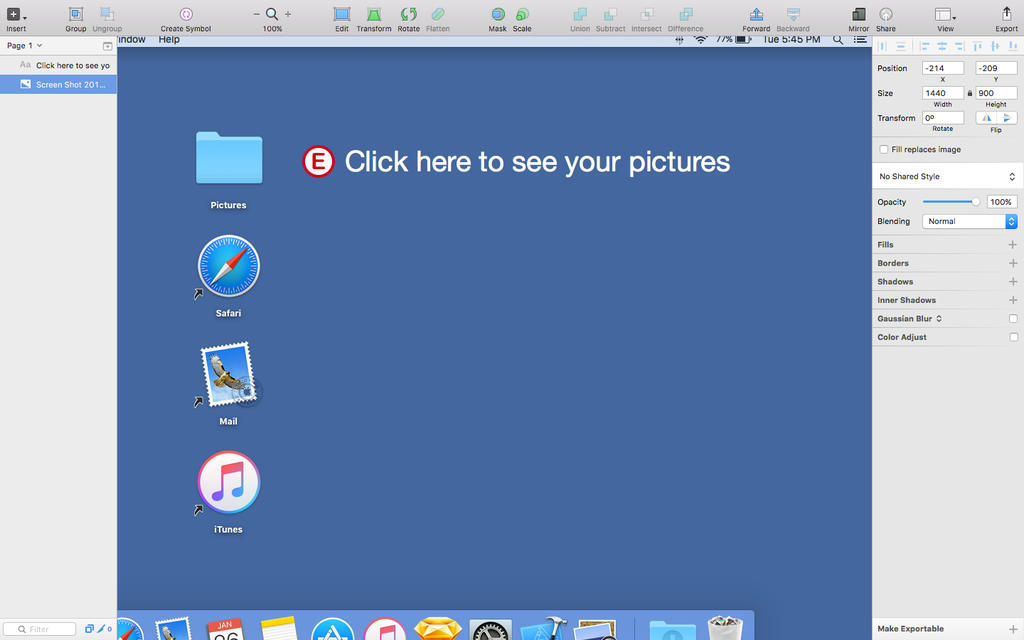
E. Now type on your keyboard what you want written in your text box. This step is dependent on what application you are labeling, so it is up to you what you write. In this example, we are labeling a folder named Pictures, so the text box says "Click here to see your pictures."
Step 8: Add an Arrow
Let's now add an arrow that points from the text box we just created to the application it is labeling.

A. Again, go to the top left corner and click on the Insert button.
B. In the dropdown menu that appears, hold your mouse over the Shape option to access its submenu. Then, in the new list that appears, select Arrow.

C. Insert the arrow into the document by clicking and dragging your mouse from its start location to end location.
D. In the menu to the right, change the arrow's color to white, and set its thickness to 4.
Step 9: Repeat!
Now that one label is down, let's repeat the last two steps to add labels to the rest of the icons.

Step 10: Block the Dock
To give our customized background a more clean and refined feel, let's cover up the dock. The dock is the row of applications at the bottom of the screen.

A. Let's start by clicking on the Insert button in the top left corner of the screen.
B. In the dropdown menu that appears, hold your mouse over the Shape option to again access the submenu, then click Rectangle.

C. Click and drag to insert the rectangle on the bottom of the customized background, such that it completely covers the dock.
Step 11: Change the Color of the Rectangle
Now let's change the color of the rectangle so that it matches the blue color around it.

A. With the rectangle selected, look at the menu on the right and select the color box above the word Fill.
B. In the color selector menu, click the button with the tiny eyedropper on it.
C. Your mouse should now change into a circle allowing you to select the color of individual pixels. Click on the color of the blue background using this tool.
Step 12: Group It All Together
In order to save our customized background as an image, we need to group it together first.

A. Select everything in the project. This can be done by dragging a box around it all using your mouse.

B. In the top left corner, click the button labeled Group.
Step 13: Export
With our customized background finished, let's export it.

A. With the group selected, there is a button in the bottom right corner labeled Make Exportable. Click on the plus sign next to it.

B. Leave the size as 1x and the format as PNG. Click Export Group.

C. In the dialogue that appears, type "Customized Desktop Background" in the Save As field.
D. Select Desktop as the location the file is being saved to.
E. Click Save.
Step 14: Set As Desktop Background
Now that our file is on the desktop, we can set it as the background.

A. Right click on the Customized Desktop Background file.
B. In the dropdown menu that appears, select "Set Desktop Picture."
That's it! Feel free to personalize these instructions to add your own flair to it. Be creative!

Participated in the
Digital Life 101 Challenge


