

Introduction: Ceramic Pots Planter


For this instructable, I willl be showing you how to make ceramic pots/planter.
Honestly ceramic work originally feels scary and messy when you start, but as soon as you get the hang of it, it's actually something that is very calming and fun to do.
In this tutorial, I will be showing two designs.... Like why not XD
Step 1: Equipment
So...... , there are actually more than one thing needed besides the clay.
- Your preferred clay (I used buffstone clay)
- Throwing Wheel
- Kiln
- Tools for carving (Optional.... You can use you r hands for a more cool look.. i guess - this includes wood tools too. They are usually sold in a set)
- Underglaze and Glaze
- Plant for potting
- Jute Rope, or any other thick type of rope works as well.
I did this at a studio where they had an kiln that I could use.
Step 2: Begin Preparing Your Clay


Begin to prep your clay.
This step is important as if it is there are too many air bubble in the clay, there is a high probability that the piece will explode.
To prepare, you will have to kneel it until its smooth and easy to work will. Its similar to kneel for bread but without a machine. You can also slam it and throw it on to the table..... It a great way to let out you stress... or anger. LOL
You can check by cutting it in half with a wire.
By doing this, you are essentially getting rid of the air bubbles and also making it easy to throw on the wheel.
Step 3: Throwing on the Wheel


Throw the clay with some force into the center of the wheel, this ensures that it sticks on and this reduces the air bubbles.
Seal it on the wheel with water.
Its best to start with a handful of clay on the wheel. (Its better to reduce than to add with the risk of air bubbles...)
Wet your hands with water and start shaping the clay.
Start coning the mass of clay to find the center. Its important to find the center.
Start squeezing it upward with your hands, and by making a hole to begin the pot.
Its best to stay steady for this step.
Step 4: Starting the Form


Begin to shape the pot.
The size I made was around 4-5 inch in diameter. Its also better to smooth the shape with a sponge.
Trim excess clay at the bottom of the pot to allow it to dry faster at the bottom.
After finishing the look, you dry to an almost leather hard which is essentially half dried.
You can now use sculpting or carving tools to shape it. You can flip it upside own to trim it. ( If you decide to flip it, find the center and put water to keep it on the wheel.
Its better to poke a hole at this point. I did it later so it's more work for me.
For cactus plants, its optional to add a hole on the bottom, but for other plants, its necessary to add a hole for water to come out after each water period.
Step 5: Adding Features


After completing the form, you can add the details, which are the arms and legs, and are done by hand.
Note - Arms are short to hold the thick twine.
Once competed, dry until it is bone dry.
Step 6: Firing


This is the first round of firing.
I fired this at cone 04 (△04) which is a process called green ware, where the pots go through a high-temperature heating. It also has to be loaded very carefully because they are still fragile.
The clay can also explode in the kiln if there are air bubbles in it. It can also explode if it hasn't been dried properly.
Step 7: Adding Color and Final Firing


For the second round of firing comes the glazing and the color.
I put splashes of primary colors on the pot. This is called the under glazing. After that I put on some basic glazing.
Always but the under glazing first, then put on the glazing
NOTE : Glazing cannot be on the bottom of the pot unless you can put it on stilts.
I fired this at cone 06 ( △06) but you can do it at cone 04 (△04). The package should tell you what temp to fire it at.
Only after the kiln has cool, can the kiln be opened and unloaded.
Step 8: Final Hanging and Decor


For hanging and decor, I bought some jute rope to hold up the pot if i were to hang it.
I bought it from a dollar store near me. You can basically use anything.
If you are using a slippery rope, you can use a hot glue gun to make dots on the rope to work as non slip grips for the pot.
Step 9: Extra Project


I also did another project as an extra. I wanted to make something cute that could be put on the table instead of being hung up.
Here are some pictures of it being thrown on the wheel. So, instead of a cylinder it has a more globe and circle shape.
Step 10: Shaping the Ears


After the shape has been formed, I added the ears and the nose and set it to dry after completion
Step 11: First Firing


Here are the images of the pot in the kiln.
The second and third images are the results after firing plus the addition of eyes on the pot after firing.
Step 12: Painting


Then I painted it.... like a pig needs to be pink...XD
Fired it after for a second time at the same temperature as the previous one.
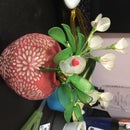
Step 13: Finished Products


Here are the finished products.
Thank you for taking the time to read this instructable.
I hope you have fun trying this out.
If hand molding is not your type, there are always more than one way to do it.
Have fun!!!

Participated in the
Planter Challenge


