

Introduction: Create Internal Interrupt in Arduino


Interrupt is a process through where you can complete certain tusk through interrupt function without interrupting your continuous program.For example, suppose you want to sleep 2 hour and after that you want to go to your work.Now, it is important to wake up after 2 hour to go to your work.If you can not wake up you can not go to work.Now, you have two options, one is to not to sleep and another is to through something make sure that you will wake up after 2 hour.If you chose second option(that mean you want to sleep). Then you have to set an alarm on your watch that, after 2 hour this will be ringing.Interrupts are like this.After a certain time it will break your main program and execute your desire work after that go back to your main program which was running.There are mainly two types of interrupt in arduino one is external interrupt and another is internal interrupt.Here the link of " create external interrupt"
https://www.instructables.com/id/External-Interrupt...
Lets make an internal interrupt in arduino.....
Step 1: Preparation to Make an Internal Interrupt in Arduino
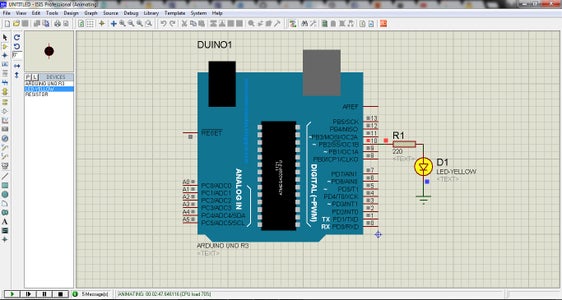
Before starting write the program you need to make sure that, you have arduino Timerone library in your arduino IDE.IF not then you can download from here or from arduino page Link: http://playground.arduino.cc/Code/Timer1. Normally, internal interrupt are created by timer resister.Arduino has three timer. They are timer zero,timer one, timer two.Timer zero and timer one are 8 bit and timer one is 16 bit.In this tutorial we will create internal interrupt using timer one interrupt. So, we need timer one library.by using this interrupt we can create three types of internal interrupt.They are Timer Overflow Interrupt,Output Compare Match Interrupt,Timer Input Capture Interrupt.I am not going to too much deep in this tutorial.I will just make an internal interrupt using some functions.This will be easy to understand.Our aim is to create an interrupt which will blink a led in pin 10.
Attachments

Step 2: Add the Library in the Program First (Step-1)
First you have to include the library in your program.That is,
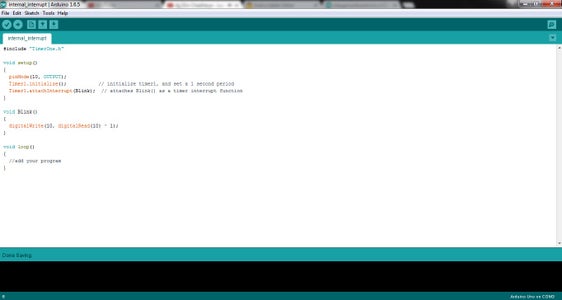
#include "TimerOne.h"
Step 3: In the Setup(Step-2)
We need to declare a pin to make a led blink.Let, declared pin 10 as OUTPUT.
pinMode(10, OUTPUT);
Step 4: Initialized Internal Interrupt(Step-3)
Now, we have to initialize internal interrupt to create internal interrupt.The name of the function which initialize interrupt is
"TimerX.initialize(period)"
here ,
X=0,1,2; (Since arduino uno has three timer zero,one and two)
period=period mean time in microsecond.By default period is set at 1 second.
Since, we will use timer one.So function will be,
Timer1.initialize(); //set a 1 second period
Step 5: Initialize Internal Interrupt Function (Step-4)
In the previous step we initialize internal interrupt.Now, time comes to call interrupt function to do the work in the interrupt.To call the interrupt function we need to use,
"TimerX.attachInterrupt(function)"
X=0,1,2; (Since, arduino uno has three timer zero,one and two)
function=function is the name of the function that we are going to use as interrupt function.
I want to use the name of the of the function is "Blink".
So the command is,
Timer1.attachInterrupt(Blink); //initialize internal interrupt function Blink
Step 6: Interrupt Function(Step-5)
We want to blink led.So, we need to toggle pin 10 in the interrupt function in "Blink" function.
void Blink()
{
digitalWrite(10, digitalRead(10) ^ 1);//Toggle pin 10 for blink
}
Step 7: In the Loop(Step-6)
Add your program in the loop.
void loop()
{
// add your program
}
Step 8: Total Program for Arduino Internal Interrupt (Step-7)
#include "TimerOne.h"
void setup()
{
pinMode(10, OUTPUT);
Timer1.initialize(); // initialize timer1, and set a 1 second period
Timer1.attachInterrupt(Blink); // attaches Blink() as a timer interrupt function
}
void Blink()
{
digitalWrite(10, digitalRead(10) ^ 1);
}
void loop()
{
//add your program
}


