

Introduction: Custom Operation Game Using Makey Makey


Hello! In this instructable I will teach you how to build your own personalized operation game powered by Makey Makey! You will create a tabletop game similar to Hasbro's Classic Operation Game. This build also houses all the wires and the Makey Makey (because who wants an ugly spider's web of alligator clips creeping out of their beautiful creation). Also, it is built so that you can remove the Makey Makey and the clips easily for other projects, while still keeping the game intact.
Along with each step, I have included pictures that follow the procedure in chronological order.
This is a unique project, because each is specific to the maker themselves. Lets get Started!
Supplies
Tools
- X-acto knife (or any other small craft knife capable of fine cutting)
- Hot glue gun and sticks
- Craft glue
- Cutting mat or a non scratch surface on which to cut
- Scissors
- Ruler
- Printer
- Pencil
Supplies
- Cardboard
- Aluminum foil
- Makey Makey
- Makey Makey alligator clips
- Clear tape
- Removable objects (See step one)
- Paint (optional)
Step 1: Deciding on Your Removable Objects

The main idea of the operation game is to remove small items from holes in a cutout of a patient using tweezers, without touching the sides of the holes. If the tweezers touch the edge of a hole, a buzzer will sound and your turn is up. The game requires fine motor skills, a steady hand, and lots of concentration.
For this game, you will be selecting what gets removed from the patient! You should plan out the objects you want to use for your game before anything else. Your items can be beads, charms, pencil erasers, etc. These items don't need to be literal, for example, an eraser could be an organ or a bead could be an apple swallowed whole! Get creative with it. If you enjoy working with clay or 3D printing, you could also create your own specific items as well.
Step 2: Cutting the Parts


Included are files with patterns for all the cardboard parts. Use the dimensions in the files to draw out all the pieces except for the figure. Once you have drawn the patterns, use the knife to cut out all the parts. BE CAREFUL AND MAKE SURE YOUR KNIFE IS SHARP! NEVER CUT WITH A DULL KNIFE! You may need to cut a line several times to achieve a full cut through. Try and get these cuts as neat as possible as they determine the overall neatness of your final product.
Also in the files is a figure stencil. Print this out and use it to trace out your figure. Feel free to make some minor changes to body shape, but make sure you don't change its height or width. Once you have traced it, go ahead and cut it out with your knife.
If you want to paint any of your parts or personalize your figure, the ideal time is at this step.
Attachments

Step 3: Cut Out Your Figure Holes


Now you need to plan where you are going to place the figure holes from which the small pieces will be removed. The number of holes is up to you, but I've found that 6 works well. Your holes should be slightly bigger than the items you are placing in them. Have fun with this part, give each piece a reason to be in the place it is!
After you have cut out the holes from the figure, you need to cut them out from the middle board. Place the top cover on the middle board and then center your figure in the middle of the hole. (See pictures) Use some tape to secure the figure in its place, then use a pencil to trace the holes onto the middle board.
Remove the tape and the figure from the middle board, then on the middle board, draw a slightly larger outline around each hole. (See pictures)
Cut out the larger holes from the middle board. These new holes should line up with the holes in the figure, though they are slightly larger.
Step 4: Foil Coating Your Figure Holes


Now comes the tricky part. Go ahead and plug in your hot glue gun and let it warm up. In this step you will line the edges of your figure holes with foil so that the Makey Makey can detect when the tweezers touch them. First cut several strips of foil that are at least a 1/2" wide.
- First, pick a hole to work on.
- Line the back of the hole with hot glue.
- Rip a segment from one of your foil strips that is small enough to fit in the hole. I was using 1/3" - 1/2" segments.
- Place half of it on the glue in a way that the other half hangs into the hole BE CAREFUL NOT TO BURN YOURSELF.
- Push the unglued part of the foil through the hole and wrap it around to the other side.
- Reheat the glue around the strip with the glue gun's hot tip.
- Add another strip making sure it overlaps the current one.
- Repeat steps 3-7 until you have covered hole's entire perimeter.
- Take a strip at least 4 inches long and hot glue it to the hole so that it only goes through the hole as much as your other strips, but the long end travels away from the hole. (See picture)
- Squish (not twist) the long strip into a wire.
- Repeat for each hole.
Step 5: Securing Figure Holes


Now that you have you foil attached, we need to make sure it stays attached.
To secure the back, cover your foil edges with hot glue, making sure not to get any glue in the hole. Also add a fair amount of glue to the foil wire's base to prevent tearing.
To secure the front, take some regular craft glue and use a q-tip to cover the edges of the foil. Again, make sure not to get any in the hole.
Step 6: Attaching the Figure to the Middle Board


Now you need to mark out a slot for each hole on the middle board in the direction of the foil wire. (See pictures) Then you need to add glue to the figure's back and line up each wire to its relative slot, pulling them through and gluing the figure to the board. MAKE SURE YOUR HOLES LINE UP AS WELL!
Once you have secured the figure to the middle board, use hot glue to fill the wire slots and secure the wires in them.
Step 7: Add the Hole Backings


Now you need to cut several pieces of cardboard, one for each hole on the middle piece. Make sure that these pieces are big enough to cover the holes entirely with room to glue them down. Once you have them cut out, glue them on without getting glue in the hole.
Step 8: Assemble the Box


Now you are going to assemble your game box! Take the support strips and the height sides and glue the support strips to the height sides in a way that leaves a space about the thickness of a cardboard sheet at the top. (See picture) Do the same to the other support strip and side.
Now you need to glue the top cover to both height sides in the gap you left in the previous step. (See pictures)
You now need to glue the figure board to the top cover and sides. Add hot glue to the other edges of the support strips and attach the figure board so that the figure looks through the opening in the top cover. (See pictures)
Hot glue the width sides to the apparatus and complete the box.
Step 9: Attach Tweezers


Okay, now we have a complete box, but we need to attach our tweezers. Place your Makey Makey face-down in the top left corner with the click terminal facing down. Now using a pencil, mark the two click holes onto the middle board. Cut out a small box around the two dots that is big enough to see the holes through it. Finally take one of your alligator clips and clip it to the Makey Makey's click terminal through the cardboard.
Now clip the other end of the alligator clip to your tweezers. Depending on the size of your tweezers, you may also be able to stretch the rubber covering over the end of them as well. (See pictures)
Step 10: Attach the USB


You should now be able to cut a hole in the side of the box for the USB cord to attach to the Makey Makey.
Step 11: Wire Your Holes


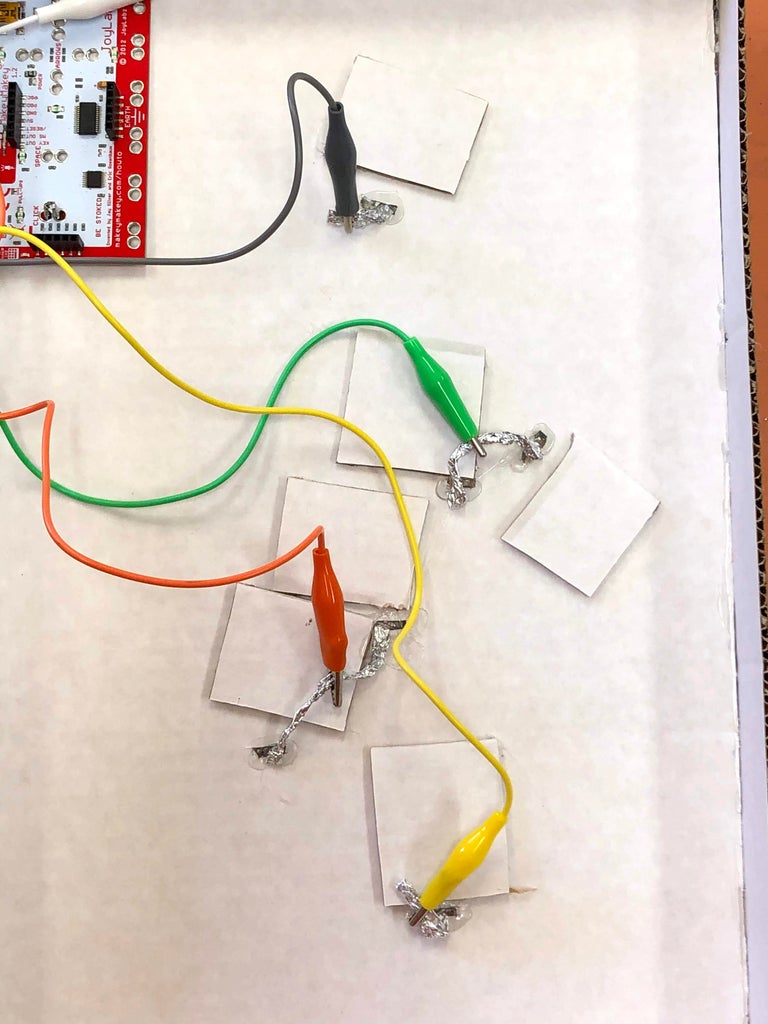

You are now ready to attach the Makey Makey to your foil wires. To conserve your clips, you may also want to twist some of the foil wires together. Connect an alligator clip to each wire, or connected wires, then connect each clip's other end to the space terminal on your Makey Makey. (See pictures)
Step 12: Add the Back Cover


Now you just need to tape on the back cover. You should tape and not glue it so that you can still retrieve your Makey Makey for other AWESOME PROJECTS!
Step 13: Set Up Computer
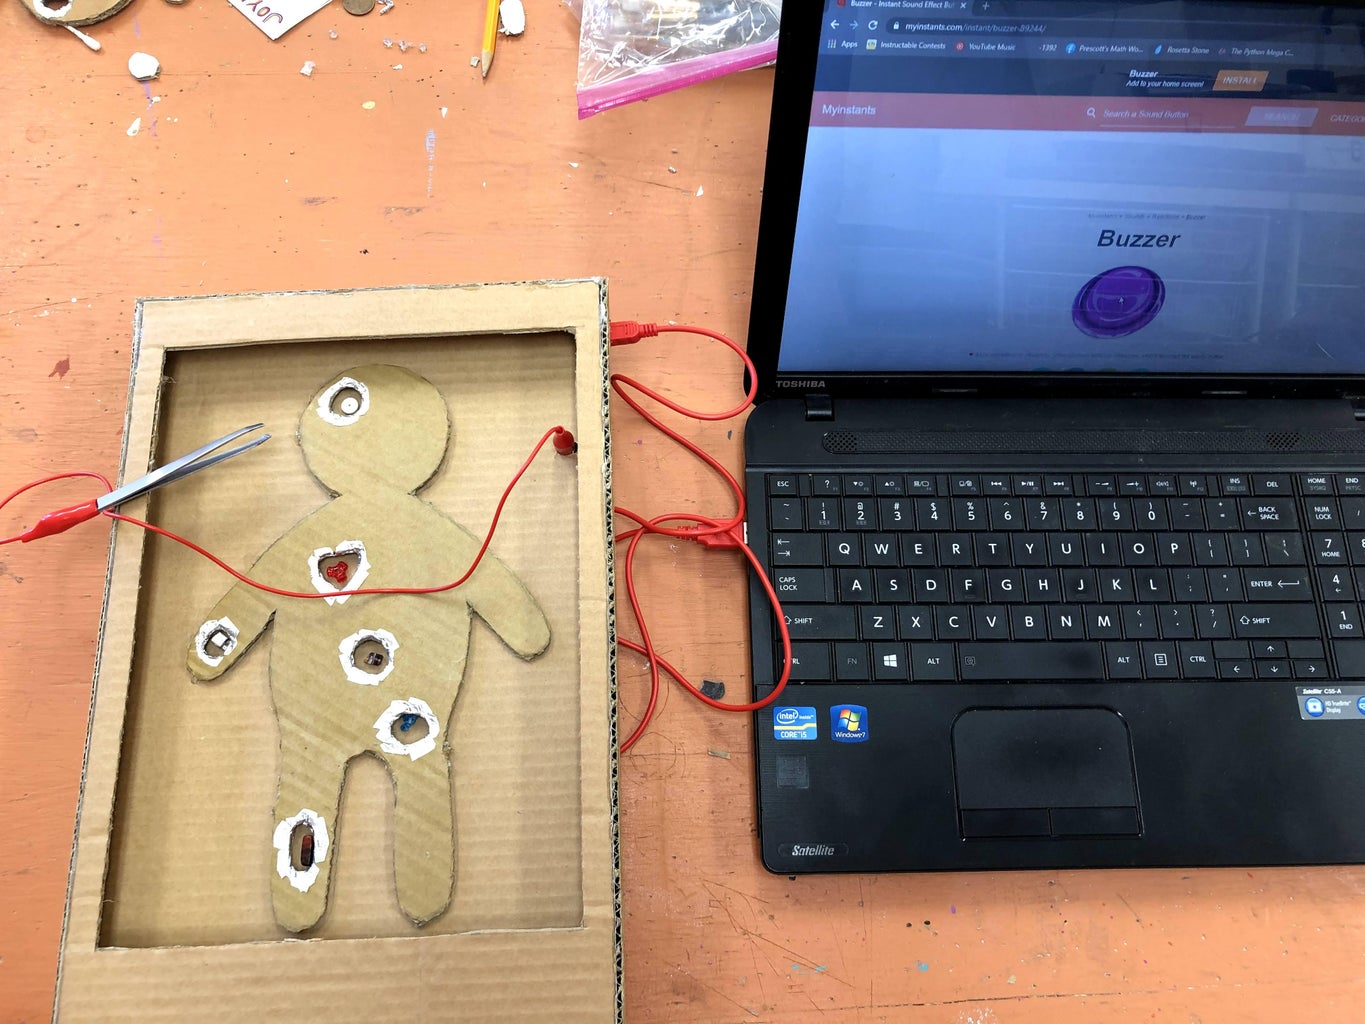


For the final step you need your computer. You can go to any click-activated soundboard website or app, but I've been using https://www.myinstants.com/instant/buzzer-89244/.
Plug the Makey Makey USB cord into your PC. If this is your first time using Makey Makey, it may cause several popups to appear on your screen, just close out of all of them. Now place your mouse over the button and...
Step 14: PLAY!
Congrats! You now have a fully operational Makey Makey Operation game.
Some ideas to take it further:
- Set it up with a Raspberry Pi
- Add housed batteries
- Try different types of tweezers
- Try different hole sizes
- Try different items
Runner Up in the
Makey Makey Contest


