

Introduction: DIY Cordless Water Pump


Its time to pump some water out of the bucket.....
Yes! In this instructable I am going to built a water pump that is powered by cordless tools batteries. The idea behind this whole instructable is to built a good quality water pump out of very common hardware lying around.
As all my tool lineup is from AEG 18v cordless series so this pump is made to fit the standard 18v lithium batteries offered by AEG.This not only gives me the convenience of powering the pump anywhere but also enables me to use the same battery for all my tools.
Its time to ready get set built !!!
Step 1: Components


As all my other projects, this project is also based on very common materials that are available from any hardware store.So the list of the required material is :
- 18v brushed DC motor (Chinese ones commonly used in cordless table fans)
- A cordless tool battery (In my case its AEG 18V lipo battery you can use any other brand as well)
- 2inch UPVC pipe
- 2inch UPVC pipe end cap
- 5mm plexi glass sheet
- 1/2 inch pipe (In my case i have used an old carbon fibre pipe that i got from a broken golf stick )
- 5mm thick plywood sheet
- wooden strip 20mm*5mm
- A bunch of philips head screw
- A drum cap from an old oil container
Now time to put some labour on that bunch of material and transform it to pump some water.
Step 2: Main Housing


The whole idea is based on the design of centrifugal in which an impeller revolves arround an enclosed housing so that when the impeller revolves, it forces the water outwards which then flows through the output pipe on the housing.
So the whole pump is based around the 2inch UPVC end cap which acts as an enclosure or housing for the impeller that actually forces the water out of the pump.The motor is also mounted on the UPVC cap by using two screws.Later on the UPVC cap is glued to the base using some plywood supports.
To make an outlet, I have used a carbon fibre pipe that i got from an old golf stick measure 20mm in diameter which is sufficient size outlet for this water pump.The outlet pipe is mounted such that is is much like a tangent on the surface of the impeller housing which helps the water flows more easily out of the pump.
Next to that i have decided to make a transparent front cap for the housing which definitely gives the whole pump a neat and nice look and one can easily see all the moving parts inside the pump through this transparent sheet. For the front end i have used a 5mm thick plexi glass sheet which is cut down using a hole saw and later on the centre hole is enlarged to fit the inlet pipe which is from the same golf stick as the outlet pipe. The pipe was glued down and holes were made to that this whole front piece will be screwed down on the main housing.
Step 3: Impeller


The whole idea behind pumping water using an electric motor is based on the working of a centrifugal impeller. As the impeller rotates inside a closed chamber, it forces the water towards its walls where there is an outlet channel available for the water to flow outside of the pump.
So to built ourself an impeller, I have used an old oil container lid (Yellow colour plastic sheet) to cut a pair of round plates to serve as the base of impeller.The diameter of these sheets is a bit smaller than that of the 2 inch UPVC pipe so that impeller is allowed to spin freely within the enclosure.
The impeller blades are made out of 20mm wide pieces of 2inch diameter UPVC pipe that are glued inbetween the round plastic plates such that six impeller blades were glued at equally measure distances.
Furthermore to improve the performance of the impeller, the tip of the blade were made taper from the front end which is going to face the inlet. To make this impeller fit on the motor shaft perfectly, i have placed a piece of an old pointer exactly in the centre while glueing a rubber pipe inside to make the impeller grip on the motor shaft as tighter as possible.
The whole impeller was further strengthened by putting epoxy glue on all the joints.
Step 4: Base Plate


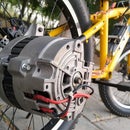
Since i have decided to power this water pump by using the same batteries that i uses for my cordless tools, so i need to built a base that exactly replicates the base of my cordless tools and fit down on the batteries just like my cordless tools.
So first of all i have traced down the shape and size of the base on a 2 layered 6mm plywood sheet. Later I cut down the sheet of plywood and sanded it so that it perfectly fits on top of the battery. Furthermore, i have aded plywood stripes on sides of the base to make a sliding mechanism. I have also added a grove at the bottom of the base so that the two hatches on the battery can pop inside while locking the whole base plate in place ensuring that the pump wont slide out of the battery during the operation.
This whole base plate finished up much better than expected as it slides and locks down on the battery just like all the other cordless tools.
Step 5: Painting All the Parts


After making all the parts i have decided to paint all the parts in the same colour scheme (orange and black) as of all the AEG tools, giving the water pump a nice and sleek look.
The paint also protects the wooded parts from water and hence making the whole body water proof.
Step 6: Assembling the Water Pump.


All the parts were assembled together after the paint dried up.
First the motor was mounted to the main housing. Then impeller is mounted on the motor shaft by just pushing it on the shaft.The rubber pipe inside the impeller grips the motor shaft so nicely that it never slips from the motor shaft. The plexi glass front end was screwed down and to ensure that no water leakage takes place, silicon is added in between the end cap and the impeller housing.
Later on a switch is glued on the base plate which is then wired up with the motor and the elegator clips were added so that power can be extracted from battery terminals.
The end results were just outstanding as the whole pump finished up so nicely that it seems like a factory made product. Not only this but the whole pump worked better that it looks as it pumps almost upto 10 liters per minute while throwing the water almost 10 foots away.
Just checkout the pump construction and working vide on YOUTUBE:
If you like my project then don't forget to vote my project in built a tool contest
https://www.instructables.com/contest/bat2017/
For further videos visit my instructables page,like my facebook page and subscribe to my youtube channel for the videos of my upcoming DIY projects
https://www.instructables.com/member/DIY%20KING%20...
https://www.facebook.com/DIYKING00/?ref=bookmarks
https://www.youtube.com/user/falconsamad
Regards.
DIY KING.

Participated in the
Build a Tool Contest 2017

Participated in the
Woodworking Contest 2017


