

Introduction: DIY Drill Press With Rubber Band Suspension


EDIT: I have added the Sketchup model I used for download if you want; but keep in mind that if you want to build this it has to be customized for your drill; though the carriage and track can remain basically the same. Also check the comments out for some great tips and comments from others.
I do woodworking as a hobby, not as a business, so I'm always looking for fun & creative ways to improvise. I don't have a drill press, but lately every project I've been working on would benefit from the precision of a drill press: both the depth of the hole and the vertical axis. So: I decided to convert a corded drill that I have into a drill press.
This entire project was made with materials I already had, including four super heavy duty awesome rubber bands, which is why I entered this project in the Rubber Band contest.
The other materials I used, besides the Rubber Bands, were:
- Two spare full extension drawer slides (from a keyboard drawer)
- A corded drill (that I didn't use very often)
- Scrap plywood, 3/4" and 1/2"
- 1/2" wood dowel
- A 6" (diameter) steel band clamp
- Miscellaneous screws and fasteners
- Wood glue, Spray adhesive, Epoxy
- 3/16" threaded rod & two nuts
- Clear wood sealer, Black rubberized spray paint
I used the following tools during the build:
- Tablesaw
- Scroll Saw (You could use a jigsaw, bandsaw or coping saw for this)
- Cordless Drill
- Belt Sander
- Mitre saw (Everything could be done with just a table saw)
- Printer (for printing the templates and grid guide)
- Level, Adjustable Square, Calipers - Lots of precision is needed during the build to make sure you get a straight vertical result
This took a full day to build, lots of that time was in trying to get the two pieces of plywood that hold the drill to be straight and level. If you need a drill press and have a limited budget, this one is an option, but you might also be able to find a used one that will meet your needs.
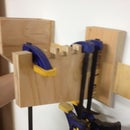
The best part of this drill press is the suspension system: The rubber bands are used to counteract the weight of the drill and allow it to 'bounce back' after each hole. It's easy to control the drill with its handle and trigger without having to support its weight. I used rubber bands because I needed something that stretched out to 3x its original length. It was hard to find a metal spring that stretched to even 1.5x; and coil springs would have been too complicated; so keeping it simple was the way to go.
Attachments

Step 1: Measure, Model, Plan!


My drill has a handle that can be attached just behind the chuck, and the handle clamps around a nice circular portion of the drill body. This was perfect for mounting the drill to ensure the base was stable.
I clamped the drill to a work surface, checked to make sure it was level and plumb, then measured up to another point on the body that I could brace to.
I modeled the entire drill press in Sketchup, to make sure everything fit together. I did not model the drawer slides themselves, I just measured the required distance between the slide mounting point and the drawer mounting point, which told me how far the offset between the drill carriage (the part attached to the drill) and the track (the non-moving part) needed to be.
The handle for the depth stop adjustment is from Matthias Wandel's Wood Gear Generator, check his website out for some amazing wood tools and machinery built entirely from wood. I have attached a sample PDF for a five pointed handle: what I built has six points but I find the points are a bit too close together, five would work better.
This model does not show the base of the drill press; I just used another piece of 3/4" plywood and clamped this into my workmate when I want to use the drill press. The base for anything you build would depend on what you want to attach the drill press to.
Attachments

Step 2: Cut Parts, Check Fit


After I modeled everything in Sketchup, I printed out templates for the smaller pieces full size. I used spray adhesive to attach these to plywood, then cut them out with my mitre saw and my scroll saw.
After cutting the parts out, test fit them on your drill to ensure that the drill will be level and plumb. I cannot stress enough how important it is to be as close to perfectly vertical as possible.
Some parts (ie, rectangular parts) didn't need a printed template, just dimensions. I made a cut list of the required parts and cut them on my tablesaw and mitre saw.The cut list is below, but keep in mind that this was sized based on my drill and the length of threaded rod that I already had:
Qty - Item - Size
1 - Carriage Back - 6" X 10" X 3/4" Plywood
2 - Track Sides - 2" X 25" X 1/2" Plywood
1 - Track Back - 6" X 28" X 3/4" Plywood
1 - Track top / Adjustment Knob support - 2 3/4" X 6" X 3/4" Plywood
1 - Track Base Stop - 8" X 6" X 3/4" Plywood, this needs 2" wide X 5" high cutouts on both sides
1 - Stop Block - 1" X 1 3/4" X 3/4" Plywood - With nut epoxied in at centre
1 - Band Clamp Spacer - 3/4" X 1 3/4" X 3/4" Plywood - The band clamp tightens around this and this is also what hits the stop block.
2 - Carriage side brace - 4 1/4" X 1 1/2" X 3/4" Plywood - This braces between the two 'hands' that hold onto the drill
4 - Rubber Band Peg - 1/2" dowel, 1 1/4" long, sanded down a bit so this it will fit into a 1/2" diameter hole
Step 3: Assemble


I glued all the parts together and also used screws to assemble components of the carriage (the part the drill atatches to). Some parts of the carriage I did not glue, as I wanted to be able to remove the drill at some point in the future without having to destroy the drill press.
It isn't necessary to paint or finish the drill press, however I did spray paint the depth stop dial with some black rubberized rockerguard paint.
Follow the directions for whatever glue you are using. The epoxy I had was 1 hour epoxy but it didn't fully harden for 24 hours, so I left the handle overnight before trying to use it.
Pay careful attention to the sequence that things need to be assembled in: The depth stop block needs to be first, then the drill carriage, then the top piece (with "Lower / Raise" written on it).
Step 4: Finish & Test


I glued a sheet of paper with a 1/4" square grid onto the base; then I sealed the base with some clear coat polyurethane. This was glued on with wood glue that I spread out with a piece of scrap plywood as a squeegee. This has helped me align materials and ensure that I'm drilling in the correct spot.
I also tested the rubber band suspension: Normally the drill is fairly heavy, but with four rubber bands it will hover about an inch above the table surface. It can easily be pushed down or retracted. Success!

First Prize in the
Rubber Bands Challenge


