

Introduction: Easiest Arduino VESC Monitor


Hi,
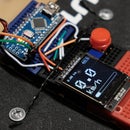
in this project we will make easy VESC monitor. This would be useful when you want to monitor your temperature and find out problems like I had with my Vesc overheating (which I found out just with this monitor) or you can use it simply for attaching display to your board or handlebars and watch your speed, mileage, battery percentage and many more. So let's get into building!
Step 1: Parts


1. - Arduino (I am using UNO but you can also use any other board including esp8266 or esp32)
2. - some cables for connecting (try to find connector for your connector for vesc because it will be much easier to unplug 1 big connector vs. a lot of small cables)
3. - display (I am using 124 x 32 Oled but you can use any other by changing library)
4. - optional - breadboard (this is for people who dont want to solder or for ones who want to do it temporarily)
5. - USB cable for your arduino
Step 2: Connecting Parts Together


display: Vcc to 3.3V
Gnd to Gnd
Sck (or scl) to A5
Sda to A4
VESC: 5V from Vesc to Vin on Arduino
Gnd to Gnd
RX on VESC to TX on Arduino
TX on VESC to RX on Arduino
Step 3: Uploading and Modifying the Code to Your Preference
CODE:
/** 2020 code by Lukas Janky
VESC monitor with Oled display If you need to ask me anything, contact me on lukasjanky2003@gmail.com or on my instructables. I hope that this will help you.
*/
#include #include #include #include #include #include #include #define SCREEN_WIDTH 128 #define SCREEN_HEIGHT 64 #define OLED_RESET 4 Adafruit_SSD1306 display(SCREEN_WIDTH, SCREEN_HEIGHT, &Wire, OLED_RESET);
VescUart UART;
int rpm; float voltage; float current; int power; float amphour; float tach; float distance; float velocity; float watthour; float batpercentage;
SimpleKalmanFilter Filter1(2, 2, 0.01);
void setup() {
Serial.begin(115200); display.begin(SSD1306_SWITCHCAPVCC, 0x3C); display.fillScreen(0); display.display();
/** Setup UART port (Serial1 on Atmega32u4) */ // Serial1.begin(19200); while (!Serial) {;}
/** Define which ports to use as UART */ UART.setSerialPort(&Serial);
}
void loop() {
////////// Read values ////////// if ( UART.getVescValues() ) {
rpm = (UART.data.rpm)/7; // The '7' is the number of pole pairs in the motor. Most motors have 14 poles, therefore 7 pole pairs voltage = (UART.data.inpVoltage); current = (UART.data.avgInputCurrent); power = voltage*current; amphour = (UART.data.ampHours); watthour = amphour*voltage; tach = (UART.data.tachometerAbs)/42; // The '42' is the number of motor poles multiplied by 3 distance = tach*3.142*(1/1609)*0.72*(16/185); // Motor RPM x Pi x (1 / meters in a mile or km) x Wheel diameter x (motor pulley / wheelpulley) velocity = rpm*3.142*(60/1609)*0.72*(16/185); // Motor RPM x Pi x (seconds in a minute / meters in a mile) x Wheel diameter x (motor pulley / wheelpulley) batpercentage = ((voltage-38.4)/12)*100; // ((Battery voltage - minimum voltage) / number of cells) x 100
}
////////// Filter ////////// // calculate the estimated value with Kalman Filter float powerfiltered = Filter1.updateEstimate(power);
display.fillScreen(0); display.setCursor(10,5); display.setTextColor(1); display.setTextSize(1); display.print(voltage);
display.setCursor(10,20); display.setTextColor(1); display.setTextSize(1); display.print(power);
display.setCursor(10,40); display.setTextColor(1); display.setTextSize(1); display.print(rpm);
display.setCursor(10,55); display.setTextColor(1); display.setTextSize(1); display.print(current); display.display();
delay(50);
}
You can modify and display any value from code that you want.
Attachments

Step 4: Checking If It Works
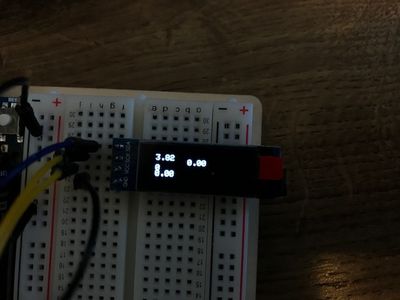


Now when you check if it is working is time for soldering it and adding labels to your values like Volts or Amps. Solder it on arduino nano so it will be smaller or you can even transmit it with other arduino to your remote controller. but for that are many other tutorials (search transmitting values with arduino). I hope that this helped you solving your problem or making nice little vesc telemetry.

Participated in the
Arduino Contest 2020


