

Introduction: Half-Life 2 Gravity Gun


"You can call it the zero-point energy field manipulator if you reallywant to. " -Alyx Vance, Black Mesa
Happy video game awareness month. I'm celebrating March by showing my nerdiness, my prop-making skills, and my dedication for one of my favorite games of all time . I decided to honor Valve's Half Life 2 by replicating the most infamous weapon in the game (and probably of all time):
The Zero Point Energy Field Manipulator .............Otherwise known as- "The Gravity gun" .
Here's a quick demonstration of the implications of the weapon in combat in the second episode of Half Life 2-
Warning: Video contains graphic violence, blood, and gore. Content may not be appropriate for all ages.
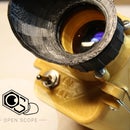
The Gravity gun is one of the most iconic weapons in one of the most iconic games in the last decade of video game history. It's debut set the bar high for any physics weapon yet to come. The weapon may not the best choice for blasting your typical final boss, but it can use essentially any object as it's ammunition, which is pretty awesome, not to mention original to say the least. The weapon can attract objects closer to the player, pick them up, set them back down, or launch them at your enemies. It's also handy to draw health and ammunition close to the player from inaccessible places. The gun is powered from what seems to be a xen crystal in a vacuum chamber giving the device it's unique gravity-bending properties.
Since I didn't paper model this, it has geometrical imperfections and isn't exactly perfect in shape. But it still lights up and looks pretty sweet. The gun is divided into three main parts: The power reactor at the rear of the gun with the handles, the quantum vacuum chamber with its glowing tube-like shape in the middle, and the emitter on the front of the gun with the claws.
I got my idea for this when I saw a replica of the portal gun from Valve's Portal (https://www.instructables.com/id/How-to-make-a-Portal-Gun/ ). So I built my rendition of it's predecessor, the Gravity gun. Personally, I think the likeness of the weapon was captured just fine and it looks great in the dark. Let's go!
Step 1: Gather Parts


You'ge going to need some stuff to make this. Here's a list of the items and tools I needed:
Tools/equipment-
-Hot glue gun & glue
-Heat gun for heat shrink tubing and softening plastic
-Soldering equipment (iron, solder, resin, sponge)
-X-acto knives , Box cutters , scissors , paper guillotine
-Sandpaper
-Multimeter
-Breadboard for testing circuitry
-Paint brushes (those little ones from art class)
-A rough rag for distressing (other cloths or towelettes may work also)
Materials-
-Cardboard
-Cardstock
-Foamcore board
-Plastic jars/lids
-Wire
-LED's to light your gun
-Resistors to keep your LED's from burning out
-Batteries
-Battery holder
-Wood filler (Lots)
-Spray paint:
-Primer
-Colors: Most likely black, gray, and brown/sienna
-Metallics: Silver and Copper
Step 2: Build the Reactor and Vacuum Chamber


Basically, I started by setting my two containers for my cylinders at an angle. Adding cardboard, I made the profile of several key points on the reactor. Next, I fleshed out the sides with more cardboard and hot glue. I used a lot of triangles since they're easy to cut and can easily fit together to form complex shapes. Once I had most of the reactor constructed, I melted a hole in my vacuum chamber lid for my center LED, and made a matching hole in the front of the reactor. Aligning the two holes, I glued my lid. Don't enclose the gun though as you'll need to be able to install your wiring in it later.
Step 3: The Emitter


The emitter is basically a round and flat cylinder with claws on it. The base part of the emitter was made from three sizes of plastic container lids. The lids were glued onto each other from largest to smallest. I cut and sawed through two of the lids so that the inside of the furthest lid was visible from the hole through the closest and largest. That's the base for the emitter.
The claws took experimentation. At first I tried double-thickness cardboard, but when I tested wood filler on it, they cracked and were still flimsy. I tried foamcore board with more success. I cut out the rough claw shapes with an X-acto knife and made a few marks along the base of each claw. The marks helped me cut out the profile of the base of the emitter so the claw would sit cleanly against the lids. I repeated this twice, and then hot glued the claws into place. I also bored a hole next to each claw for the leads of the LED's on the tips of the claws to come through.
Step 4: Wiring


Basically, I wired all of my LED's in parallel with my 33 Ohm resistor in series to my batteries. I wanted to have a 3mm LED on the tip of each claw of the emitter, one for the center of the emitter (shining backwards into the vacuum chamber), one more for the vacuum chamber, and two for the sides of the reactor. That's 7 LED's. I also wanted a rocker switch at the handle on the side. The batteries needed to be accessible as well, so I put them on the inside of the lid to my left cylinder.
Also, it's important that each LED in your circuit has it's own resistor. The only reason I wired my resistors in series to my parallel LED circuitry was because I simply didn't know any better.
First, I bored a small hole for my switch leads to go through the bottom of my left cylinder. Then, I cut a square out of the side of a plastic lid and was able to fit the rocker switch in it and hot glue it in place as well as against the outside of my left cylinder. The resisters were twisted up in parallel and soldered them between my switch and my battery holder. That's it for power and control. Now for the LED's.......
After soldering wires to all of them and heat shrinking the tubing on my connections, I tack glued the three LED's on the emitter on the inner part of each claw facing the center. The leads went down the claw, turned 180 degrees, and went back through the hole next to each claw. The positive and negative leads were soldered together and were connected to a common positive and negative lead going to the middle of the gun.
The common leads that went from the front of the gun to the back were hidden. I fed the wire through a cardboard strut on the outside of the glowing vacuum chamber. This was intended to keep wires from being visible in the middle part of the gun. The strut was glued over a small hole that the lead went through into the reactor part of the weapon. Two LED's on the sides of the reactor met up with the common leads here. Then, my common leads exited the reactor and went into the lid of the left cylinder. There, they connected to my batteries, switch, and resistors.
Step 5: Complete the Reactor and Handles


Next, I finished enclosing my wiring. I added two strips of cardboard through the middle of the cylinders and curved to form the center rear handle. I glued them to the back face and bottom of the reactor. On top of those strips, I added two strips side by side, each with a thinner strip on top of that. This would form the back of the gun behind the reactor and around the cylinders.
The back handle was built around a cardboard tube for structure. I glued the ends of the strips around the end of the tube and cut sides for the handle. After the sides of the back handle were glued into place, it was time for the side handle on the left cylinder.
For the left handle, I used a very thick cardboard tube. This was because there would be a lot of stress on the tube to bend, and a thicker tube would be better suited for the job. I cut it with my X-acto knife and made a glue welded against the lid with the rocker switch.
For the bottom of the reactor, it was only a matter of cutting triangles, copying the shape, and gluing it into place.
Note, please note that hot glue guns are indeed, very hot-
Take a look at my hand. I wasn't paying attention to where my left hand was when I had just made a glue tack, and my wire moved away from the bonding site. I quickly put down my glue gun and tried to correct the wire. The next thing I felt was searing pain from the back of my hand. It had been touching my 40 Watt glue gun nozzle for approximately 2 seconds. Keep an eye on that hand as you look through my photos, as will they transgress over a few days to show what a small burn turns into.
Remember- STUPID HURTS!!!!
Step 6: Filling and Sanding


Ok, go get your sandable wood filler. If possible, try to sand or clip any excess glue obtruding from the joint before filling. Fill in the seams and joints where your messy glue is. Be generous when putting this stuff on and make sure you fill in the gaps. Spread it flat. Let it dry. Sand it flush. Repeat if necessary. Don't put any of this stuff on the vacuum chamber, because you won't be able to see it glow (Duh!).
I made the mistake of trying to put filler on my claws. They didn't need to be filled and sanded. The claws could have been painted and would've looked great had I not make them look like stone from the filling and sanding. I had to live with it.
For the cylinders, there were a few areas where I was dobbing a LOT of putty. Don't do this . It won't dry. I had to find a clever way to cover up the seams using two large coils of lacquered wire glued into place after I painted this. The only other option is to use cardboard to fill the space and fill over that. That way, you have less volume to fill and it'll actually dry.
This process took me several days. Patience is required. Once you're happy with it, it's time to paint.......
Step 7: Painting


Priming-
I went and bought shiny silver, gray, black, brown, and primer spray paint. The effect we're trying to mimic here is that of various tones of metal. First thing's first. Cover anything transparent or important (like the rocker switch, LED's, the front of the emitter, batteries, and especially the vacuum chamber) and lay down a coat of primer. Cover the whole reactor and emitter. Let it sit and dry fully.
Silver coating-
Once you've primed the top and bottom, add the silver metallic paint. Cover the gun from multiple angles in order to paint all of the nooks and crannies.
Color coating and weathering-
Please make sure that your silver is fully dry before adding and distressing the black, gray, and brown coats. Get a paper towel or a rag. Once ready, add a generous coat of black paint (really generous) to a particular area and scrape the surfaces with the rag or towel in order to show wear. Masking is also important to keep your colors separated. I used plastic grocery bags for this. Once done, you can use a small paint brush to add particular details, rust, dirt, etc.
Step 8: Guage, Coils, and the Side Handle


Coils-
The coils were made from lacquer wire. I looped the wire around a board, took off the coil, flattened it, and used a metal hammer on an anvil to further flatten the ends. These "coils" were hot glued between the cylinders and the middle of the back handle to cover the seams. I also added black paint and spread it around for looks.
Gauge-
The gauge was made in Gimp, printed, and cut out. I glued it in a lid that I painted and cut a ring out of cardstock. For the clear plastic, I needed to use a piece of plexiglass, but since I didn't have any, I had to improvise and use the plastic from a clear plastic container. I cut it out with a X-acto knife, drew a circle on it, softened and flattened it with the heat gun (beware, it'll want to curl). I glued it on top of the lid, and glued the cardstock ring on top of that. Finally I glued the gauge assembly to the left cylinder and decorated it with some duct tape strips (I tore mine in half to make them thinner). I also made two bars out of cardstock and painted them copper. These were hot glued behind the gauge and to the cylinder where they hang off under the middle of the seam to still allow the left cylinder to be removable.
Side handle-
For the side handle, I simply wrapped it in black electrical tape for grip and appearance.
Step 9: Finished!


Here's some pics of the completed Gravity gun replica. In the future, I may steampunk the whole thing at some point, but for now I think the original replica will suffice.

Participated in the
MakerBot Challenge

Participated in the
game.life challenge


