

Introduction: Get Set Up


In this lesson, you will learn all that is necessary to set up your Raspberry Pi. To get you ready to have a conversation with your Raspberry Pi, you will connect a screen, keyboard, and mouse. You will also connect the camera module and learn how to install the Raspberry Pi's operating system, Raspbian.
Ready to take the first step? Let's go!
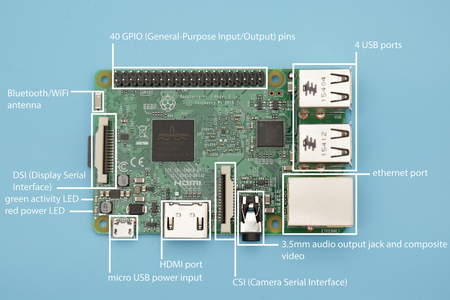
Step 1: Parts of the Raspberry Pi 3


Side view of USB and ethernet ports.

Side view of micro USB , HDMI, and 3.5mm ports.
Before you connect anything to it, let's take a tour of the board.
4 USB ports
Four USB 2.0 (which means High-speed USB) for connecting keyboards and mouses to. USB 2.0 also handles multimedia transfer meaning USB storage devices and webcams, scanners, and printers.
Ethernet port
Raspberry Pi 3 has a built-in WiFi antenna but you can still hard-wire the Raspberry Pi 3 to the internet through the 10/100 (defines the speed of data transmission) ethernet port.
3.5 mm audio output and composite video
This port does double duty. It supports any speaker or set of headphones with a 3.5mm TRRS audio jack. It also outputs composite video/audio which is the oldest method of carrying a video and audio signal. Found on older screens, it is still widely used for media today. If you would like to output composite video from this port you need to purchase a 3.5mm to RCA cable.
CSI (Camera Serial Interface)
This is the port a Raspberry Pi camera module gets connected to.
HDMI
HDMI (High-Definition Multimedia Interface) is found on most computer monitors and digital TV screens. This is what we will use in this class. It supports audio and video and can be configured using the Raspberry Pi's software.
Micro USB Power Input
Where power supplies connect to power Raspberry Pi board. The power supply needs to be +5.1 volts at a recommended 2.5 amps. Read more about power supplies for the Raspberry Pi 3's here.
Red Power LED
On when Raspberry Pi is receiving power.
Green Activity LED
Also known as the ACT LED. This goes on when there is activity between the board and the SD card.
DSI (Display Serial Interface)
DSI is mostly used for mobile devices that use LCD screens. You can buy small LCD and touch screens to use with your Raspberry Pi that connect to this port.
Bluetooth/WiFi Antenna
A new addition to a Raspberry Pi board and part of what make the Raspberry Pi 3 stand out from the rest.
40 GPIO (General Purpose Input/Output) pins
Where you connect sensors, switches, motors, and anything else you want to control or sense the world with. You will use and learn more about these in a later lesson.
Step 2: Connect the HDMI Screen

Out of the myriad ways the Raspberry Pi can send images to a display, you will use the HDMI port. If your display has a base, connect it to the screen so it can stand on its own and grab your HDMI cable. Locate the HDMI port on the back of the screen and plug it in. Plug the other end into the Raspberry Pi's port and you have a screen!


Step 3: Connect Wireless Keyboard and Mouse

A computer needs a way to get input from the user (you) so you can navigate the desktop, type commands, and more. This is where the USB mouse and keyboard come in. I favor wireless accessories that keep things tidy by cutting down the number of wires. To connect the keyboard and mouse linked to in the material list, plug the wireless receiver into any of the four USB ports. This receiver is for both the keyboard and mouse. Push the power switches to ON on both keyboard and mouse or you can wait until the Raspberry Pi gets powered.

Do you have a Bluetooth or wired Mouse or Keyboard?
Any USB keyboard or mouse can be plugged into the USB ports and used. It doesn't have to be wireless or the brand used in this class. A wired mouse and keyboard will automatically be recognized and ready to use once the Raspberry Pi receives power. If you have a Bluetooth mouse or keyboard that you would like to use the next step will show you how.
Step 4: Connect Pi Camera

To start using the camera module it needs to be connected to the CSI port. To do this, lift the top piece of the camera port and insert the FFC (Flexible Flat ribbon Cable) with the metal contacts facing towards the HDMI port.


Push the cable in until it stops then press the top back down to lock the cable into place. Pull up gently on the FFC to see if it is indeed locked in.
Step 5: The MicroSD Card

Just like any other computer the Raspberry Pi 3 needs an OS (Operating System) to manage tasks, open applications, and control attached accessories. The OS and all other software are stored on the microSD card that plugs into the Raspberry Pi. The official OS of the Raspberry Pi Foundation is Raspbian which is what we use in this class. Raspbian is based on Debian Linux, a free and open source operating system that has quickly become a favorite amongst users.
To install the Raspbian OS on your Raspberry Pi's microSD card I offer two different options. Both options use NOOBS, which stands for New Out Of Box Software. NOOBS is specifically designed to make installation of an OS on the Raspberry Pi easy. The difference between the two options is one uses a microSD card that has NOOBS preinstalled and the other uses a microSD card that does not have NOOBS preinstalled.
The first option is the easiest one. It's the option you should be ready to follow if you bought the microSD card linked to in the class material list. That one comes with NOOBS preinstalled, but it's just a few extra steps to install NOOBS in case you have a blank SD card.
1) NOOBS Preinstalled on microSD Card
If you bought the card from the class material list you are in the right place. To get started, take the card out of the case and pull the micro card out from the adapter. Turn the Raspberry Pi over and insert the card text side away from the Raspberry Pi. Push the card into the slot until it stops. The Raspberry Pi 3's card slot holds the SD card in place by friction. This is worth mentioning since it is different from previous Raspberry Pis such as the Raspberry Pi 2 which has a spring-click card slot. It was changed because if you grabbed the Raspberry Pi 2 in the wrong place while it was on there was a chance the card could be released. Removing the card mid-process can potentially corrupt the data on the card. Proceed to the next step in the lesson.

2) SD Card Without NOOBS Installed
If you have an SD card with NOOBS preinstalled, scroll down to the Power Your Raspberry Pi and Install Raspbian step to complete the OS installation process (skip the rest of this step).
To install NOOBS onto a card you will need:
- micro SD card that is at least 8GB
- SD card adapter
- SD card reader (some computers have built-in readers)
- a computer that is connected to the internet
Format Card as FAT
Windows
Click over to SD Association's Formatting Tool page and download the one for Windows. Click through the agreement page by hitting Accept to download the tool.

Double-click the downloaded package to start the installation process. Once installed open the application.
Pop the card into a reader and it will be recognized by the software.
Click Format, then Ok when prompted. A window stating that it has formatted correctly will pop up after it's completed.


Mac Disk Utility
Plug the SD card into an external or built-in reader. Save all the items on the card that you do not want to lose. Formatting the card will erase everything.
Open Disk Utility usually found under Applications > Utilities > Disk Utility
Choose the card from the left side menu. Mine is called "UNTITLED". It is critical to choose the correct disk, or you risk deleting your primary hard drive with all your data! If you're not sure, do not proceed, instead post a screenshot in the questions section below and we'll help you figure it out.
At the bottom of the window, you will see information about the card. This is where you will see if your card is already formatted as MS-DOS (FAT32) card. If it is, you do not need to continue because the format is already correct. If it is not, continue on to reformat.

Choose the Erase tab in the middle panel.
Choose MS-DOS (FAT) from the drop-down menu.
Click Erase button in the lower right-hand corner. A window will pop up asking if you are sure you want to erase the disk... click the Erase button to complete the formatting.


Download NOOBS
Download the latest version of NOOBS from Raspberry Pi's Download page and extract the files from the .zip file. Download the full version, not the Lite version, since that relies on a net connection we have not yet established.
Copy those files onto the SD card.


NOOBS is now on the SD card. The only thing left to do is to unmount the disk and insert it into the Raspberry Pi.
Step 6: Power Your Raspberry Pi and Install Raspbian

Before installing Raspbian, make sure your keyboard, mouse, and screen are plugged in and receiving power. Once those things are powered, the Raspberry Pi is ready to be. Do this by plugging the micro USB wall adapter into the Raspberry Pi's port and then into the wall. Unlike a desktop or laptop computer, the Raspberry Pi does not have a power switch and will start immediately after power is connected. Once powered, the red power LED comes on.
The screen connected to the Raspberry Pi will come to life. A rainbow splash page will appear then shortly disappear followed by a window with a checkbox next to the Raspbian icon.

Click to check the box then the Install button in the upper left corner. A warning will pop up asking if you want to install the OS, click Yes. Raspbian will start installing! All you need to do now is sit back and relax while it finishes.


When it's finished a window will pop up saying the OS has been successfully installed, click Ok. You will then see a black screen with text scrolling down. This is the boot sequence for Raspbian. You can watch all the things it does to set up the software. After the boot sequence, the Raspberry Pi's graphical desktop environment will appear.

Step 7: Configure Your Raspberry Pi
Hooray! Your Raspberry Pi is ready to be explored!
Configuring the Raspberry Pi is one of the first things you want to do to a newly installed OS. There are two ways to do this: through the desktop and through the command-line. To change configurations through the desktop, click the Menu and navigate to Preferences > Raspberry Pi Configuration.

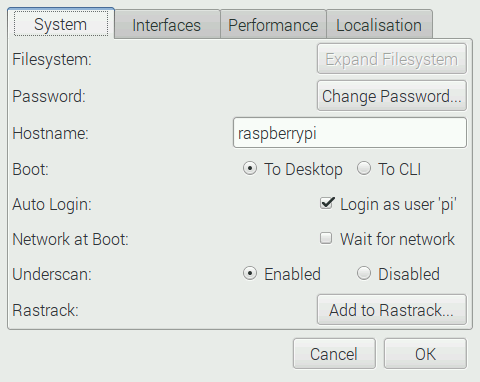
Here you can make some necessary and important choices about your Raspberry Pi's settings. The settings you should change right now are the keyboard layout, clock, and camera.
Keyboard Layout
Click the Localization tab. Start with Set Locale and choose your Language and Country. Next, click Set Keyboard and choose which country and layout variant best describes your keyboard.


Clock
To change the clock to your time zone, choose Set Timezone and choose your area and location. Then choose Set Wifi Country settings and choose what country you are in.
Enable Camera
You have a camera board connected and ready to go. For it to work with the Raspberry Pi it first needs to be enabled. Click on the Interfaces tab and choose Enabled next to Camera.

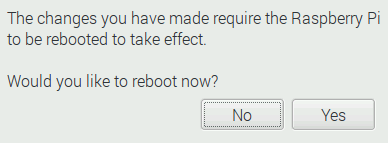
The changes you make will not stick unless the Raspberry Pi is rebooted (restarted). Click OK and then Yes to reboot.
If your display looks stretched, mouse acts funny, or you want to configure a Bluetooth device, see more optional configuration instructions later in this lesson.
Step 8: Connect Your Raspberry Pi to a Network
In previous Raspberry Pi versions, the Raspberry Pi connected to a network using an ethernet cord or wifi USB dongle. The Raspberry Pi 3 has a built-in WiFi chip, which makes getting online easier.
To connect to a network click on the icon that looks like two computers in the upper right corner. A list of available networks will drop down. Choose the network you want to connect to and enter the password if prompted. Once the Raspberry Pi is connected, the two computers will turn into a WiFi reception icon. When you shut the Raspberry Pi down and power it back on it will remember this network and automatically connect.

The internet is yours! Go ahead and give it a test spin. Open Raspbian's web browser Epiphany via the taskbar or application Menu and visit your favorite website or send yourself an email. Or, go check out the sci-fi illustrations of Japanese artist, Shigeru Komatsuzaki. At this point, advanced users may wish to SSH into their Pi from their regular computer, which would negate the need for a display, keyboard, and mouse (this is known as operating the Pi "headless"), but the lessons that follow will assume you're using the full display/keyboard/mouse combo, physically connected to the Pi.

Step 9: Display Resolution & Bluetooth Configuration (optional)
Change Display Resolution (only if you need to)
The Raspberry Pi does it's best to automatically detect a screen's resolution. If it does not and the screens aspect ratio is off (which can be a real headache), you can change the display resolution by editing a file called config.txt. The best way to edit config.txt is through the command-line interface. We'll learn more about the command-line soon, but for now follow the steps bellow to change the resolution and don't worry about how it works just yet.
To get started you need to open up a terminal window. Press the keys:
Ctrl+Alt+t
Or, head to the upper left corner and click on the computer monitor icon with the black screen.

In the window type the following line and hit the enter key:
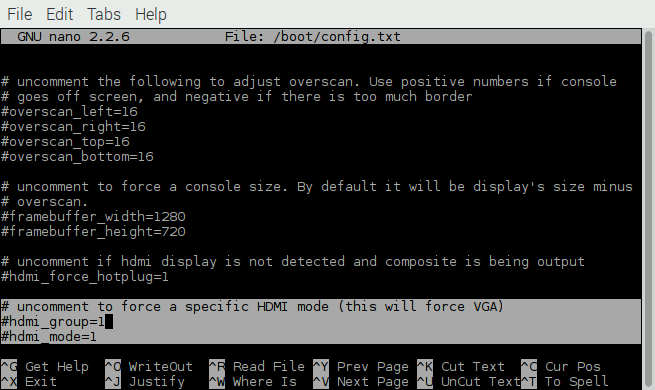
sudo nano /boot/config.txt

The config.txt file will open using the Nano text editor in terminal. To change the resolution of the display you need to find and edit the numeric value in these two lines:
#hdmi_group=1
#hdmi_mode=1
When you find them delete the "#" in front of each line, navigating through the file using the arrow keys rather than the mouse cursor. The "#" character comments a line out so it's ignored by the Raspberry Pi. We want the Raspberry Pi to read and use these lines.
hdmi_group=1
hdmi_mode=1
The next thing to do is find out the resolution of your screen. For example, one I am using in this class has a resolution of 800 x 600 (which is small). If you do not know the resolution of your screen there is this nifty website that will tell you-- after configuring your Pi to connect to the Internet, open up this class in your Raspberry Pi's web browser and follow the link to visit the link to discover your display's resolution. Once you know, go here and scroll down to find the HDMI_GROUP and HDMI_MODE headings.

Find the resolution of your screen and record the number of the hdmi_group it's found under and the number next to the hdmi_mode. For example, I am using a 10" screen that is 800 x 600. This resolution at a refresh rate of 60Hz was found next to the number 9 under hdmi_group=2 (DMT). You may need to try different refresh rates but first try 60Hz if you have the option.

So going back to the config.txt file, I would change the two lines to:
hdmi_group=2
hdmi_mode=9
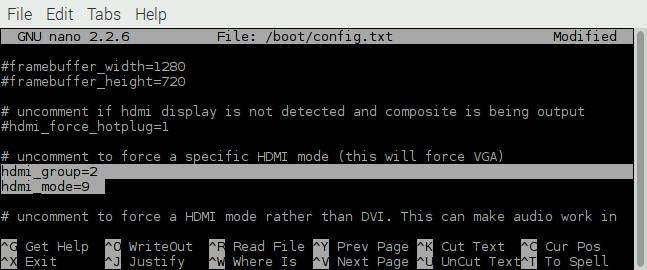
Exit Nano with CTRL + X. Nano will ask you if you want to save when exiting. Type "y" for yes.
To enable the new resolution setting reboot the RPi by typing then pressing enter in terminal window:
sudo reboot

Before (this larger resolution looked squished on my 800 x 600 screen)

After
Mouse + More Keyboard Settings (Optional)
If you need to change the speed of your mouse click on Menu and choose Preferences > Mouse and Keyboard Settings. Here you can change how fast your mouse travels and you will find more keyboard settings. Generally, these do not need to be altered so don't worry about changing them now. You can also change your keyboard layout from here.


Bluetooth Configuration (Optional)
If you have a Bluetooth mouse or keyboard that you would like to use with your Raspberry Pi it can easily be connected using the Raspberry Pi 3's built-in Bluetooth radio (but configuration requires a physically connected mouse, either through a wireless USB dongle or regular USB cable).
Turn on the Bluetooth device you would like to connect to the Pi to make it discoverable. Click on the Bluetooth icon in the upper right corner and choose Add Device from the menu.


A window will pop up and the Raspberry Pi will start scanning for nearby Bluetooth devices. If you do not see your device after a while, turn the device off and close the Add New Device window. Turn the device back on and wait a couple of seconds before reopening the Add New Device. Once you see the device listed, click on it and then the Pair button. The Raspberry Pi and device will pair and then connect ending with a window saying it has succeeded.
Pair vs Connect
Once you pair a device with the Pi, it will remember a device. After it is paired it needs to be connected for it to be used. When you're done using the device you disconnect it, but it will stay paired. If a device is in range and already paired with the Raspberry Pi it will automatically connect. This is really convenient but it also means that if you would like to use the device with another computer in the same area you need to remove the device from the Raspberry Pi first.


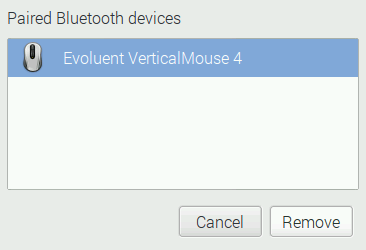
Remove a Bluetooth Device
Removing a Bluetooth device from the Raspberry Pi is the same as unpairing it. It forgets the device so if you want to connect again, you will need to pair it again.
Click on the Bluetooth icon and choose Remove Device...

Choose the device and click Remove.
Step 10: Snap a Photo of Your Set Up!
Share your setup with a photo, then get ready to discover the software included in your newly installed operating system in the next lesson!


