

Introduction: Gumbo 101


Though I come from Louisiana, I wasn't taught how to make gumbo as part of my upbringing. I had never made it at all until I moved to New England and began to crave it, and realized there was no place to get it. In other words, I began making gumbo purely out of self-defense. Over the years I got fairly good at it.
Gumbo isn't hard to make, though it takes a fair bit of time and prep. There's one stage that's utterly unforgiving, though (making the roux), and because you can have absolutely no interruptions during that part, doing your prep work in advance, and doing things in the right order, is pretty important. To that end, you probably should read through the entire set of instructions before setting out to cook.
This is about the smallest size gumbo I can make, and it still makes a lot. This recipe will feed four people well, or (as we do) will feed two people well, and you freeze half for another meal. It freezes nicely (however, see the remarks about filé powder later). In fact, sometimes the frozen-and-reheated gumbo is better than it was the first go-round.
Step 1: The Hardware

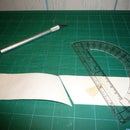
The big pot in the photo is a #26 Le Creuset enameled cast-iron job. It holds five and a half quarts, and we are gonna fill that sucker. The little All-Clad pot will be used to make the roux, which is much easier to do in a small pot. All other action will take place in the big pot. You don't have to have fancy pots like this, but don't use non-stick ones. The big pot shouldn't be non-stick because you want there to be browned bits on it that you'll be scraping around with the spoon, and the little one shouldn't be because you'll be subjecting it to very high heat.
In the same vein, don't use a plastic or rubber utensil to make the roux. It will melt. Silicone might survive it, but I haven't been willing to risk the experiment. I use that wooden spatula thing shown; I don't remember where I got it and I don't know where to tell you to get one. I use a different spoon for the main pot because I want the roux spatula to be absolutely clean and dry when I start making the roux.
You'll be chopping a lot of stuff, hence the knife and the cutting board and the bowl to hold a pile of chopped vegetables. The 1/2 cup metal measure measures flour and oil for the roux; the glass measuring cup is for water, and the strainer ... turned out not to be necessary. I'll explain why I brought it out, and then didn't use it, later.
Not shown: a plate to hold things temporarily removed from the big pot, and whatever you're thawing shrimp in, if you're using frozen shrimp.
Step 2: The Software

You can make a gumbo with all kinds of different ingredients. There's even a famous one called gumbo z'herbes made with all kinds of various greens (collards, etc) and no meat at all. But my basic formula is
- Poultry of some kind
- Some sort of spicy or smoky sausage (not breakfast sausage; nearly everything else goes)
- Possibly some shrimp or oysters thrown in at the end
The best poultry I've ever used in gumbo is duck, but we don't have duck lying around very often. I also usually make gumbo from the leftover parts of the Thanksgiving turkey and it's fabulous. Today we're using chicken.
The absolute best would be to have a whole bird from which you have previously used just the breasts. For example, if you roasted a chicken, ate only the breast meat, and have the entire rest of it cut up into parts waiting to be used. (For a turkey, that's too much; my spouse makes stock from the carcass and I use just the legs and wings, which is plenty.) The point is, you want dark meat, and you want some bones and some skin. White-meat chicken will just come apart in the pot and not taste like anything, if you can even find it.
Today we are using two chicken thighs and three wings, and since they're starting raw, we will be pre-browning them a little bit later. If you are starting with cooked poultry don't bother with the pre-browning. I'll tell you when to throw them in.
The sausage is locally made chorizo. Andouille is good, but outside of Louisiana it's horribly expensive and I like the flavor of the chorizo better anyway. But I've also used Hillshire Farms kielbasa and it's just fine.
We won't use nearly all of the shrimp in that bag, nor all the okra in the shrinkwrapped package. This isn't an okra gumbo, which would take a lot of okra; we're just adding it as an additional flavor. I trust no canned okra except that from Allens, which you probably don't have where you are, so if you can't find fresh okra, omit it.
Additionally we have
- Two small-to-medium white onions
- One large bell pepper
- Four large cloves of garlic
- Two large outer ribs of celery plus some of the tender ribs and foliage from the heart. (If you can find celery that hasn't had most of its leaves lopped off, then you don't need the center bits as much. Those leaves have more celery flavor than the stalks and the only reason they get lopped off for supermarkets is for you to make it harder to tell how fresh the celery is, since they wilt first.)
- Cayenne pepper (ground red pepper)
- Kosher salt (yeah, yeah, you can use regular table salt but this is better, honest)
- Flour
- Vegetable oil
- Optional parsley
Not shown: Poultry or vegetable stock, low-salt if possible, anywhere from four to eight cups. Do not use beef stock under any circumstances.
Also not shown: Additional herbs and spices, because I don't usually add them, but some thyme is nice.
Step 3: Thaw the Shrimp

If you're using shrimp, you won't add them until very near the end or they'll overcook, but if you're using frozen - and there's no real reason to pay a fortune for fresh shrimp here - then start thawing them now or you'll forget. Just put some in a bowl of cold water and, if you can, move that bowl to the refrigerator.
I didn't measure the shrimp. There are probably about twenty in that bowl. These are deveined-with-shell-on, which means you'll need to peel them as you eat. That means you'll get your fingers in your gumbo. If that bothers you, either buy peeled ones or stop now and peel them once they've thawed enough to.
Step 4: Okra

Chop the okra first because you'll need to wipe the mucus off the knife and the cutting board afterward or it'll make the thing unsafe to use. It's hard to chop an onion when it's sliding around. Cut off the caps and the very tips of the pod and discard those. Slice the remainder of the pod. This is ten pods chopped, which is plenty. It'll go in that bowl right after this picture.
Step 5: Holy Trinity Plus Garlic

The "Holy Trinity" is finely chopped celery, bell pepper, and onion in about equal parts. Half the recipes in Louisiana start with chopping up a batch of this, or "first, you make a roux" (this recipe does both!)
Most everyone adds garlic, because "garlic don't need no reason." (Alton Brown)
You can chop the celery and the bell pepper and add them to the bowl in any order you like, but when you get finished with the onions and garlic, divide them as I have done here and only put half the onions and garlic in the bowl. The other half goes into the big pot.
Step 6: Saute the Aromatics

To the onion and garlic in the pot, add a small splash of oil and a generous sprinkle of kosher salt. I use olive oil for this part because it's tastier, but don't use olive oil later for the roux (I think it makes the roux taste strange for some reason). Let this soften for a while over medium-low heat, stirring occasionally while you cut up the sausage (next step).
Step 7: Sausage

I've separated the sausage into two halves here. The lower one has been skinned. The object at the far right end is the skin I've removed. I do this because we're going to be pre-sauteeing that half of the sausage in a moment, and I want to allow it to break apart a little more easily as I do. You may not care, and the skin is a little tricky to remove, or you may be using a kind of sausage that doesn't even have one.
If you do want to try to remove it, make a slit with the knife the entire length of the sausage, and working your fingers under the slit gently, you will likely be able to pull the whole skin off, mostly intact, hopefully not taking much sausage with it. If you don't care, then just slice all of it the same way and don't bother.
I pre-saute half the sausage because I like what it contributes to the fat in the pot, but again, you may not want to bother. See the discussion in the next step.
Step 8: To Pre-brown or Not to Pre-brown ...

Here's the thing. You can throw the chicken in the pot later absolutely raw. I've done it many times. It will have plenty of time to cook. Same for the sausage (this happens to be a kind of sausage that's not precooked and not safe to eat raw, but it will have plenty of time to cook as well).
If you do pre-brown these items, you'll get some tasty fat and browned bits in the big pot (and possibly some excess fat to deal with, but you'll have to deal with it sooner or later anyway). If you don't, it won't be that much of a big deal.
In this case, once the aromatics softened a little bit, I cooked half the sausage briefly and then removed it and all of the aromatics I could scoop out easily while trying to leave most of the fat in the pot. I put the chicken in skin side up, salted the skin side and sprinkled it with cayenne, then flipped the pieces over and sprinkled salt and cayenne on the other side. You want to do most of the browning here with the skin side down.
If you're starting with pre-cooked poultry I wouldn't bother. Though it does mean you'll have to adjust the amount of cayenne you add later. (Upward.)
I didn't brown the chicken pieces very long because I was impatient. If I had cooked them a bit longer at this point, I might have made a different choice shortly afterward (two steps hence). Anyway, once you've seared them a bit, remove them from the pot (you can pile them atop the sausage and onions) and turn off the heat under that pot completely. It'll be sitting for a while and we don't want its contents to burn.
Step 9: I Lack the Courage of My Searing Convictions

You'll see here that the chicken has really only been barely browned - I guarantee you the meat is still almost totally raw inside - and the sausage wasn't seared for very long either, nor did I bother to break the slices apart much as I sauteed it.
Next time I use raw poultry I might give this step a bit longer. I'll discuss why at the end.
Step 10: The Fat Problem

There is not much fat in this pot. Less than a teaspoon, I'd say.
Now, the roux is made with neutral oil. And though it thickens the gumbo, and adds a flavor of its own, the oil doesn't contribute any of that flavor. If you could use an oil when making the roux that had more flavor - for example, the oil that has rendered from the chicken and sausage - then that might be a plus, right?
But there's a problem. If you use oil that food has already cooked in, it has all kinds of little particles of stuff in it. Those particles taste pretty good right now - but if they're present in the roux when you're making it, they will burn, and then they won't taste good. Furthermore, you're likely to mistake those little dark specks for flour and it will lead you to misjudge whether you're about to burn the roux.
The strainer I pulled out in the hardware step was going to be for the oil in this pot. I was going to pour it through a couple of thicknesses of paper towel in the strainer and hopefully get some of the particles out of it and make it clear enough to use in the roux. But as it turned out, since I didn't leave the chicken or sausage in long enough to render much, there's not enough fat in the pot to bother with. We'll just leave this pot as it is and continue with it as is later.
If you do have a lot of fat in the pot at this step, for whatever reason, you can try straining it and using it in the roux. If you don't use it in the roux, and there's a lot of it, you may want to consider pouring some of it out (and throwing it away) at this point. A little grease in the pot right now - like the tiny amount in the picture - is fine; a lot will just be excess grease later.
We've taken this pot off heat right now because we are about to become uninterruptible. If you need to use the toilet, go now. Put something on the TV to distract the kids. Prepare not to answer the phone. I'm serious. The next part really does demand your undivided attention.
Step 11: The Roux, Part 1

Open a container of your chicken or vegetable stock. Don't use it yet. Just have it standing by, ready to use, for later.
Measure 1/2 cup flour and a scant 1/2 cup vegetable oil (somewhere between 1/2 and 1/3 cup) in your little pot. Don't let them sit long unmixed like in this photo; the flour will clump. I stopped only long enough to take the photo. Begin stirring them together immediately. Turn the heat to medium-high (to start with), and get ready.
A roux (at least the kind we're making here) is flour browned in oil. We want to get it fairly brown, but it's a very short time between "fairly brown" and "burnt and ruined." So your attention is required.
You'll want to stir the roux constantly while you're making it, and keep scraping the pot. The flour will have a tendency to clot on the sides and bottom of the pot, and those places are where it browns the fastest. You have to keep scraping those rapidly-browning bits and stirring them back into the mixture.
BUT
You must also stir gently. Do not get excited. Do not hurry. Do not splash. You are making napalm, and you do not want to have an accident with this stuff. Even a pinhole burn from this brew will be noticeable for days. Ask me how I know this.
Step 12: The Roux, Part 2

At first, the roux will seem very liquid and smooth like this. It will make a sort of paste or dough smell. It will start behaving a little strangely almost immediately - it'll appear to thicken and get clumpy while you're moving it around, but if you stop stirring, it will smooth itself back out into looking liquid again.
Step 13: The Roux, Part 3

As the flour browns, its properties change, and gradually the "returns to smooth when you stop stirring" will stop happening; it'll stay clumpy.
Eventually it will begin to start making an aroma that smells like frying foods (I associate it with fried fish in particular). This is a sign that it is now going to start browning very quickly.
If you feel like you're losing control - if you start scraping down the sides and suddenly it seems like there are brown bits everywhere - lift the pot off the heat. It'll still keep cooking, but that'll slow it down. You can also turn the heat lower and take it more slowly. Don't panic.
Step 14: The Roux, Part 4

When the roux is the color of peanut butter, you don't have very long to go. You can safely reach over, however, and turn the heat back on (medium-low) under the big pot so it'll start heating up again. That is all you can safely do, other than give your complete attention to the roux.
Keep stirring. Keep scraping.
Step 15: The Roux, Part 5

This is as dark as we want to go. A true pro can take it a shade darker but let's not risk it. It'll continue to cook even off heat, remember. (Notice the difference in color between this and in the next picture. There is less than three minutes elapsed time between the two.)
Scoop this all into the big pot, and put the little napalm pot off to the side in some heatsafe place where you aren't going to bump against it accidentally or melt anything with it. It needs to be defused, but we don't have time right now. The clock is still ticking on the roux.
Step 16: Calming the Roux

Immediately add a couple of splashes of stock, and mix it into the roux, scraping all those nice browned bits from the bottom of the pot as you do. This will help keep the roux from cooking further.
Step 17: The Veggies

Add the entire contents of your bowl of chopped vegetables. Turn the heat up to medium-high. Add another few splashes of stock, and do the stirring-and-scraping-stuff-off-the-bottom bit again. Let this cook for a minute or two, stirring a couple of times.
Meanwhile, now is a good time to run cold water all over your napalm pot, including its underside. Don't be surprised at how much it hisses when you run cold water on it. That pot is hot. Fill it with water and let it sit to soak somewhere where it's not touching anything it can melt. Letting it soak now will make it much easier to clean later.
Step 18: Plate O' Meat

Give another splash of stock and another stir/scrape to deglaze the bottom, then add in your sauteed chicken, sausage and aromatics you'd set aside.
At this point, go ahead and add the rest of your liquid. I tend to use half stock and half water. You can use all stock, and it's very good, though you want eight cups of liquid in all so that's a lot of stock. I don't recommend using all water.
Once the total amount of liquid comes up to just barely a boil - when it first starts to bubble around the edges - add the sausage you didn't precook. If you are using poultry that was already cooked for a previous meal, instead of starting from raw, now's when you add that as well.
(Shrimp and other seafood don't go in until almost the very end.)
Unfortunately you can't taste analytically at this point if you're using raw poultry or a not-safe-to-eat-raw type of sausage, unless you really did cook the snot out of them in the pre-browning. But you probably want another hit of cayenne, and if you're going to add, say, a small palmful of thyme, or any other dried herb, now's the moment. I would wait to taste for salt until later. It may not need more.
Having added everything to the pot that's going to go in except the seafood and some parsley, you should give it another few good stirs, cover the pot (not tightly - put the lid on slightly offset so that steam can escape), and turn the heat down to medium or even medium-low. You'll need to listen for a bit; you want it just barely bubbling with the lid on, not acting super-volcanic.
And then, once you get that adjusted right, you can mostly leave it alone. For quite a while.
Step 19: Timing Is Not Really Everything

This is what the gumbo looked like just before I covered it and let it cook for an hour and a half.
I have cooked gumbo for as little as an hour and for as long as two hours. Two is excessive; it'll cook down too much and you'll have to add water, and that does its flavor no favors. But you want at least an hour. An hour and a half is about optimal.
You do want to stir it occasionally, but other than that you can leave it alone until about fifteen minutes before it's done. Go make a post-roux drink to celebrate your survival or something.
A half an hour before you're planning to eat it, start making a pot of rice. (Rice instructions not included.)
My spouse prefers to skim fat off the top gradually as it cooks. I never do, when left to my own devices, but you'll probably want to skim some fat from it eventually ... and you may find it easier to do in stages, depending on how good you are at the task. I stink at it.
Oh, yeah, if you're adding parsley, stem and finely chop it somewhere in here. Have it ready to go; it'll go in with the seafood.
You could also wash the dishes.
Step 20: And Now a Word About Filé

Filé powder is ground sassafras leaves. It has a distinctive flavor which some people like, and it also acts as a thickener. But it has a trap.
It can't be allowed to boil. It gets stringy and nasty if it boils.
So I don't actually add it to the gumbo during any part of the cooking process - not even near the end, because I know half the gumbo is likely to be reheated, possibly to a boil, at a later date.
Instead what we do is sprinkle some over our individual servings, like a seasoning. That way we get the flavor, even if we don't get its thickening power.
Of course if you make a true okra gumbo you don't need the thickening powers of filé - in fact, custom is that you would never use both as thickeners in the same batch of gumbo (presumably you'd be able to stand a spoon up in it and hack off chunks of it with a pickaxe). But a true okra gumbo, really using it to thicken and not just using some for flavor as I have here, takes something like thirty or more pods of okra and is too okra-y for some. (You may feel that even ten pods of okra is too okra-y. Not everyone is okra-positive.)
I don't really worry about how thick my gumbo is, anyway. It comes out as a slightly thick soup with lots of good stuff in it, and that's fine with me.
Step 21: Lid Off

Here's the gumbo at an hour and fifteen minutes of cooking. Notice how much lower the level of liquid is in the pot compared to the photo two steps back. Not all of that is because of evaporation, though; about an hour in, my spouse - who prefers not to have to pick around bones in the serving bowl - worked at the chicken a little to get any bits of it off the bones which hadn't fallen off already and tried to remove bones from the pot. So they're not in there taking up space at this point.
Notice that even though it's been skimmed several times, there's still a grease slick around the edges. I don't mind the grease, but my spouse does.
Actually, we're trying to figure out a solution to the grease problem. We skimmed a scant half cup of grease from this gumbo, which, you'll recall, was almost exactly the same amount of oil we put into the roux. But it's unlikely that grease was coming from the roux. More likely, it was coming from the chicken. It's possible that if I'd pre-browned the chicken for longer, and maybe discarded some of that fat, we'd have had less grease to remove later. Further experimentation is called for.
Anyway, skimming the grease doesn't seem to affect the flavor. It'll be very tasty even with that excess fat removed. Trust me.
Step 22: Final Additions

Here's what it looks like after the shrimp and the parsley are in. The shrimp have been in for maybe three or four minutes but they're already completely pink, which means they're done. Oysters, should you fancy them in your gumbo, cook even faster.
If for some strange reason you don't want to serve your gumbo over rice as nature intended, a fine alternative is tearing off big hunks of French bread and using them to sop it up. But rice is traditional. I've never bothered with any other accompaniments to this one-pot meal - even a green salad on the side seems superfluous - but please yourself.
If you can find any room for dessert, pecan pie is nice. But that's a story for another day ...


