

Introduction: Handmade Keith Haring Mini Tote


This is my foray into the leather craft world. This mini tote is made with 100% Australian leather, chrome tanned on the outside for the vibrant color and texture. Veg tanned leather on the inside for structural stability and durability. The Design is inspired by Dior's iconic Lady Dior tote. The Graphic is Keith Haring's baby graphic embedded on the front side of the bag. the feet are custom 3d printed to prevent the white leather touches the ground. I started with 3d modelling the bag on 3ds Max and used design softwares to aid the process of traditional leather craft.
Step 1: Materials and Tools


The Materials used to make this leather bag
1.5mm Chrome tanned Full Grain ( Black )
1 mm Chrome tanned Full Grain ( white )
3.5 mm Veg tanned Side ( Neutral )
0.7mm waxed thread ( white and black )
3d printing materials for the feet
The tools are standard leather craft tools
- Saddle stitching Clamp
- Leather craft hammer for flatten leather
- poly hammer for set in diamond chisel
- wool burnish tool
- diamond chisel (4mm set)
- bevel tool, bevel edge tool
- sharp leather cutting knife or xacto knife
- stitching awl, spacing tool, needles X 2
Step 2: Design Phase


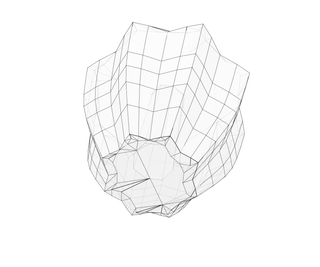
to me the form of the bag is crucial, I start of with base block out the shape of the bag in 3ds max. the polygonal modelling method allow me to tweak the angle of the fold and the taper amount. the handles are roughly modelled to make sure it is proportional to the bag. The model is fairly simply. once I have the shape and form correct I started to play with the offsets.
In order to stitch the leather in layers later on. the model needs to be off set so there is gaps in between two pieces of patterns. this gap ensure the thickness of the leather can be added to the pattern so when stitching there won't be to much stress on the leather and therefore keeps the shape and form of the bag, it will last longer ultimately. Also make sure the areas of the pattern needs to be overlapped so there is enough leather for the diamond punch to set up holes. The feet are longer than most of the commercial available bags. the feet keeps the bag elevated and ensure the white leather doesn't rub the ground and get dirty. There is alot of trial and error when making this. and I took extra attention to make sure the pattern is suitable for leather.
Once the pattern is made on 3ds max, I began to transfer polygons to actual patterns
1. the flat surface area ( front and back ) is exported to DXF file and later on edited in Adobe Illustrator.
2. the folded and curved area is exported to OBJ and later on imported to Papakura to make them into paper Patterns
3 the feet are exported to STL files and go straight to 3d printing softwares.
keep in mind this is my first time spend significant amount of time to make leather craft. the method i used are adapted from skills and knowledges I learned in doing other projects. This might not be the best way of doing it but it is my own way of make it possible.
Step 3: Design Patterns in Illustrator


The Centre piece of this Tote bag is its embedded artwork of Keith Haring. Keith Haring is one of my favourite artist, I was honoured to exhibit my speaker sculpture pieces at His retrospective exhibition (Keith Haring - The Political Line) in deYoung Museum in San Francisco in 2014. This bag is inspired by his baby graphic artwork.
I first found a good image of the baby graphic, then Imported to Adobe Illustrator (AI). in the same file I also imported the DXF file of the front and back of the bag front 3ds Max.
1. The graphic is traced to vector path, then changed the path into dotted lines. the distances of the dotted can be set to mark the diamond chisel ( 4mm apart ).
2. add an offset the path to the original path. the offset distance should be close to the thickness of the leather( 2.5mm) this offset path is set to solid lines. this will be the pattern for the actually embedded leather. the smaller embedded leather can be easily wrapped by the outside layer and still stitch onto the original path.
3. make stitching lines for the bag pattern.
Once the paths are all clear, print it out and paste it on a piece of card stock to make the pattern.
Step 4: Design Pattern in Papakura and 3d Printing the Feet


I imported the side pattern to pepakura and unfolded to reveal all the fold lines. Then print it to be used later.
The feet and printed on my Zortrax M200 with white Z-Ultrat material.
Step 5: Patterns and 3d Printing Files
Print all the patterns and paste them on card stock, printing the feet of the bag and get ready to create this leather bag

Step 6: Make the Baby Graphic


This process probably took the longest time. it is fairly straightforward, patience and a very sharp knife is needed.
1. I cut the Veg tan leather with the the pattern. then cut of the solid path on the pattern. the baby graphic will hollow out along with the light beams, now the pattern can be used as a guide when glue on the extra piece of leather.
2. use the baby graphic cutout to cut additional leather ideally the same kind of leather. I used a scrap of veg tan, the light beams also requires additional piece to rise up the graphic so when wrap the outside layer they are all viable and will cast a cool shade on the bag. each piece needs to be trimmed on the corner and beveled with a bevelling tool. the end result is the top of the leather is curved and smooth.
3. I used leather glue to glue the graphic stripes in place with the guide pattern. this make sure the graphic is not distorted or off centre.
4. additionally, i punched some holes along the contour of the graphic to make the stitching easier.
5. Pick the best part of the white chrome tanned leather with no scars or blemishes. make sure it is soft and stretchable.
Now we can on to wrap the leather.
Step 7: Wrap Chrome Tan Leather to Veg Tan Leather


I cut the Chrome tan leather larger and applied glue from the centre, I used rubber cement for this application because it is heat and water resistant. Slowly work my way from the centre to the edge of the veg tan. Leather is a tough material so apply enough force to ensure the bond is permanent, the graphic should be visible without the stitching lines. Once the white leather tightly wrapped onto the veg tan. I punched holes with the same set of diamond chisel. I used a stitching awl to poke the guide hole this will ensure the holes on both leather are aligned. Once all the punches are done. hand Stitch from the centre outwards. I tried not to apply too much tension to the threads, it might cost the chrome tan to tear eventually. Lastly, burnish the edge of the veg tan with wooden tool and fold the thiner chrome tan leather. use a flat hammer to flat out the bond and the threads.
Step 8: More Stitching


The rest of the pieces are all done using the same method. the veg tan leather is first cut to the pattern size. then beveled on the edges with bevel tool, burnished and wrapped with white chrome tan leather. while making the bottom piece i also screwed on the feet. I used a saddle stitching clamp to make it easier access. the finish piece is the front and back connected to the bottom piece all wrapped in Chrome tan leather and ready to attach the handle.
Step 9: Making the Handle


The Handle is made of fine quality chrome tan wrapped on veg tan leather, The veg tan core is a thicker scrap piece ( 3.5mm) beveled and trimmed on both sides to make the handle durable and stiff. the black chrome tan leather is also thicker than the white leather that covered the bag. the grains are tighter and the smooth satin finish is somewhat easier to clean. The process is wrap the core with the black leather, make sure to leave the end of the veg tan core taper cut so the black leather can be pressed down and form a triangular shape at the end. a bit of hammering will make the fold more permanent. glue another piece of black leather onto the back of the open end. this will seal the veg tan leather inside. Trim off the excess and punch holes on the handle first, then use a stitching awl to pierce the bag and mark the holes. Punch out the holes on the bag then stitch them together, make sure the handles are placed symmetrical, I used 1mm black thread to stitch the handle.
Step 10: Make the Side and Folds


The side of the bag has folded lines so when using it the bag is not wide open. to make the folds precisely, I printed out the fold pattern which I imported to Papakura, in Papakura the folds are generated to mountain and valley. Carefully trace all the marks on the veg tan leather then score the leather with awl, and light cut the marks open, I used a grove cutter to take off some materials on both sides this will ensure the leather can be folded easily. I also used bevel tool to gradually shave off some materials near the grove, so the fold lines are not too harsh. the veg tan is then hammered and clamped to form the shape i want. Wrap the white leather on top of the veg tan leather while it is still in folding position can further fortify the fold shape and make the bag naturally stay folded and closed. The edges are all burnished and treated with gum Tragacanth for a clean and smooth edge.
Once both side of the bag are done, it's time for final assembly.
Step 11: Final Assembly


attach the sides to the front and back, then start stitching from the middle of the bottom, this way the fold line will be in the center. when reached the round corner the the outside leather ( front and back ) will have one punched hole that is not aligned with the inside leather ( side) . this can be fixed by warp the thread around the extra punch and move to the next on. the blue and red diagram will explain better. Once all the stitching is done I trimmed off all the excess threads and press the bag into the desired shape.
Step 12: Complete


The complete bag has a beautiful texture and well made quality. I think it rivals commercial designer bags and to some extend even better because it is one of a kind and there is no second one. I gave it to my girlfriend as a present and she loved it. I loved the process even more. I think I am going to create another bag after this and give it to my mom. the accomplishment of making something beautiful and also can be appreciated by others is wonderful. There are a few mistakes that I made while making it, but it will only lead to a better crafted bag next time.
Practice and Enjoy

Second Prize in the
Tandy Leather Contest 2016


