

Introduction: How to Make Classy Cornhole Boards


In this Video I make a set of Classy "High End" Cornhole Boards
Instead of the standard cornhole board design, I use a few different techniques to get a more "High End" Look, with the same materials. This project takes about 1 day if you use DAP Rapidfuse, and take your time with paint and finish.
Please Check out the video for a full walk thru and tutorial.
What you'll need:
Materials:
1/2 (48" x 48") Sheet of 1/2" Plywood (Maple, Oak, or Whitewood)
4 - 8ft. 2x4's
2 1/2" Brad Nails
Glue ( I use DAP Rapidfuse)
3" Stainless Steel Carriage Bolts, washers, and nuts ( size is your preference, I use 3/4")
Semi Gloss Water Based Poly Acrylic
Sand Paper
Tools:
Pencil
Safety Glasses
Tape Measure
Table Saw
Circular saw or Track Saw
Carpenter Square
Brad Nailer and Compressor (or cordless)
Mitre Saw
6" Hole Saw (or jigsaw)
Palm Router
Speed Clamps
Drill
Orbital Sander
Step 1: Cut Down Framing Stock


From the 2x4's you want to cut your stock to size. That includes
4 - 48" 2x4's
4 - 24" 2x4's
Once you have your pieces cut to size, you will square them on the table saw down to 3" wide and also cut your rabbets to inset the top. They will have a 1" reveal and can be cut using a standard blade or a dado stack.
Step 2: Cut Mitres and Assemble Bases


once you have all of your stock milled and rabbets cut, use your mitre saw to cut your 45' angle mitres on each end. Make sure to use proper orientation of the rabbet joints when doing so.
Apply DAP Rapidfuse or glue of choice to each end, and fasten together with 2 1/2" brad nails. Using your tape measure, check for squareness and apply clamps if necessary.
Step 3: Cut Out the Plywood Panel


Measure the interior dimension of the inset bases and cut your sheet goods down to size. I used a track saw, but a circular saw with a straight edge would work perfect as well.
Then mark 12" to the center of the board and 9" down from the top. Using your 6" hole saw bit, cut your hole. If you do not have a hole saw, use a protractor and a jigsaw.
Use a 1/4" round over bit in your palm sander to smooth over the edge of the holes, and finish with some 220 grit sand paper.
Step 4: Apply Stain of Choice

Once your top is cut to size, I like to apply the stain so it can dry while I work on the rest. I used a Brunette shade from Evergrain Stain PureColor line. You can check that out here.
Step 5: Fill Nail Holes and Voids, Sand to Smooth


Next you're going to apply wood filler to all the nail holes and voids in your base, then sand the entire thing smooth. Once sanded to your liking, apply the color of paint you desire.
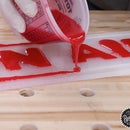
Step 6: Layout Lettering, Attach the Top, Apply Clear Coat.


Once the stain has dried and the bases are painted, I then laid out the lettering for the top of my board. Once centered, I went ahead and glued and brad nailed the top into the bases from the sides. Let the glue dry then apply the finish of your liking. I prefer a water based poly acrylic finish
Step 7: Cutting the Legs


While the boards dry, Cut the legs from the leftover 2x4. Cut them to the width of the bottom of the board (mine turned out to be 2 1/4" thick) and leave them long to cut to length later.
Then mark the center of the leg, and mark down equal distance from the top. Using a protractor, create a rounded end for the top of your leg.
Use a drill or drill press to cut the hole big enough for your carriage bolts and use the bandsaw to cut the rounded edge.
Step 8: Sand and Stain Legs

Use an orbital sander to sand down the legs, then apply the same stain and finish as the top of the boards.
Step 9: Cutting the Legs to Length, and Attaching.


Layout the holes for your legs by using a 1" space from the top of the board. Then use the same bit to reference the hole to the frame from the inside. Drill through the frame of the boards until the tip of the bit barely pokes out, and finish the hole from the outside in.
Then run your bolt through both the leg and the frame.
Prop the board up 12" from a flat surface, and mark the angle on the leg to the base of the table using a pencil.
Cut the leg on your mark and reference to the other 3 legs.
Using washers, add 2 washers to the inside of the leg between the wall and the leg itself, and one on the outside.
Thats a wrap.
I hope you enjoyed this build, if you did please share!
Check out my other Instructables as well and my videos on Youtube.
Thanks,
John Malecki

Participated in the
Outside Contest 2016

Participated in the
Summer Fun Contest 2016


