

Introduction: Jack-O-Lantern Costume!


I made this costume for my nephew! I used a circle skirt pattern. You'll want to make your pattern first.
You have to measure your *waist/chest* add 2 inches and then divide by 6.28 2pi.
*For a skirt you would measure your waist but because this costume goes around the chest and then flares down you take the chest measurement*
(W+2)/6.28=R
(26+2)/6.28=R
(28)/6.28=R
4.46=R
4.5=R I rounded up so that it would be easier to measure.
Mark the pattern on tissue paper my "skirt" length was 20" originally but I ran out of the bright orange flannel I was using so I added a darker orange around the bottom to make it longer.
Cut out the pattern from the tissue paper.
Step 1: Cutting Out the "skirt." and Sewing.


Materials:
Fabric (I used Flannel but you should use something stretchier) ORANGE AND BLACK.
Thread
Sewing machine
Pins
Elastic
Buttons 2
THE PICTURE IS A DIFFERENT CASING BUT IT IS APPLICABLE TO SHOW HOW IT SHOULD LOOK. The first picture is the elastic being sewn together!
Okay so you're going to need to fold your fabric into quarters. You will place the pattern on a corner that has no open side. If you place it where there is an open side you will have to sew a seam. Pin the pattern in place, cut around the top where the radius is you will have a circle of orange from that cut. That's how you know you are making a circle "skirt."
Cut around the bottom of the pattern.
If you end up with the open side sew it together using a 5/8" seam allowance.
ALL OF THESE STEPS WILL BE ON THE INSIDE OF THE "SKIRT."
The next thing you will do is create a hem along the top of the "skirt."
Make sure you have flipped the fabric if you need to. This will end up on the inside of the "skirt." Fold down about 1/2" then fold the end under to create a clean hem, you can just fold it so it is in half as long as the edge of the fabric isn't showing. Pin that down. Sew around the hem when it is all pinned.
At the bottom of the skirt you will create 4 darts. One in the front, one in the back, and one on each side. Darts are Triangles that help to change the fit of the clothing. These darts help give the pumpkin shape. The wide part will be at the bottom. The widest part of my darts was about 3" the darts were about 5-6" long/tall.
Make the darts then cut close to the seam, this way you will have an easier time doing the bottom hem/casing.
You will now make a casing for your elastic. Depending on the size of your elastic your casing will be either 1/4"-1/2" wider than the width of the elastic. I made a wider casing than necessary because the edge of the "Skirt" wasn't even and I didn't feel like cutting it. My casing was about 3/4-1" wide when my elastic was about 1/4" wide.
LEAVE AN OPENING ABOUT 1 1/2" LONG OR LONGER TO SLIP YOUR ELASTIC INTO THE CASING.
Pin and sew the casing. ATTACH a safety pin to the end of the elastic and work the elastic all the way through the casing.
Tighten the elastic to where you want it, You want to be able to move your legs to be able to walk or whatever you will be doing. It does have to be somewhat tightened to give the Jack-O-lantern the pumpkin shape.
Cut the elastic to the length you want. Overlap the ends about an inch. Put one pin on each end of the elastic overlap.
Sew a square/rectangle to hold the elastic together.
Put the elastic inside of the casing and sew the casing's opening shut.
Step 2: Straps, Buttons, and FACES!

The Picture is how the straps should look when being sewn.
For the straps you want to measure where you want it to sit on your chest.
FLIP THE "SKIRT" SO THE RIGHT SIDE IS ON THE OUTSIDE!
For my nephew the straps are about 15" which I added 2 inches for sewing room.
The straps were cut out as 5" by 15". I then folded them in half so they were 2.5" Then I folded under the edges to give it a clean side, I also folded the top and bottom under to give the straps a clean finish. Pin the folds so that they will stay in place. Sew around the edges to make them stay.
After that you want to make buttonholes on one end, the end that will be in the front. If you don't know how look in your sewing machine manual, or if you don't have one look for another instructable or how to online.
Then you'll want to sew your buttons on the front of the "skirt" I marked where I wanted them with chalk and used my sewing machine to stitch them on. If you don't want to hand sew them on you will need to use a zigzag stitch. Be careful not to crack the buttons. Make sure the zigzag isn't too big or too small.
The next step is to sew the straps on. I attached the straps to their buttons and then pinned the other edge to the back.
Keep the ends of the straps on the inside and sew a straight line along the edge. I made a rectangle just to keep the straps more secure.
FACES!!
I made patterns out of tissue paper so that I wouldn't mess up the face.
I made 1 Triangle an equilateral 5" all around. I made the mouth by folding the paper in half that way it would be as even as possible.
I used black felt for the eyes and mouth. Place the Triangle onto a folded piece of black felt so that you can cut both eyes at the same time. Pin the pattern on. Cut out the eyes. You can either put the mouth pattern flat onto the felt and cut it that way or do what I did by folding the felt in half and putting the folded pattern down on the fold and Pin the pattern on. Cut out the mouth piece.
Place the eyes on the front of the "Skirt" in the place you like it, pin the pieces on. Place the mouth under the eyes in the place you like it and Pin it on.
Sew the Pieces on the front.
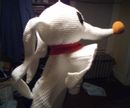
Step 3: YOU ARE DONE!!!


NOW YOU ARE DONE!!! HERE ARE SOME NICE PICTURES OF MY ADORABLE NEPHEW IN HIS COSTUME!!
I made a hat but there is no point of adding it on here because it was too small and he didn't wear it because he hates hats.

Participated in the
Halloween Costume Contest

Participated in the
Pumpkin Contest


