

Introduction: KL250 From Forgotten to Roadworthy (Non-Technical)


My initial idea behind taking on this project - I knew I wanted dual-sport motorcycle and I didn't have the money to go out and buy a brand new Suzuki DRZ or, for that matter, buy a used one. I had done a bit of looking around in the local ads for some affordable dual-sport bikes but most had a price tag = or >$2000. The misses was already thinking that the only way this was going to happen was if I found a bike that was salvageable and I could do the repairs myself. I continued to look for a month or so with no luck. Then, on a routine visit to a good friend of mine in our college town, I (we) stumbled on this 2003 KL250 Super Sherpa. Stop the car!
The Kawasaki KL250 is not a super popular bike, and it has some less than desirable features. The main jet in carburetor's of these bikes make it notoriously difficult to get warmed up and the body style lacks the flair of the newer Yamaha and Suzuki Dual-Sport bikes. Nonetheless, I wanted a bike that I could tinker on, fix up and eventually ride.
This project took about three months from the day I bought it to the day it was registered and legal to drive on the road (wahoo).
Before I started working on this bike I had no experience working on Motorcycles. I watched a lot of helpful YouTube videos, some of which I'll include in this Instructable. I also didn't start with an uber-complex bike. This is a simple bike. The carb has only one throttle valve so I didn't have to do any complex syncs. I'd imagine that this is pretty typical of a 250. If you're more adventurous then me, you may want to get something bigger. The goal here was to have a toy that I could get back and forth from the grocery store on, not have a white whale in my garage.
What my YouTube research taught me was that most motorcycle engines don't need much to get working again. A clean Carb and new gaskets, new spark plug(s), new air filter, new gas and some elbow grease on the plastic can get you on the road pretty quick and not looking to bad.
What I'll try to review in this Instructable goes as follows:
- Making the deal and what you'll need to do to make sure you don't sit in line at the registration office twice (Texas).
- Carb Removal and Cleaning
- Air filter replacement
- Oil Change
- Battery Replacement
- Restoring Dry-Rotted plastic (on the cheap)
These type of bikes are super easy to work on. If you have just a few (complete) sets of tools, you'll be able to take this bike down to the Carb. What you'll need:
- Owners Manual (Oil Levels, oil type, tire pressures & preventative maintenance)
- Repair Manual
- Full Socket Set (Best to have both Imperial and Metric for other projects)
- Phillips Head Screw Driver (Removal of Seat and Petcock attached to tank)
- Mini Screw Driver Set (Removal of Pilot Jet in the Carb)
- Drain Pan
- Funnel
- Allen Wrench Set (After-market carb bolts)
- Extendable Magnetic Wand (Optional but highly encouraged)
- Razor Blade
- Wire Brush
- Propane Hand Torch
- Replacement Carb Parts (Gaskets, Float Valve, Jets)
- Welding rod cleaning tips (Used for cleaning the holes in the carb jets)
- Spark Plug(s)
- Carb Cleaner
- Replacement Battery
- Soap
Step 1: Making the Deal
When we stumbled on this bike it appeared to be in an abandoned state. There was another pretty nice bike parked next to it, tarped and everything. The house had a "For Rent" sign on it and the place was in pretty rough shape. All signs say "You're going to make a steal!". When I finally got a hold of the seller, he was in the process of moving and did need to sell the bike. Time to negotiate!
First, be patient. People want a lot for their things that have been in the yard for over 7 yrs. uncovered, rain, sleet, snow and blazing Texas sun exposure. This bike was no exception.
Know what you're buying:
- Flat, likely dry rotted tires
- Dull, flaky plastic on all applicable parts
- Dead battery
- Gummed up Carb (assumed on most long-sitting motorcycles)
- Bad Brakes
- 2000k+ miles
- Make / Model
- Desirability (Are you going to make a buck if you decide to sell it?)
Also, do a thorough check for integrity in the frame and for rust in the gas tank.
The risk and what you can't see:
The owner claimed that the bike was in good shape (engine, frame, electrical, etc.). I was willing to take the risk, and it wasn't leaking out of the engine block. If you see excessive grime around the engine's head gasket, you will likely have some additional things to be concerned about. In this case, there wasn't anything clearly leaking. The guy didn't have time to clean it up before I arrived and, for the most part, the bike looked like it was in decent shape.
It's always good to know what you're going to have to spend to before the negotiations start. The battery will have to be replaced ($60+). The Carb parts ($10-$60 depending on the extent of grime in your jets and if the float valve doesn't stick). Brake job (~$60-$80 depending on what's needed and who does it) - this is something that I, as well as the manufacturer, advise you get done by a professional. On a motorcycle (or any vehicle for that matter), brakes are of the up-most importance, have it done right. Anyway, with a little planning, you can negotiate the price of repairs on the asking price to get a better deal.
All that said, I saved more than half that of the normal Blue Book value for this bike (when running). Some do better, some do worse. I was happy.
Next Step (Process for a title transfer in TX)
Receipt of Purchase - If you ever want a title, do this.
- Include the date of sale
- Include the names of both parties and have signatures
- Include the sale price (you'll have to pay for the taxes when you're getting it registered)
- Verify the VIN's of the title and bike
- Both parties sign off on the Title and indicate mileage
Documents for the state:
- Title Transfer form (in TX - Form 130 u) - This is much easier to have completed during the sale of the vehicle than doing it at the Registration office. Make sure you include the address and signature of the seller. Otherwise, come back tomorrow!
- Completed title with signatures and mileage of the vehicle.
- Verification of Insurance
- Legal Tender - Don't forget, you've now gotta pay taxes on that new ride of your's
NOTE: In Texas, the longer you wait to do the title transfer, the more you will pay in taxes. $30/month after the date of transaction. I waited three months so that was an extra $90...
Step 2: Load Up You New Ride!

You've made the deal (Wahoo!!).
Load 'er up and take 'er home. First thing's first - Bath time. If your bike looks like mine did, it's likely covered in dirt, chain grease, wildlife excrement, spider webs/eggs, etc. A good dousing with an anti-grease soap and some elbow grease should get it squared away in no time.
To do a deep clean, you may consider removing the side panels and the seat. This is where the spiders like to live. You'll need to have your socket set when removing the seat. The panels usually just pop off after you remove one of the securing bolts. You might consider taking the cover off of the air filter case too. Mine had an abandoned dirt-dobber nest inside of it.
When doing this clean, roll back on your throttle to see if it returns to it's original position with ease. Bikes that sit for a long time may have dirt under the throttle assembly. This can be dangerous if you're trying to let off of the throttle and it stays in the same position. To clean out a throttle assembly, there are usually two screws that house the throttle cables and attach to the actual throttle grip. If you remove these screws, you should be able to dust off the area and remove some of the debris that may jam up your throttle. Just make sure that your throttle cables go back in the way they were originally. When in doubt, pictures!
I also used this time to clean up the chain. If your chain is beyond repair, just replace it. Having a chain snap on you when your flying down the road can be an ugly scene. Mine just needed some TLC, a strong solvent, and some aggressive scrubbing with wire brush.
In the spirit of preventative maintenance, make sure that you regularly apply your chain lube to avoid said catastrophe.
Lessons from my inexperience -
The first thing that I tried to do was air up the tires, they held! If you do find a bike that's been sitting for a while, it's strongly advised that you replace the tires. Next, replaced the battery, drained the old fuel and added the new fuel, turned the key and hit the ignition switch. Although this may answer some looming questions on the electrical portions of the bike, you're likely better off slowing down and taking a few more steps.
Note: When installing your battery, make sure that you know the proper size battery needed for your bike. These bikes have tiny batteries. Installing something larger may cause damage to your electrical system in your bike. The battery will have a Negative (-) and Positive (+), these correlate with your terminal cables. Red indicates positive, black - negative.
http://www.motorcycle-battery.cn/Products/Motorcyc...
This link is similar to the battery installed on this bike. The terminals attach with a bolt and nut. They should be included in battery box upon purchase. Also note that these batteries require a charge before instillation. The chemicals are dumped into the batteries housing, they begin to react which allows the battery to hold a charge.
If your bike came from the back of someone's yard, exposed to the elements, your going to have anywhere from a little moisture to what seems like a few liters of water in the muffler. There is a bolt on the muffler (shown in picture) that can be removed in order to drain all the accumulated moisture and soot. Instead of doing this, I turned the key, pulled the choke, hit the start button and tried to see it start. Immediately the moisture accumulated in the muffler started to leak out. I continued to try to get the engine to turn until the battery died. I pulled the bolt off of the muffler and what seemed like a bath-tub's worth of watery soot started coming out of the port.
Okay, that's done. Now I've got a dead (brand new) battery and no charger. Now, before you do what I did, it's worth noting that jumping a motorcycle battery with a car battery is not recommended. If you do, make sure that the car is NOT turned on. This can overload your battery and do some damage to your electrical system on your new (used) bike. Ensure that your connections are made to the correct terminals and in the proper order. When in doubt YouTube.
Once the battery was back on the bike I tried to turn the engine over again and hey, wadda-ya-know. Engine started!
This is not the time to hit the open road, but hey, down the street.... why not!?!
Brakes don't work so good.
Okay, back to the garage.
The video attached was the first time I got it started. You'll note that it was running with the choke on so that's not the typical idle. Also, check out the moisture coming from the muffler. This is also before I did the work on the carb.
Attachments

Step 3: Disassembly and the Carburetor


Getting to the carburetor and doing the work on it will be where the majority of your time is spent, provided you don't have engine issues. The first time that I worked on one was a pretty frustrating process. There isn't a lot a space to work around in a small bike like this so there is a lot of tight maneuvers you'll have to do to get all the parts off. Once you get to the Carb you'll begin to see what makes the bike run, it's design allows the oxygen / fuel to mix at the correct ratios.
Getting to the Carb: If you've already done the scrub down, you'll probably already have the seat and panels off.
Now, before you start taking everything apart, I would strongly advise that you either take pictures or have some sort of labeling system. Some things look intuitive... until you can't figure out where that "one" hose goes.
You'll need to start by removing the seat (if you haven't already done so), petcock (this part has a toggle switch on it that allows you to deliver fuel to your carb, you can also use it to go to your reserve tank), battery, tank and rear tire panel. Hopefully you've already drained your tank, but if you try removing the petcock before doing this, make sure you have your drain pan handy. The seat is simple, few bolts, it should slip right off (shown in photo). The tank is secured by another two bolts (shown in photo). Once those bolts are removed, the tank will slip right off. The rear panel is secured by a few bolts. Once those are removed you can pull the panel off. This involves unplugging the rear tail light if this is a street legal bike. For bikes like this, you generally have a few pins that are secured by rubber gaskets. These are pried out with relative ease.
Note on the tank and petcock: If you see debris in your tank, the petcock is equipped with a little filter on the end that goes into your tank which ensures that no large particulates enter into your carb. If you need to clean the tank, do so while the petcock is off to ensure no more debris blocks that filter.
The Air Filter box comes next. Few bolts and a bit of manuvering and you can get it loose. Your carb connects directly to this box with a hose and a hose clamp. Loosen the hose clamp, pull the box out.
The carb... ah, the carb. Lot's of hoses and cables. Your carb is going to have a fuel hose, an atmosphere (air) hose, throttle cables and your choke cables attached to it. The one on this bike is a mikuni style carb. Have I already mentioned taking pictures?? Take pictures!
Most of the hoses can be pulled off easily enough. The choke cable and the the throttle cables might be another story. Take your time and manipulate the throttle until you can get the cables removed. The choke (if it runs to the controls near the throttle) may be removed by removing the securing nut on the throttle housing on the carburetor. Be aware of the assembly of this part. It is a little tricky.
http://www.cyclepedia.com/online-manuals/kawasaki-...
This link will show you what the inside of the bowl looks like.
http://cdn.partzilla.com/diagram/kawasaki/C19/C191...
This link is the diagram of the carburetor of the KL250 Super Sherpa.
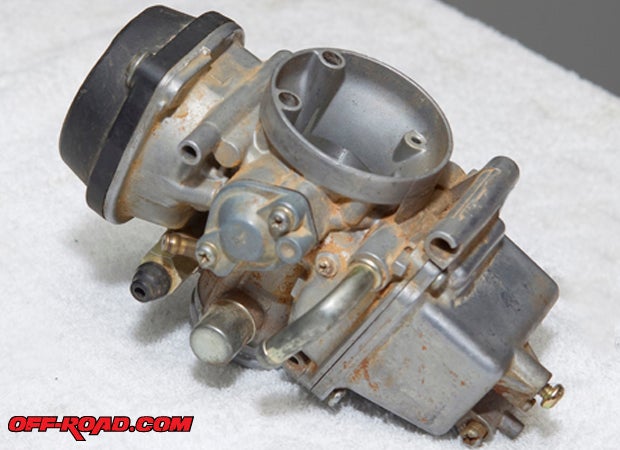
http://img.off-road.com/aimages/articlestandard/at...
Example of a small engine carburetor, similar to the on in the KL250
A carburetors main function is to mix the fuel from the fuel tank and air from the atmosphere and, once the mixture is correct, deliver it into the piston chamber. As soon as you open up the carb you'll see a few notable things. First, the float. This is a plastic device that releases when the proper amount of fuel and oxygen mixture is in the bowl. The problem with bikes when they sit for a while is that, if the bike isn't drained, you can tend to have some gunk that accumulates in that bowl. Sitting fuel can jam up your jets, prevent your float valve from properly functioning and cause your bike to run lean or rich depending on the mixture ratios.
To disassemble your carb, I would recommend starting the the bowl side and not the bladder side. The bladder is a rubber piece that sits at the top of your carb. Getting carb spray on it will likely cause the bladder to tear. Start by removing the screws from the bowl side of the carb. I ended up replacing these with Allen wrench style bolts because the stock screws stripped with little force applied.
The bowl of your carb, if it's been sitting for a while, is probably not in the correct position. I my case it was sagging into the bowl. If you clean out the carb and fail to properly adjust the float bowl to its correct position, you can pretty much guarantee that your bike is going to run poorly. This is best done by having a caliper and referencing the repair guide for your bike. There is a certain threshold that you'll need to achieve, otherwise, your bike may run poorly. This is one portion of the service that is critical to the overall performance of your bike.
Your carburetor may look anywhere from clean to sludge-city. If it is the latter, this is where carb spray is going to be your friend. This stuff is super hard on grime, but also extremely destructive to rubber. If you bought replacement gaskets for your carb, do not get carb spray on them.
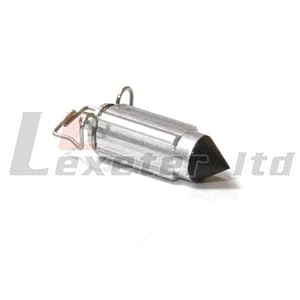
The first thing you'll want to check will be the float valve. The float valve can gum up after being set up for a while. To remove the float valve you need to push the pin out that connects the float to the carb. It should push out with a little effort. Be gentle though, if you try to bang it out, you're likely to break one of the mounting pegs. If you look at the picture of the float valve, it has a very thin wire that connects it to the float. It's a free floating piece, but the bowl secures it in it's position. If you remove the float valve and examine the pin that extends from that valve doesn't spring out, you'll likely need to replace this part. There is a trick to getting these working again. Replace or repair, up to you.
http://ecx.images-amazon.com/images/I/31TF8Ts43KL....
Image of a carburetor float valve.
Note: This is not my video, but his channel (mrmaxstorey) has great tutorials on fixing carbs.
Next, you'll want to remove your jets. This is where your tiny screwdrivers will come in handy. Your main jet is easily removed but the pilot jet requires a bit more delicate tools. Once the jets are removed, you'll need to do a thorough inspection of them. If you see any gunk on the jets it is important to clean them off or replace. Not doing so will lead to performance issues later on. In a jar or can, squirt a liberal amount of carb cleaner in the bottom and drop the jets into the spray. Shake it up. Rinse and repeat until you see NOTHING in the spray. If the little holes in the jets are clogged up, you'll need to make sure they are cleared out. This can be assisted with the welding rod cleaning tips.
If you're interested in seeing the bladder side of the carburetor, be careful with the dissasembly. There is a part on these mikuni style carbs that is spring loaded. If you do what I did, you'll be looking for a little plastic piece in your garage for a while. Shown in the attached picture.
After everything's looking shiny and clean, go in reverse and put the carb back together (Jets, float needle valve, float, throttle valve, bladder, etc.). Before you put the bowl lid on, replace the rubber gasket in the groove. Make sure there is no residual carb spray on that area. Plug the carb back into the engine port, attach the air filter box with the hose and clamp, Replace your old air filter, attach the electrical connections for the tail light, attach the rear panel to the frame, tank to the frame, petcock to the tank then the seat to the frame.
Step 4: Repairing Sun Damaged Plastic


This step can apply to most dry-rotted plastics.
Once the sun has done surface damage to the plastic you'll begin to see fading then it will begin turning to an ashy flaky texture. To fix this you'll need to remove that layer. A razor blade can be used during this process to scrape away the surface layer. Next you'll apply heat. I use a propane torch but I'm sure a heat gun could probably achieve the same result.
NOTE: Use extreme caution when performing these processes. Never attempt to cut towards yourself and be extremely cautions when operating the blow torch. This device can cause severe burns upon contact.
If you see the original picture of the bike, the panels look, well, bad.
This process can take a while and if your panels are too far gone, you may have to replace them. However, if they are still flexible you should be able to repair/restore with this process.
First, scrape scrape scrape. Until you can see the original color and your past the ashy layer. If you really want it to look perfect you can use different stages of sandpaper, rough to fine.
Next, turn on your torch. Reduce the flame to a minimize the chances of burning the plastic. That can happen fast too so do not go directly to the plastic with the flame. I usually float around 3/4 - to 1" away from the plastic. Once you see the oils emerging, continue to expand around the area until you have hit all of the affected area.
This process may take some time to get used to. Finding the right heat and distance will be the key.
Here's a good video to reference:
Step 5: Change the Oil


Motorcycles can very on the ways that you can change the oil. Older bikes may circulate within the frame, however, most modern day bikes work the same way a car does.
http://www.sinnismotorcycles.com/mpw/graphics/cons...
Link shows and example of a small engine oil filter
For this bike the process is pretty simple -
- Remove the skid plate
- Place your drainage pan under the reservoir plug
- Remove the oil reservoir plug
- After the reservoir is empty, replace the plug
- Place your drainage pan under the oil filter port
- Open the filter port
- Remove your old filter
- Place the new filter in the port
- Replace the filter port cover
- Open up the cap to the reservoir
- Fill with oil as per your manual.
If you haven't already done so, this may be a good time to replace your spark plug. Reference your repair manual for the correct size and gauge for the plug.
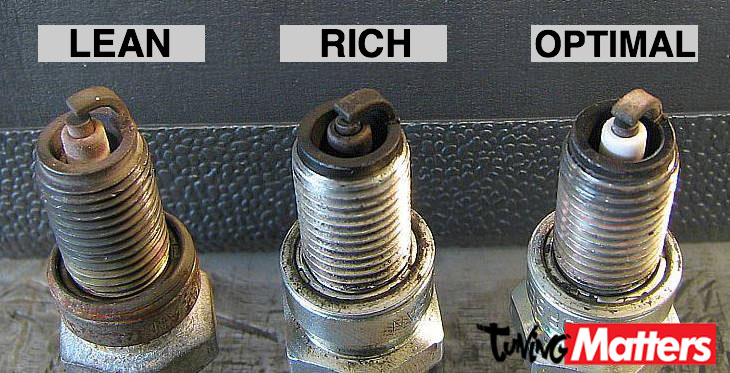
Once you get your bike running it should be pretty easy to tell if it is running poorly. If the work on your carburetor wasn't successful, you can usually tell by a quick glance at the spark plug. The below link shows the difference between Rich, Lean and Optimal fuel ratios in your fuel mixture.
http://www.tuningmatters.com/wp-content/uploads/20...
Based on what you see on your plugs you should know (or have an idea of) where to adjust. You may also be experiencing some problems with your jets in the carb. The below hyperlink is a chart that is used to help assist with troubleshooting the areas where your bike is bogging down.
http://www.iwt.com.au/images/effects3.gif
Based on where the throttle is in the rotation and where your experiencing poor performance, you can use this chart to identify what might be causing the issue. E.g. If your performance is good up until 3/4 full throttle and it begins to bog down, your Main Jet is likely your candidate. Tear down and rebuild. Follow the same idea for each area represented within this graph.
Step 6: Buy Your Gear and Ride!

Notice that buy your gear comes before the Ride.
This is the only protection that you've got between you and the asphalt. All The Gear All The Time (ATGATT).
Know what SNELL rated v. DOT rated means.
Suit up and start 'er up! Ride!
Hopefully you've got some inspiration from this Instructable. I had a blast working on it and it doesn't take a masters mechanic license to tinker on small motorcycle engines. Be careful when you select your bike, but if you find one that looks good and you can get a good deal, go for it!
Thanks for reading!

Second Prize in the
Car and Motorcycle Contest

Participated in the
First Time Author Contest


