

Introduction: Kintsugi / Kintsukuroi Repair With Gold - Repair Lesson


Japanese kintsugi (sometimes called kintsukuroi) processes of implementing the traditional art of ceramic repair using gold and lacquer or our proprietary process of gold effect metals and encapsulating epoxy. This tutorial is intended to illustrate the two different kintsugi repair implementation.
Most of our kintsugi work is not real gold and uses instead a blend of brass, copper and zinc creating a durable realistic gold effect. We developed this process of the gold effect due to the high demand for the lower cost product which is virtually indistinguishable from real gold.
The lesson below will help you learn some of the highlights and some steps of both processes.
For pottery and sculpture repair lessons - visit www.lakesidepottery.com
Step 1: Breaking to Bowl

Broken pottery can happen due to an accident of broken on purpose. Breaking vessels require some practice to insure the break is just right with aesthetically pleasing repair lines.
Step 2: Cementing the Broken Pieces


Cement broken pieces using two part 5-minutes epoxy.Scrape off excess epoxy and wipe all surfaces with a 91% alcohol to remove dust and hand oils prior to applying filler epoxy
More specific cementing details, materials and tools used and where to purchase, visit the link to the tutorial below:
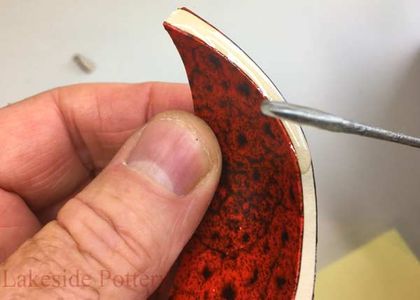
Step 3: Filling in the Cracks and Chips With Epoxy Filler


Mix even parts of PC-11 epoxy filler. For ease of application, work in room temperature of 75 degrees F or warmer. Apply thin layer of filler while pushing in to fill cracks and missing fragments. Saturate rag with 91% alcohol. Use the rag and alcohol and rub off the PC-11 filler epoxy from surfaces. Allow filler epoxy to cure for 12 hours or more at a temperature of 75 degrees F or warmer
Step 4: Traditional Japanese Kintsugi Application Lesson Using Real Gold Over Lacquer


Apply lacquer with thin brush over the repair line in the desired thickness. Allow the lacquer to get a bit tacky before applying the gold powder. Place bowl over folder paper to collect the excess gold powder. Use very soft brush to apply the gold powder over the lacquer.
Wait until the lacquer hardness and brush off excess gold powder. Pour the fallen off gold powder in to the container.
Use soft cotton cloth to burnish the gold applied over the lacquer.
Step 5: Kintsugi Application Using Metal Alloyed Powder With Gold Effect


We use proprietary Encapsulating two part non-yellowing epoxy.
Apply about 35% metal alloy (consists of brass, copper and zinc) - not available for sale. Apply about 35% metal alloy (consists of brass, copper and zinc) and mix well. Use a sharp tool to carry the gold effect. Apply the desired width and thickness over the repair lines. Allow to cure before handling.
IMPORTANT: Kintsugi repair materials are not food safe, liquid or heat proof (over 190 degree F) and repaired items should not be used on cooking or food serving ware
Step 6: Video - Kintsugi Process With Real Gold and With Non-gold Metals
Step 7: More About Kintsugi


Step 8: Lakeside Pottery Created a Presidential Gift for Japanese Prime Minister


