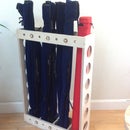
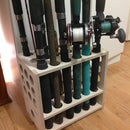
Introduction: Long Tool Organizer Cart Made With CNC-plywood -Brooms, Rakes, Shovels...
Here is a cart that can be used to store all those long and odd shaped tools, without losing valuable wall space. Plus the cart can be moved to where you are working, so you don't have to run back and forth each time you need another tool.
This cart was made from leftover 3/4 and 1/2 plywood scraps, and cut on a CNC Router. The design takes advantage of the CNC capabilities, but could also be accomplished with a hand router and templates.
This is the second of my utility cart designs. You can find the first design here: https://www.instructables.com/id/Plywood-Shop-Cart-made-with-CNC-Router/
Step 1: Materials and Equipment
Materials
3/4 plywood - for the tray sides and legs I cut this from scrap, but you should be able to cut all from a 1/2 sheet.
1/2 plywood -less than 1/2 sheet
3 inch fixed caster wheels - 2
3 inch swivel caster wheels -2
mounting screws and washers for the casters- 16
wood glue
Equipment
CNC router
Any plywood friendly 1/4" router bit- this is a shop cart - not worried about tearout on the cut.
3/4" router bit (optional - will speed up the hole and slot cutouts)
brad nailer
clamps
Step 2: Design
This leveraged my original shop cart design (https://www.instructables.com/id/Plywood-Shop-Cart-made-with-CNC-Router/)
The design was extended to place holes and slots of varying sizes in the top tray. The bottom tray doe not have holes , but an additional shelf rests on top of the tray with holes and slots aligned with in the top tray.
I cut the legs by including them is scrap space on other CNC router projects, but I included an image here that shows a layout on a single half sheet of plywood
Step 3: Cut
Now the CNC router goes to work!
I used a big bit (11/16) to rout out the holes and pockets- a big time saver!
Step 4: Assemble
Note- use a jig or square piece of scrap to ensure joints are square as you are assembling them. Working quickly will allow you to adjust the fit on final assembly before the glue dries
1. Glue and brad nail the tray parts together
2. Glue and brad nail the leg halves together
3. glue and brad nail the tray assemblies to the leg assemblies. Clamp for the glue set time (usually one hour- but varies by brand). The shelf should now be fitted on top of the bottom tray. It should be snug, but does not need to be glued. Not gluing the shelf will allow for conversion to a standard shop cart later (just cover the holes in the top tray with a layer of 1/4 plywood).
Once the glue has dried:
4. turn the cart upside down and glue 4 square pieces of 3/4 plywood to support the casters
5. install the wheels with large wood screws.
I did not apply any finish, but it is probably a good idea to paint or varnish the piece to facilitate cleaning of spills when the cart is put into service.
That's it!
Step 5: Retrospective
Using some square cut scrap to ensure that the sub assemblies were square simplified the assembly, but it is still a bit of a rush to put the whole piece together.
But the cart layout is great! you can pack a bunch of long tools on it.


