

Introduction: Macro Photography Platform


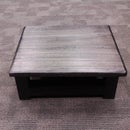

In the process of doing some other instructables I have a need for a consistent way of taking of overhead and macro shots. I've come up with this custom rig that, for me, works better than a tripod. It's also a very cheap project.
Materials needed:
- Plywood/MDF slab for the platform
- scrap 2x4 for platform risers
- 2x2 stud for X and Y axis bars.
- 3 sets of bolts,nuts,washers
- assorted drill bits
-wrenches/ratchets
- hack saw (for cutting through one of the bolts)
Step 1: Cut Platform and Risers and X/Y Bars


I already had a piece of MDF that was a piece of 2ft x 4ft cut in half so I had a perfect 24" x 24 platform.
But you can make the platform any size you want.
I used a scrap piece of 2x4 to make 4 risers for each corner. Each riser is 4 inches tall.
For the two cross bars I used a piece of 2x2 rough cut. Each piece is 24" long to eventually fit nice and square on the platform.
Step 2: Drill Some Holes


On the riser that sits in the back right corner we need to drill a 1/2" straight through to attach one of the cross bars to it. Glue that and other risers down to the MDF. Clamp down and let sit.
On the cross bar we need to drill another 1/2" hole through to connect it to the riser.
After the 1/2" hole is drilled near the bottom of cross we need to fill in the gaps with 5/16" holes to accept the other cross bar.
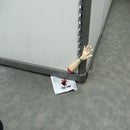
Once the holes are drilled push a bolt threads first from the underside of the platform towards the outside with a washer in between. The head of the bolt should be under the platform. On the other side of the riser put the cross bar on and then another washer and then the wing nut. The wing nut will be allow you to quickly tighten and loosen the bar to find the first angle of your shot.
Step 3: Prepare Second Cross Bar


For the second cross bar that is going across the platform the first step is to drill a hole in the center of one of the ends. We want this hole to be approximately 1" deep or more to make sure that the bolt is in their far enough and the torque of it's own weight won't work itself loose. We will be threading a 5/16" bolt into the hole so we want to under drill the hole so that the bolt threads in tight. Use a drill bit like 9/32" or there abouts.
Once the hole is drilled we can start to thread the bolt into the hole. I start off by hand threading into the hole and then using a ratchet and socket to get the bolt half way in. About half way I don't want to ruin my ratchet teeth so I move over to a standard open/closed wrench to finish the bolt off. When the bolt won't move any further it is safe to assume you have bottomed it out and it should be fairly well tight.
Holding the cross bar in a vice i use my hacksaw to saw through the bolt and cut the bolt's head off. Once this is done I get my wing nut and start trying to thread it over the newly cut off bolt head area. This may take a little bit of elbow grease in some places as the saw may have marred the threads but I didn't have much trouble and soon my wing nut effortlessly threaded on and off.
Putting this bolt through the other cross bar's and then affixing it with washer and wing nut gives you the final camera axis.
Step 4: Done!

The last step is to find a bolt that fits the under side of your camera. The few cameras I have had all use 1/4" bolts. I use two wing nuts and a washer to hold the camera in place.

Participated in the
Wood Contest


