

Introduction: Make a Branding Iron for Barbecue Steaks


Hello and welcome to my Instructable.
I was recently commissioned to make a fire pit for a very old friend, and I wanted to personalise the project for him. I came up with the idea of making a branding iron for putting a fire brand on the steaks that were to be cooked over the fire pit.
Here are links to my Instructables for fire pits: Small Fire Pit and Large Fire Pit.
The process of creating this branding iron was pretty straightforward and I will try to share it with you in the following steps.
Step 1: What You Will Need

Materials
• Steel flat bar. About 400mm of 15mm x 2mm would do the trick.
• Another small bit of flat bar for backing the design.
• Steel round bar for the handle. About 800mm of 10mm bar would do.
Tools and Equipment
• Pencil and paper
• Safety gear. Goggles, gloves, ear muffs, etc.
• Hammer
• Vice
• Cutting disc or hacksaw
• Grinding disc or file
• Welder
Step 2: Design

It's far more satisfying to create your own design than copying someone else's, and it's not hard to do.
Get out your pencil and paper and engage your imagination.
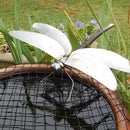
Think of the person who the piece is intend for and try to visualise images that relate closely to that person. In my example, my friend has a farm called "Cattle Creek" so I envisaged cows and water. The final design is supposed to represent a cow fording a stream.
Sketch the images you come up with as simply as possible. Use as few line as you can; you don't want the result to be to crowded or the resulting brand might not be clear.
When you are happy with the design, draw it actual size on paper. Remember that it needs to fit on a steak.
You are now ready to do some steel work.
Step 3: Build the Branding Iron


Use the paper pattern as a guide and cut appropriate lengths of flat bar to make each line in the design.
Using the vice, hammer, elbow grease, and whatever other tools you think might help to shape the pieces of flat bar to match the lines of the pattern.
When you are happy with the design in steel, set up the pieces in their intended positions and place another piece of flat bar over them. This piece holds all the pieces together so it should be touching them all.
Carefully weld each piece to the backing bar. Don't be shy with the weld - the more steel there is, the more heat the brand will hold.
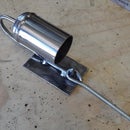
Now make your handle. Simply bend a ninety degree angle at one end and weld it to the backing bar. I also bent a hook into the other end to make it easier to grip, and so it can be hung up for storage.
Step 4: Try It Out


Heat the branding iron in a fire until it's red hot, then carefully touch it against whatever you want to brand.
I'm sure you will find it hard not to brand everything in sight.
I hope you liked my Instructable. Please feel free to post comments or questions.
And don't forget to vote for me in the contests if you think it deserves it.
If you would like to see more of my work please visit my website de Burgh Steel and my Etsy shop.

Participated in the
Homemade Gifts Contest 2015


